


Authors: Henry Hongo, Inès Ruzindana, Angela Chen, Lowan Yip, Alexandra Tyler, Elodie Manalo, Madison Tsuchiya, Vi Dinh MD.
Paracentesis is a procedure used to remove fluid that abnormally collects in the peritoneal cavity due to various causes such as liver disease (cirrhosis), portal hypertension, heart failure, and kidney failure. The fluid that builds up in the peritoneal cavity is often referred to as ascites or peritoneal free fluid. You may also see paracentesis referred to as an abdominal/suprapubic tap, laparocentesis, or abdominocentesis.
The goal of an abdominal paracentesis procedure is to remove fluid from the abdomen either for diagnostic purposes or for relief of symptoms associated with excess fluid. Needle and catheter insertion is required, so ultrasound guidance is particularly helpful for finding the largest pocket of fluid and avoiding vascular structures such as the inferior epigastric vessels. Compared to using percussion to locate ascites, ultrasound guidance has been associated with lower complication rates, especially in patients with significant subcutaneous tissue (Mercaldi & Lanes, 2013).
Learning the ultrasound-guided approach to performing a paracentesis can improve patient safety and is a great procedure to develop your skills of evaluating an access site and avoiding vessel puncture (Millington & Koenig, 2018; Ennis et al., 2014).
By the end of this post, you will be able to:
- Identify the equipment necessary to perform a paracentesis
- Prepare the patient, ultrasound machine, and equipment before the procedure
- Identify the inferior epigastric vessels on ultrasound
- Use ultrasound to mark a paracentesis access site
- Perform a diagnostic or therapeutic static paracentesis
- Understand the role of ultrasound in a dynamic paracentesis
Table of Contents
Paracentesis Indications and Contraindications
Paracentesis Indications
- New onset ascites (establish etiology)
- Refractory abdominal distention
- Worsening symptoms (dyspnea, pain, abdominal distention, etc.) due to ascites*
* If symptoms suggest spontaneous bacterial peritonitis, immediate paracentesis is indicated.
Paracentesis Contraindications
Absolute contraindications in which paracentesis should NOT be performed include:
- Disseminated intravascular coagulation (DIC) or hyperfibrinolysis
Relative contraindications in which paracentesis may be performed but with caution include:
- Fluid volume <5 cm (consider dynamic paracentesis)
- Local infection over the proposed site of puncture
- Advanced kidney disease
- Pregnancy
- Surgical scars
- Hepatosplenomegaly
- Bladder distension
- Bowel obstruction
*Editor’s Note: Laboratory evaluation for coagulopathy is not generally necessary prior to paracentesis (McVay & Toy, 1991).
Diagnostic vs. Therapeutic Paracentesis
| Diagnostic Paracentesis | Therapeutic Paracentesis | |
|---|---|---|
| Primary goal | Obtain fluid for analysis | Fluid removal for relief of symptoms (e.g., dyspnea or abdominal pain) |
| Volume removed | Around 30-50 mL | Larger volumes; albumin replacement (6-8 g albumin per liter of removed fluid) indicated if >5 L of fluid withdrawn |
| Fluid analysis | Routine (cell count, albumin, protein, culture) | Often not required |
Paracentesis Pre-Procedural Checklist
Patient Preparation
- Supine with head slightly elevated
- Bladder empty (if possible)
POCUS 101 Tip: Avoid movement of fluid collection and resultant complications by ensuring the patient is comfortable enough to maintain the position for the duration of the procedure. In cases with smaller volume ascites, it may be helpful to slightly roll the patient towards their left or right side to maximize the fluid pocket.
Ultrasound Machine Preparation
- Transducer: Curvilinear or Phased Array Ultrasound Probe to assess peritoneal free fluid, Linear Ultrasound Probe to assess vasculature
- Preset: Abdominal
- Ultrasound IMAGE Indicator/Orientation Marker: Upper left-hand corner of the screen
- Ultrasound Machine Placement: Roll the ultrasound machine to the head of the bed on the side of the patient’s ascites. Place the machine on the patient’s right side so you can scan with one hand and manipulate ultrasound buttons with the other. Also, place gel on the probe you will use later in the procedure.
Paracentesis Equipment List
Here is a list of materials you will need for paracentesis. If you are busy, you can ask the nurse or tech to help obtain these:
- Marking pen
- Skin disinfectant (Chloroprep)
- Non-sterile gloves
- Sterile gown, cap, mask, and gloves
- Sterile towels
- Paracentesis Kit
- Gauze swabs
- 1% lidocaine, 5-10 cc syringe, and 22 or 25-gauge needle
- Scalpel (11-blade)
- 5cc syringe, introducer needle with a catheter over it
- 1-way tubing
- 50 mL syringe, 18-gauge needle
- Specimen vials (Diagnostic)
- Collection bag or bottles (Therapeutic)
- Bandage

Complete Pre-Procedure Setup
- Place the equipment stand near the patient’s bedside (as shown below), and do not open the sterile paracentesis kit until directed to do so in later steps.

Paracentesis Pre-Procedure Scan
Evaluate Ascitic Fluid Size
- Place the probe with the indicator towards the patient’s head, and scan the right and left lower quadrants 2-3 cm lateral to the rectus abdominus muscles.
POCUS 101 Tip: Be sure the probe is not placed along the midline in order to avoid the bladder which can be mistaken for ascitic fluid.

- Identify the ascitic pocket.
- Slide the ultrasound probe superiorly to find the largest superior-inferior distance of the ascites.
- Rotate the probe 90 degrees clockwise to identify the largest transverse distance of the fluid pocket.

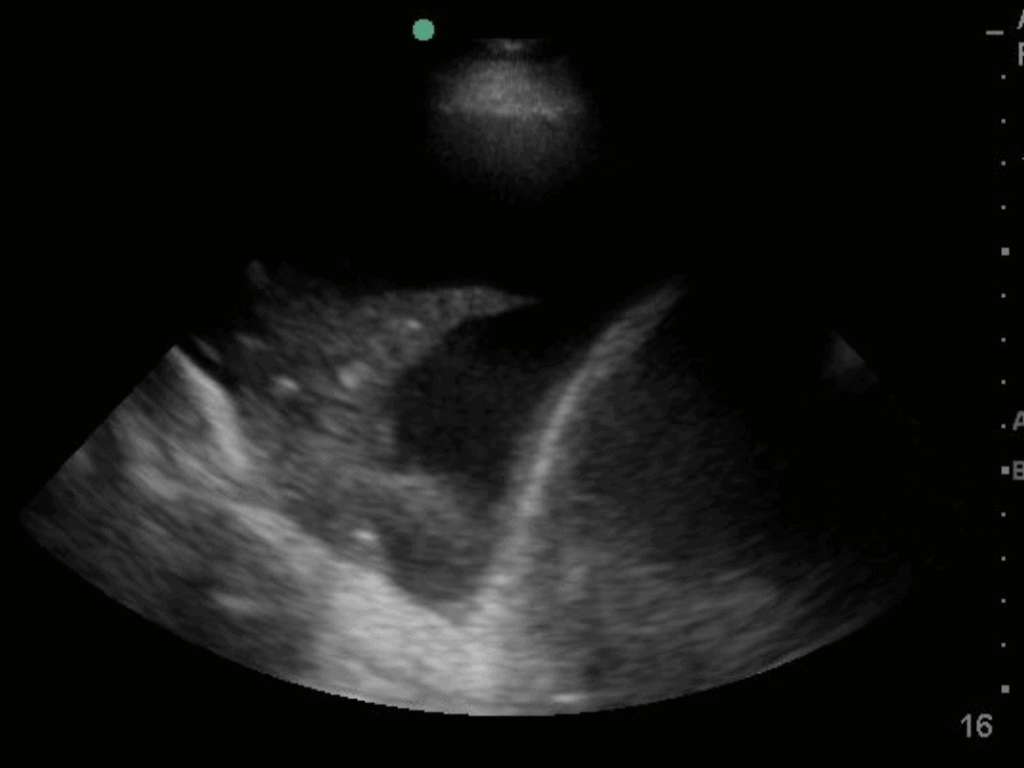
*Editor’s Note: Make sure the fluid is inferior to the diaphragm. Fluid seen superior to the diaphragm indicates a pleural effusion (free fluid in the pleural cavity). Locating the free fluid can help you determine whether to do a paracentesis vs. a thoracentesis.
Mark the Access Site
- Center the largest anechoic pocket (where both the superior-inferior and left-right distances are greatest) on the ultrasound screen and mark an X on the skin where the probe was.
- Use either a sterile pen to mark an X or a needle cap to press an indentation into the skin as shown below.


Evaluate Vasculature
The inferior epigastric artery runs longitudinally just lateral to the midline and should be visualized on ultrasound to verify that it is not in the proposed needle insertion pathway.
To find the inferior epigastric vessels:
- Place the linear probe in the transverse orientation 4-5 cm below the umbilicus.
- Identify the aorta, then slide the probe 2-3 cm laterally, tracing the aorta inferiorly until it splits into the iliacs. You should see the inferior epigastric vessels branching off near the iliacs, superficial to the ascites, and within the rectus abdominus muscles.
- Use the Doppler flow setting to help with identification of these vessels within the abdominal wall (if necessary).
- Confirm that the vessel is not within the previously marked needle pathway.


Paracentesis Procedure Steps
Paracentesis Step 1. Procedural Preparation
Just before you start the paracentesis procedure:
- Put on a Cap, Mask and Non-sterile gloves
- Apply Chloroprep at the Access Site
- Carefully open the paracentesis kit and place the sterile towels inside while maintaining sterility
- Remove Non-sterile gloves
- Put on a Sterile Gown and Sterile Gloves
- Place the Sterile Drape on the patient
Paracentesis Step 2. Set Up Paracentesis Equipment
Now that the patient is draped and you are sterile, let’s work on setting up our paracentesis equipment on the table. In order to perform a paracentesis in the safest and most efficient way, we recommend arranging the equipment sequentially from left to right.
Set up your Paracentesis Equipment from Left to Right in this order:
- Lidocaine with needle and syringe
- Scalpel (11 blade)
- 5cc Syringe, Introducer Needle with Catheter over it
- 1-way tubing
- 50cc syringe
- Specimen vials (for Diagnostic Paracentesis)
- Collection bag or Bottles (for Therapeutic Paracentesis)
- Bandage

Paracentesis Step 3. Anesthetize
- Draw up 5-10cc of 1% lidocaine with an 18-gauge needle, then replace the needle with a 22 or 25-gauge needle.
- Insert the needle at the X you marked earlier.
- Advance the needle towards the peritoneal space, aspirating as you advance by slightly pulling back on the plunger of the syringe, until you aspirate ascitic fluid.
- Slowly inject 2-3cc of lidocaine directly into the peritoneum to ensure anesthetization of the peritoneum.
- Evenly inject the remaining 7-8cc of lidocaine while withdrawing the needle to anesthetize the subcutaneous and cutaneous tissue in the path of the needle.
- Once the needle is completely withdrawn, set the needle in a protected location on your equipment table.
- If performing a therapeutic tap, make an incision about 0.5 cm long with your scalpel at the injection site. The incision does not need to be big–just nick the skin with the tip of the blade. This will make subsequent catheter insertion easier.
Paracentesis Step 4. Insert Needle & Aspirate Fluid
Static Paracentesis
*For small volume ascites (<5cm), consider dynamic paracentesis, which utilizes ultrasound to directly visualize the advancing needle.
POCUS 101 Tip: This is optional but before inserting the needle, you can place the ultrasound probe, covered with a sterile probe cover, over the marked access site to reconfirm that no bowel has shifted into the planned access path.
To perform a static diagnostic paracentesis:
- Insert the 18-gauge needle attached to a 10cc syringe at the marked X.


- Using a technique similar to what you did for anesthetization, aspirate as you advance the needle in the same needle path as before, toward the parietal peritoneum. Stop advancing when ascitic fluid first appears in the syringe.
Note: Consider using the Z-Track Method described below to prevent fluid leakage.
- Insert the needle about 1 cm deeper to ensure that you are completely within the peritoneal cavity.
- Aspirate fluid to fill the syringe, and remove the needle from the patient.
- Drain the paracentesis fluid into the specimen vials.
- Cover the needle insertion site with a bandage.
- Click here to continue onto Step 8 if completing a diagnostic paracentesis; the following few steps are specifically for a therapeutic paracentesis.
To perform a therapeutic paracentesis:
- Remove the plastic cover from the introducer needle with a catheter over it. A 5cc syringe and stopcock should already be attached.
- Insert the needle at the access site you marked with an X.
- Using a technique similar to anesthetization, advance the needle toward the peritoneum, continuously aspirating until you get a flash of fluid. (The removed fluid may be red, yellow, or purulent.)
- Insert the needle about 1 cm deeper to make sure you are in the peritoneal space, then advance the catheter over the needle and into the patient as far as possible.
- Hold the catheter in place with one hand while removing the needle and syringe with the other.
POCUS 101 Tip: If you are having trouble getting the needle past the peritoneum, try twisting the needle to break through and access the peritoneal space.
Dynamic Ultrasound-Guided Paracentesis
Note: For removal of small volumes of ascites, paracentesis can be performed under real-time/dynamic ultrasound guidance. When a paracentesis procedure is guided by dynamic ultrasound, the transducer is placed near the access site to allow for real-time visualization of the needle as it is inserted into the ascitic pocket.


Paracentesis Step 5. Connect the Therapeutic Paracentesis Drainage System
Using a vacuum bottle:
- Use the tubing marked “Vacuum Bottle Tubing.”
- Connect the needle end of the tubing to the vacuum bottle.
- Connect the other end of the tubing to the paracentesis catheter.
Paracentesis Step 6. When to Stop Removing Ascitic Fluid
Total paracentesis (removal of all ascitic fluid) is generally appropriate in a therapeutic paracentesis.
POCUS 101 Tip: Fluid aspiration may be impeded by blockage of the catheter with omentum or bowel. Slowly pulling the catheter out 1-2 cm should allow you to regain normal fluid removal.
Note: In general, if more than 5 L of fluid are removed, albumin should be administered (6-8 g/L ascitic fluid removed) to prevent circulatory dysfunction. If patients are hypotensive or have renal insufficiency or electrolyte abnormalities, albumin repletion can be considered for removal of smaller volumes of fluid (Orman, et al., 2025).
Paracentesis Step 7. Remove Catheter and Apply Dressing
When the procedure is finished, remove the catheter and apply a bandage.
Paracentesis Step 8. Ascitic Fluid Analysis
Give the paracentesis fluid to the nurse to send out for studies to determine the SAAG (serum ascites albumin gradient) or rule out SBP (spontaneous bacterial peritonitis). Here are the brief criteria for those two tests (Wong, et al., 2008):
SAAG: calculated to check for portal hypertension
- >1.1 g/dl = portal hypertension
- high SAAG (>1.1g/dl) suggests transudative ascites
- low SAAG (<1.1g/dl) suggests exudative ascites
Rule out SBP: < 250 PMN (polymorphonuclear) leukocytes/mm3
Paracentesis Complications
Though complications from paracentesis procedures are rare and can be notably reduced with ultrasound guidance, there are a few to keep in mind.
Insertion Site Leakage
Leakage of ascitic fluid through the access point after the procedure is an easily addressed complication. Using either the Z-track method (see the figure below) or oblique needle insertion, the perforation site of the skin and parietal peritoneum can be offset, creating a barrier to leakage.
Return to Step 4: Insert Needle and Aspirate Fluid

Hemorrhage
In the past there has been concern about hemorrhagic complications in hemodynamically unstable patients undergoing paracentesis procedures. However, abnormal hemostatic states have been shown to not be associated with increased complication rates, so administration of fresh frozen plasma or transfusion of platelets prior to the procedure are not generally necessary (McVay & Toy, 1991).
This is particularly true when paracentesis is performed under ultrasound guidance, which decreases the risk of puncturing nearby vessels leading to hemorrhage (Ennis et al., 2014; Mercaldi & Lanes, 2013).
Bowel Perforation
Large-volume paracentesis (>5 L) slightly increases the risk of bowel perforation due to the closer proximity of the needle and catheter to the surrounding intestines. Using ultrasound guidance, however, can help prevent this complication by allowing accurate measurement of the ascitic fluid volume to avoid inserting the paracentesis needle too deeply (Patel et al., 2011; Nazeer et al., 2005).
Pain and procedure failure are additional possible complications.
References
- Ennis, J., Schultz, G., Perera, P., Williams, S., Gharahbaghian, L., Mandavia, D. (2014). Ultrasound for Detection of Ascites and for Guidance of the Paracentesis Procedure: Technique and Review of the Literature International Journal of Clinical Medicine 05(20), 1277-1293. https://dx.doi.org/10.4236/ijcm.2014.520163
- Ginès, P., Cárdenas, A., Arroyo, V., Rodés, J. (2004). Management of Cirrhosis and Ascites New England Journal of Medicine 350(16), 1646-1654. https://dx.doi.org/10.1056/nejmra035021
- McVay, P., Toy, P. (1991). Lack of increased bleeding after paracentesis and thoracentesis in patients with mild coagulation abnormalities Transfusion 31(2), 164-171. https://dx.doi.org/10.1046/j.1537-2995.1991.31291142949.x
- Mercaldi, C., Lanes, S. (2013). Ultrasound Guidance Decreases Complications and Improves the Cost of Care Among Patients Undergoing Thoracentesis and Paracentesis Chest 143(2), 532-538. https://dx.doi.org/10.1378/chest.12-0447
- Millington, S., Koenig, S. (2018). Better with Ultrasound: Paracentesis. Chest 154(1), 177-184. https://dx.doi.org/10.1016/j.chest.2018.03.034
- Nazeer, S., Dewbre, H., Miller, A. (2005). Ultrasound-assisted paracentesis performed by emergency physicians vs the traditional technique: a prospective, randomized study The American Journal of Emergency Medicine 23(3), 363-367. https://dx.doi.org/10.1016/j.ajem.2004.11.001
- Orman, E., Fortune, B., John, B., & Asrani, S. (2025). AGA Clinical Practice Update on the management of ascites, volume overload, and hyponatremia in cirrhosis: Expert review. Gastroenterology, 169(7), 1547–1557. https://doi.org/10.1053/j.gastro.2025.08.029
- Wong, C., Holroyd-Leduc, J., Thorpe, K., Straus, S. (2008). Does this patient have bacterial peritonitis or portal hypertension? How do I perform a paracentesis and analyze the results? JAMA 299(10), 1166-78. https://dx.doi.org/10.1001/jama.299.10.1166