
Primary Authors: Victor Lee and Haley Kempf. Oversight, Review, and Final Edits by Vi Dinh (POCUS 101 Editor).
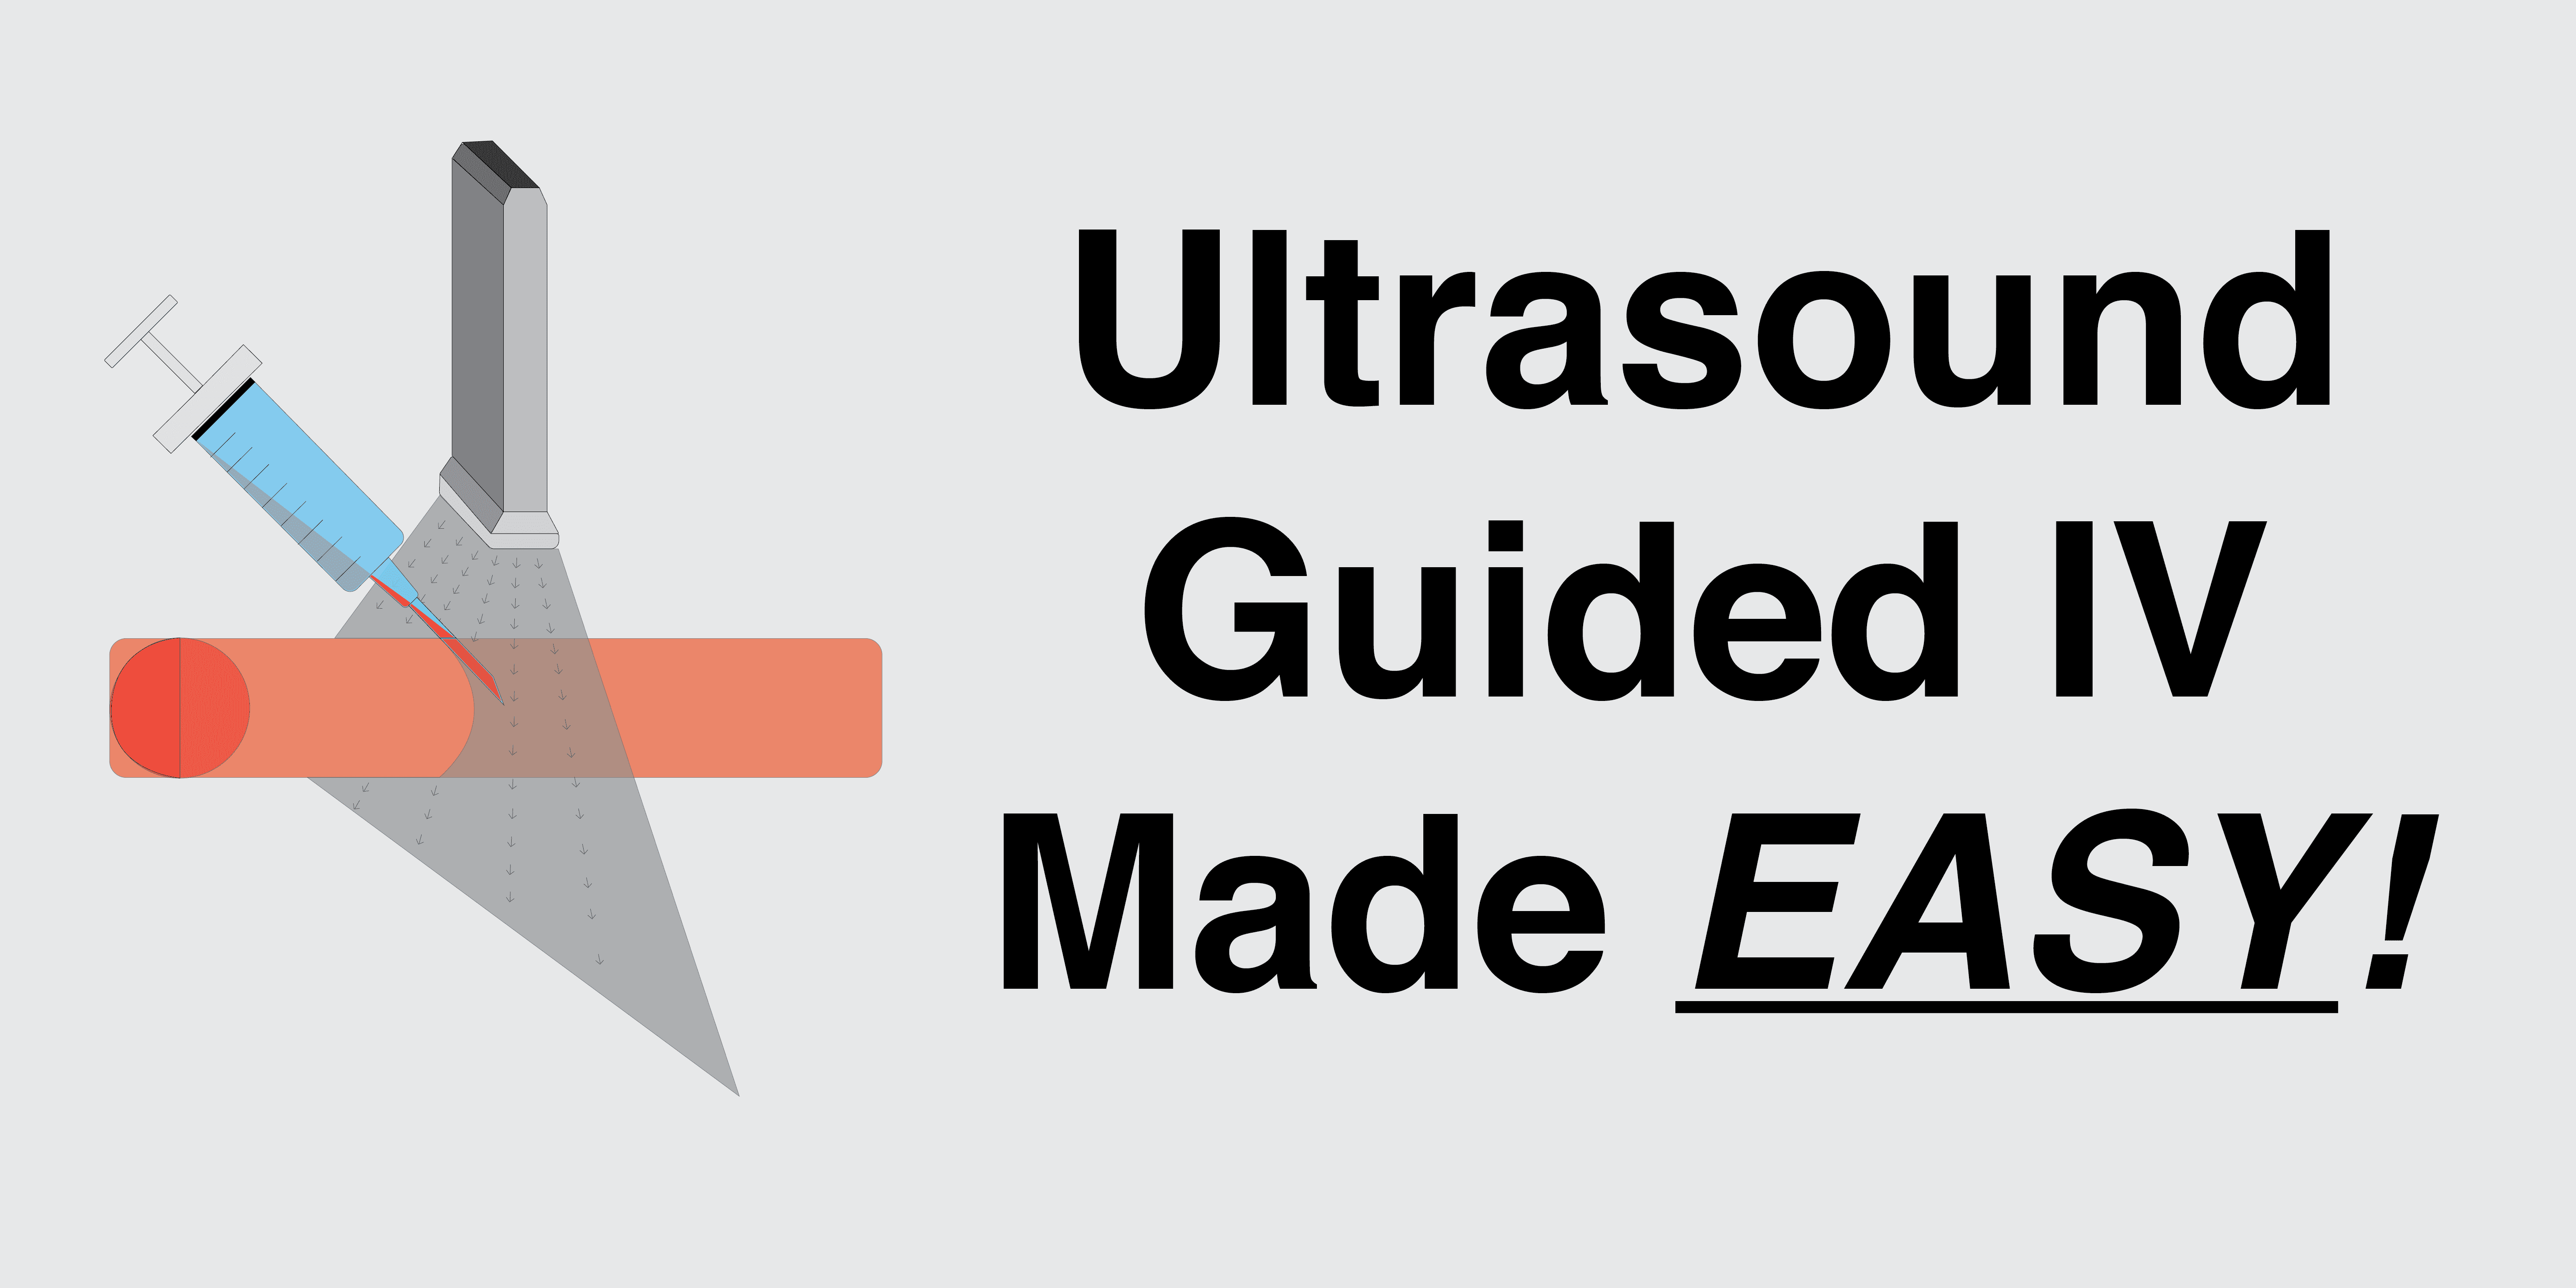
Knowing how to properly insert a Peripheral IV under ultrasound guidance can help minimize mechanical complications, help decrease the number of central lines needed, and reduce the time it takes to perform the procedure. Below is a systematic, step by step approach to placing an Ultrasound-guided Peripheral IV.
Ultrasound-guided peripheral IVs can be performed by almost any healthcare provider including medical students, nurses, resident physicians, and attending physicians.
By the end of this post you will know:
- Indications & Contraindications for using the Ultrasound guided approach for inserting a PIV
- How to gather your PIV equipment, optimally position your patient, and set up your Ultrasound machine
- How to perform a Pre-scan using the Ultrasound to localize the target vein
- How to obtain both a Transverse and Longitudinal view of a vein
- Technique on how to insert a PIV using the Ultrasound
- Tips & Tricks for faster and more accurate placement
- Common Errors & Complications that can occur with first time users
Table of Contents
Indications and Contraindications for US-Guided PIV
Indications
Here is a list of potential patients who may benefit from Ultrasound (US) guided peripheral IV because their veins are often “difficult to access” with the standard approach:
- Numerous Failed attempts (>2 attempts)
- Diabetics
- Vascular Diseases
- Morbidly Obese
- End stage Renal Disease
- Sickle Cell disease
- IV drug users
- Dehydrated
- Chemotherapy patient (damaged veins)
Contraindications
- Infection near or at the site of interest
- Lymphedema
- Burned Extremities
- Previous intravenous infiltrations
- Excessive Scar tissue
- AV Fistula (for dialysis patients)
- Sclerosed vein
- Phlebitis
Pre-Procedure Checklist
Peripheral IV Equipment and Setup
Here is a list of materials you will need on the side table. If you are busy, you can ask someone to obtain this list:
List of all required equipment:
- Tegaderm to cover the probe
- Tourniquet
- Chloraprep
- Surgilube (sterile jelly)
- IV: Usually 20 gauge IV or a 20 gauge Art line (optional)
- IV setup tubing
- 10 ml 0.9% Sodium Chloride Flush (normal saline)
- Dressing (tegaderm)
- Coban

Patient Preparation & Ultrasound Machine Positioning
Before you position the patient, wash your hands and put on a pair of well fitted gloves.
- Patient Position: Place the patient supine in a relaxed position. Position the height of the bed around 45 degrees, adjusting the level of the bed so that the patient’s arm is at the level of umbilicus. Then, position the patient’s arm in the supinated position on top of the side table with a chuck underneath.
- Ultrasound Machine Placement: Position the US machine on the same side of the vein you wish to cannulate. The side table with the patient’s arm should be between you and the US machine. This will help keep both the patient’s arm, the catheter, and the Ultrasound machine in your line of sight.

Ultrasound Settings
- Ultrasound Settings:
- Transducer: Linear Ultrasound Probe
- Probe indicator should face your left to ensure that leftward movement of the probe will result in a leftward shift on screen
- Preset: Vascular Access (Arterial or Venous Preset)
- Optimize the image by adjusting depth and gain
- Transducer: Linear Ultrasound Probe

POCUS101 TIP: To make sure that your probe indicator/marker and the screen marker or dot is on the same side, tap a finger on the side of the transducer (

Pre-Procedure scan for US-Guided PIV
Choosing a Target Vein
First, look for the cephalic vein and basilic vein in the upper extremity. If you are unable to locate either of these veins, use the deep brachial vein as a last resort. Avoid the deep brachial if possible because it is a larger vein that is commonly used for PICC lines or other accesses. Although the median cubital vein is considered a superficial vein that can be cannulated, it is best to avoid this vein because it is at the crease of the joint and can easily be occluded when the patient is flexing their elbow.
Here are some questions you can ask yourself while choosing the target vein:
- Where is the Target vein?
- Is the Target vein Patent?
- Is the course of the vein straight enough to insert a catheter?
- What is the depth of my vein?
- Are there any surrounding structures (arteries, nerves)?

Identify a Target Vein on Ultrasound
With the ultrasound Linear array probe in Left hand, apply surgilube to the transducer with your Right hand. Identify the target veins and visualize the surrounding structures.
- Map out the vein you are cannulating by scanning up and down a few centimeters to know anatomy and direction of the vein & making a mental note of any valves, arteries and nerves.
- Double check by compressing the vein by adding pressure with the transducer causing the vein to collapse. If the vein is compressible you know it is patent.
- Start at a location distal to the target vein and proceed to scan more proximally. By starting distally and proceeding proximally, you will be able to visualize the trajectory the vein is traveling.
Mapping the Cephalic Vein
Mapping the Basilic Vein
Mapping the Brachial Vein
In this video we are mapping out the brachial vein in addition to the cephalic and basilic veins.
Identify the Depth of your Vein
POCUS101 TIP:
To measure the depth the vein is beneath the skin, you can use the cm markers on the right side of the screen to determine the depth of the vein. This will be helpful when determining how far you should insert the needle before reaching the vein.

Identify Surrounding Structures
Don’t hit an artery or nerve..
Notice how close the Deep Brachial Vein is associated with the Brachial artery. It is important to correctly map out the vein and note any surrounding structures to avoid accidentally injuring a nearby nerve or puncturing an artery. The Median nerve will appear as a honeycomb structure that may be above or below the vessels.

Step by Step Ultrasound Guided Peripheral IV Insertion
Now that we patient, ultrasound machine, and PIV equipment set up along with a mapping of the vein (including the depth) we are now ready to go over the steps of the procedure.
Step 1: Apply Tegaderm to Ultrasound Probe
Place the tegaderm on top of the Linear array probe (you could also use a probe cover or surgical glove).

Step 2: Place the Tourniquet
To visualize the vein you wish to cannulize, first apply a tourniquet proximal to the region you wish to cannulate.

Here are the steps to applying a tourniquet on the right arm:
- Place the Tourniquet behind the patient’s arm.
- With each hand hold one end of the Tourniquet
- Criss cross the tourniquet (Left hand over right hand)
- Pull tightly across the arm with your left hand, while holding the other end stable
- Pinch the tourniquet at the cross section with your thumb and index finger of your left hand
- With the other end of the tourniquet in your right hand, lay it on top of the patient’s arm
- Using your right index finger, tuck the proximal end (of the tourniquet you just placed on top of the patient’s arm) underneath the crisscross you have in your left hand
- STOP AND DOUBLE CHECK
- Before proceeding to the next step remember the moment the tourniquet is on the patient, they are losing blood circulation to the distal extremity. If you ever need to release the tourniquet simply pull on the end indicated by the arrow below.
Step 3: Apply Chloraprep
- Apply to the entire forearm so that you can identify all three veins
Step 4: Apply the Surgilube
- Apply the surgilube along the antecubital fossa evenly
Step 5: Inserting the needle under Ultrasound Guidance
Before we insert the needle, you will want to grip the angiocath between your thumb and middle finger and your index finger on the catheter.

Depending on what technique (Short or Long Axis approach) Step 5 will be a little different. The main difference being the position of the needle and the image casted on to the Ultrasound machine monitor.
Step 5a: Short-Axis Technique
- Place US Probe on patient
- Slide up and down while centering vessel to Map the vein direction
- Bring probe to desired area of vein to cannulate
- Insert PIV needle 2-3 mm away from the transducer at 30-45 degrees (depending on vein depth)
- Visualize the needle tip using creep method advancing only after you visualize the needle tip at every step of the way (see below for the “Creep Method for leading the needle”

POCUS101 TIP: Make sure the needle is being inserted at the center of the transducer where the marker is located this will help to maximize precision and accuracy.


POCUS101 TIP: If you aren’t able to visualize the needle tip make sure to position the needle perpendicular to the ultrasound beam. This allows for you to maximize the amount of wave frequencies transmitted.
To do this, slightly tilt the transducer away from the needle to maintain a 90 degree angle. The reason why this works so effectively is that by tilting away from the needle and inadvertently maneuvering it toward the operator it will immediately cast its beams and begin highlighting the needle.
Step 5b: Long-Axis Technique
- The Longitudinal technique/approach is very similar to the Transverse approach in the earlier steps.
- Start by finding the vein in short axis and then twist the probe 90 degrees.
- Slide up and down while centering vessel to Map the vein direction
- Insert PIV needle 2-3 mm away from the transducer at 30-45 degrees (depending on vein depth)
- Visualize the needle tip using creep method advancing only after you visualize the needle tip at every step of the way
- You should be able to the visualize the needle as it penetrates the skin and throughout the whole procedure


POCUS 101 TIP: if you are having trouble visualizing the needle, gently fan the probe side to side. You should be able to visualize the needle tip, shaft, and vessel at all times. Do not advance the needle if you can’t see it.
Always insert the IV only a few millimeters at a time. If you insert too quickly you are at risk for blowing the vein by penetrating both the anterior and posterior walls.
Step 6: Tent the Anterior Wall of the Vein
As you slowly proceed the needle under ultrasound guidance, you will notice some Tenting that occurs on the anterior portion of the vessel. At this point you will want to decrease the angle between the skin and the needle from 45 degrees to about 20 degrees. This will ensure that when additional pressure is applied to penetrate the anterior wall of the vein, the residual force will not puncture the posterior wall.


Step 7: Advance Needle Into the Vein
Once you receive flashback avoid the temptation to advance the needle right away, first reduce your needle angle and under ultrasound guidance advance the needle until it is centered in the lumen.

POCUS101 TIP: The reason you want to advance the needle further until the needle tip is at the center of the vessel is because flashback can occur even if only a small portion of the bevel is within the lumen. Through ultrasound guided visualization this will ensure your needle tip is inside the lumen and not just outside the superficial wall.
Step 8: Insert Catheter and Dress Site
- Using the hand that is not holding the angiocath, push the catheter in
- Remove the tourniquet and retract the needle
- Throw the needle in the designated sharps container

- Hook up the IV tubing to the catheter with the syringe already attached

- Aspirate by pulling on the syringe in order to ensure needle is properly placed
- flush with saline

- Apply a tegaderm and label the time and date
- Clamp the IV tubing and clamp the port covers

- Finally make sure to secure it with Coban

Ultrasound-Guided Peripheral IV Placement Video
Here is a video summarizing all of the steps to perform ultrasound-guided peripheral IV’s
Possible Complications of US-Guided PIV
- Infiltration: Medications or I.V. fluids leak out due to improperly placing the catheter
- Thrombophlebitis: Inflammation of the vein due to trauma during IV insertion
- Extravasation: (similar to infiltration) but medications or fluids that are vesicant or irritating to the body
- Nerve injury
- Arterial Puncture
References
- Alexandrou, E., et al., International Prevalence of the Use of Peripheral Intravenous Catheters. Journal of Hospital Medicine. 2015; 10(8): 530-533.
- Helm, R. E., et al., Accepted but Unacceptable: Peripheral IV Catheter Failure. JOurnal of Infusion Nursing. 2015; 38(3): 189-203.
- Blaivas M, Brannam L, Fernandez E. Short-axis versus long-axis approaches for teaching ultrasound-guided vascular access on a new inanimate model. Acad Emerg Med 2003;10:1307-1311
- Stone MB, Moon C, Sutijono D, Blaivas M. Needle tip visualization during ultrasound-guided vascular access: short-axis vs long-axis approach. Am J Emerg Med 2010;28:343-347
- Pavlov, Helene, and Teresita Leynes. “PICC Line Insertion.” Hospital for Special Surgery, 5 Sept. 2019,
- Joing, Scott, et al. “Ultrasound-Guided Peripheral IV Placement.” New England Journal of Medicine, vol. 366, no. 25, 2012, doi:10.1056/nejmvcm1005951.
- Reusz G, Sarkany P, Gal J, Csomos A. Needle-related ultrasound artifacts and their importance in anaesthetic practice. Br J Anaesth. 2014;112(5):794-802.
- Loannides, Kimon, and Ryan Gibbons. “Techniques for Ultrasound-Guided IV Placement: Tips and Tricks.” ALiEM, 20 Sept. 2019
- hnatsenka B, Boezaart A. Ultrasound: Basic understanding and learning the language. Int J Shoulder Surg. 2010;4(3):55-62.
- Tilakaratna, Prasanna. “How Ultrasound Imaging Works Explained Simply.” How Equipment Works, 2 Apr. 2017.
- Abdel-Gadir, Ahmed. “KnobologyAhmed Abdel-Gadir.” Knobology, Image Optimisation, Correcting Gain, Depth.
- Erika Wierman, DVM. “Understanding Gain in Ultrasound.” Portable Veterinary Ultrasound, 5 Feb. 2019, www.eimedical.com/blog/understanding-gain-in-ultrasound.
- Hilty WM, Hudson PA, Levitt MA, Hall JB. Real-time ultrasound-guided femoral vein catheterization during cardiopulmonary resuscitation. Ann Emerg Med. 1997;29:331.
- Miles, Gayla, et al. “Implementation of a Successful Registered Nurse Peripheral Ultrasound-Guided Intravenous Catheter Program in an Emergency Department.” Journal of Emergency Nursing, vol. 38, no. 4, 2012, pp. 353–356., doi:10.1016/j.jen.2011.02.011.
- Saugel, Bernd, et al. “Ultrasound-Guided Central Venous Catheter Placement: a Structured Review and Recommendations for Clinical Practice.” Critical Care, vol. 21, no. 1, 2017, doi:10.1186/s13054-017-1814-y.
- Helm, R. E., et al., Accepted but Unacceptable: Peripheral IV Catheter Failure. JOurnal of Infusion Nursing. 2015; 38(3): 189-203.
- Webster, J, and S Osborne. “Replacing a Peripheral Venous Catheter When Clinically Indicated versus Routine Replacement.” Cochrane, 23 Jan. 2019.
- Ortega, Rafael, and Et Al. “Peripheral Intravenous Cannulation: NEJM.” New England Journal of Medicine, 2008
- Sepah, Yasir, et al. “Aspiration in Injections: Should We Continue or Abandon the Practice?” F1000Research, F1000Research, 10 July 2014, www.ncbi.nlm.nih.gov/pubmed/28344770.


Awesome post! Was waiting for this one!
Thanks Danielle! Glad you found it helpful!
Awesome post. One of my favorite procedure. Actually, my absolute favorite. Couple things I’d do differently. 1. Use 18G long IV catheter instead of 20G. If US-guided, and more than 1cm deep, it should be a long one. Else when patient’s flabby tissue moves side to side, the IV would pull out. And if you’re using a long catheter, the flow rates will drop. So increase diameter to account for that. 2. No tegaderms on head of probe. It leaves a sticky residue and once… Twice…. Three times… Probably fine. Eventually though, that icky residue builds up. ALSO, the entire… Read more »
Hi Vamsi! Thanks for the pointers. Definitely appreciate the insight 🙂 Yes 18 gauge preferred if possible. Also yes tegaderm is a “sticky situation” and debated among the POCUS community. Totally agree with least amount of gel when possible and thanks for the Heel-toe tip!! Appreciate the comment!
Thanks for the information. Definitely need longer catheter if using ultrasound as veins tend to be deeper. Per infusion guidelines, you need to ensure 2/3 of catheter is in the vein. BBraun makes 1.75 inch catheter for 22g, 20g, and 18g. These are sufficient until you get a vein that is 1cm deep or more. Also, the tegaderm is to cover the probe to ensure you are keeping germs off of the insertion site. If you touch the outer portion of the tegaderm, you are contaminating it with your hands. Tegaderm used in this manner is also off label and… Read more »
Hi Molly! Thanks for these comments. Great insight!
[…] Ultrasound-Guided Peripheral IV Insertion, Placement, and Access Made Easy […]