
Primary Authors: Seth White, Vi Dinh; Co-authors: Jessica Ahn, Jade Deschamps, Satchel Genobaga, Annalise Lang, Victor Lee, Devin Tooma, Reed Krause. Oversight, Review, and Final Edits by Vi Dinh (POCUS 101 Editor).
The original “FAST Exam” or the Focused Abdominal Sonogram for Trauma (Rozycki 1996) consisted of 3 views: the right upper quadrant, the left upper quadrant, and the pelvis to rule out bleeding in the abdomen from trauma. It is also commonly referred to as the “FAST Scan“
However, in 2004, Kirkpatrick et al published a paper in the Journal of Trauma that proposed the current nomenclature and protocol of “eFAST Exam” or Extended Focused Assessment with Sonography in Trauma.
The eFAST exam incorporates the evaluation of the lungs and heart in addition to the abdomen. This came as a result of several studies published in the 1990s and 2000s that demonstrated the effectiveness of using ultrasound to diagnose pneumothorax (Lichenstein et al), hemoperitoneum (Kimura et al), and pericardial effusions (Plummer et al) within the emergency department.
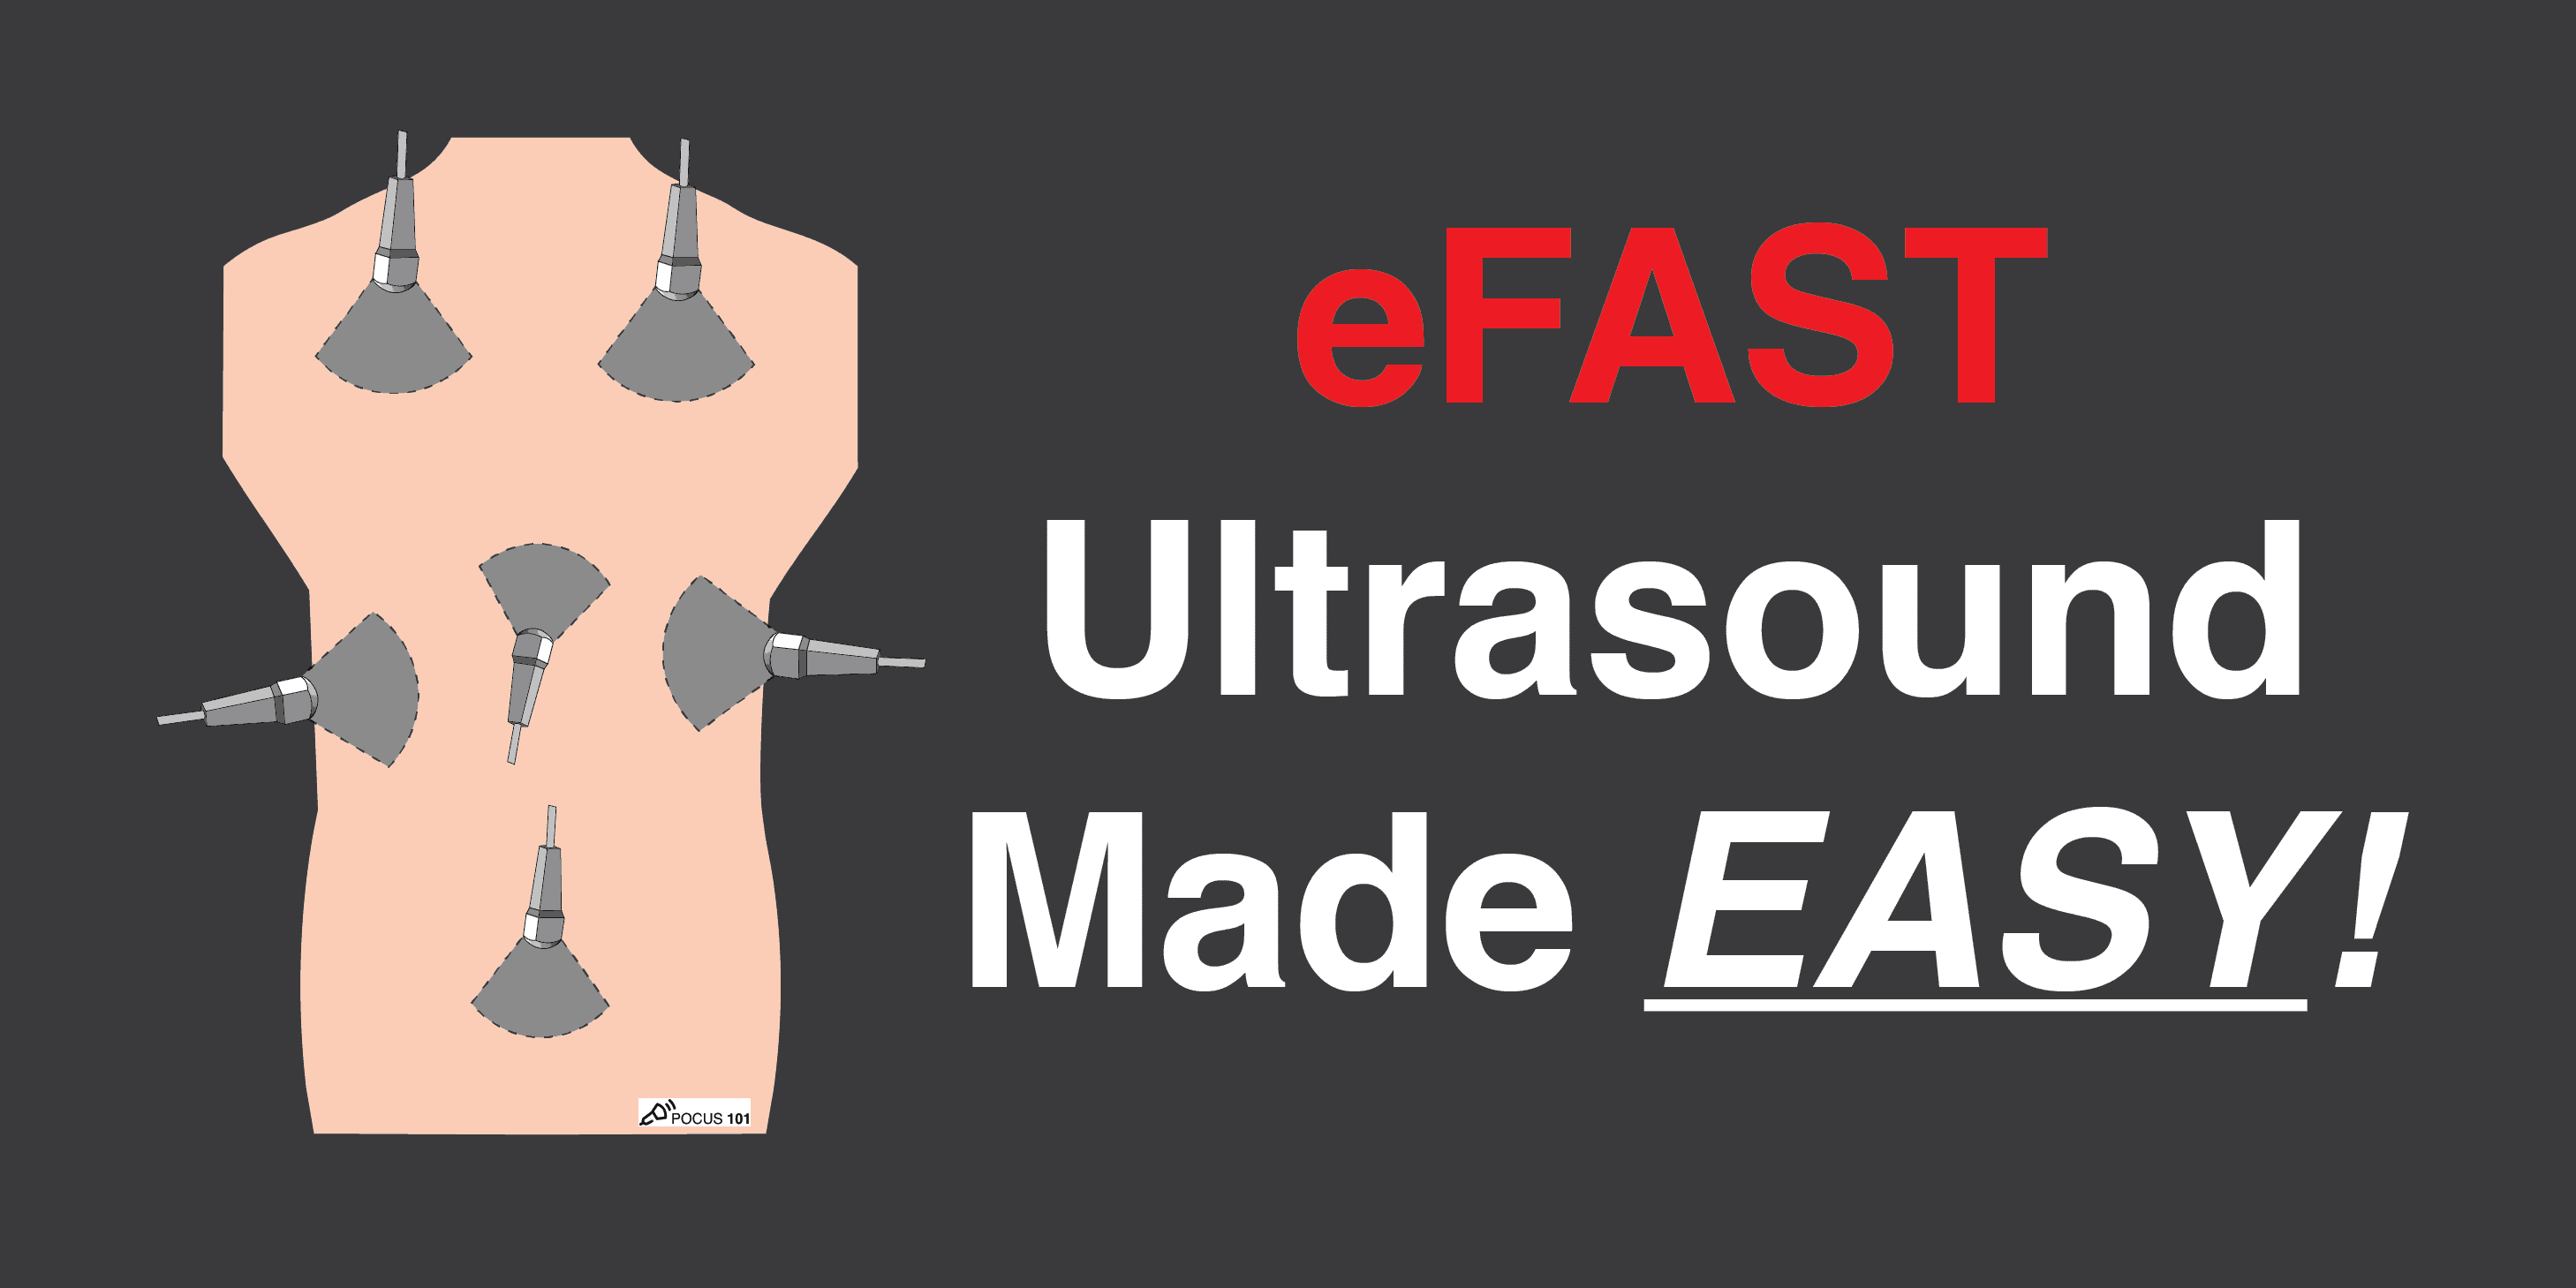
Now, the current eFAST exam consists of ultrasound scans evaluating for pathology in the abdomen, lungs, and heart!
In this post, we will show you an easy and efficient way to be able to use Point of Care Ultrasound (POCUS) to:
- Perform the complete eFAST Ultrasound Exam Protocol in 5 simple Steps
- Evaluate a patient with suspected intra-abdominal or intrathoracic free fluid collection
- Evaluate a patient for suspected cardiac tamponade
- Evaluate a patient for a suspected pneumothorax
Table of Contents
eFAST Ultrasound Exam Indications
- Hemodynamically unstable trauma patient
- Abdominal and Thoracic Trauma: Blunt or Penetrating
- Previously stable trauma patient with acute worsening in clinical status
eFAST Exam Limitations
- Does not localize the injured abdominal organ
- Views may be limited in patients with subcutaneous emphysema
- Views may be limited in patients who have a hollow-viscus injury with free air in the abdomen
eFAST Exam Ultrasound Preparation
Patient Preparation
- Patient lying supine with the exam table flat or in the Trendelenburg position (this increases the sensitivity of the exam but is not required).

Machine Preparation
- Transducer: Phased Array (or “cardiac probe”) can be used for the entirety of the exam.
- Curvilinear can be used as well, however, the cardiac views may be difficult to obtain given the large footprint of the transducer.
- See here for further discussion on probe selection.
- Preset: FAST exam or Abdominal Exam.
- Ultrasound Machine Placement: Place the machine on the patient’s right side. This makes it possible to scan with your right hand and manipulate ultrasound controls with your left hand.
If you need a quick review regarding ultrasound probe manipulation before we get going, click HERE!
Recommended eFAST Exam Sequence
There are many different sequences and variations that are described in the literature. Choose a sequence that works for you and make sure to perform it the same way each time so you don’t forget any of the views.
This is the order of the eFAST exam views that we perform at our institution and that we recommend:
- Right Upper Quadrant View (RUQ)
- Left Upper Quadrant View (LUQ)
- Pelvic View
- Cardiac View (Parasternal Long Axis or Subxiphoid)
- Lungs (Right and Left)

Like this Post?
Sign Up For POCUS 101 Updates!

Step-By-Step eFAST Exam Protocol
The eFAST Exam serves to answer 4 questions:
- Does my patient have free fluid in the Abdomen?
- Does my patient have free fluid in the Thorax?
- Does my patient have fluid in the Pericardium?
- Does my patient have a Pneumothorax?
We will first introduce you to the 5 steps of how to perform the eFAST ultrasound exam and then in the following section we will give you examples of all of the major eFAST pathologies you may encounter.
Step 1: eFAST Right Upper Quadrant View (RUQ)
For the right upper quadrant and left upper quadrant views. Remember to look free fluid both above (hemothorax) and below (hemoperitoneum) the diaphragm.
eFAST RUQ View: Does my patient have free fluid in the abdomen or right thorax?
Since the liver is the most commonly injured organ in blunt abdominal trauma, the right upper quadrant is usually the most sensitive view of the eFAST exam.
RUQ Probe Position and Hand Placement
- Orientate the probe indicator towards the patient’s head.
- Anchor your probe in the midaxillary line at the 10th intercostal space.


RUQ Normal View and Structures
- Using the liver as an acoustic window, identify the lung, liver, Morison’s Pouch, diaphragm, and the long-axis of the right kidney.
- Morison’s Pouch is where you usually identify free fluid in the RUQ view.
- A Mirror Image Artifact is a normal finding signifying there is an aerated lung above the diaphragm. If you want to dive a little deeper into the physics of the Mirror Image Artifact, click here.
- You may have to slide up or down a rib space to identify the structures.
- POCUS 101 Tip: these structures move as the diaphragm contracts and relaxes during the respiratory cycle. Consider asking your patient to hold their breath to keep the desired organs from moving. Also, consider slightly rotating the probe counterclockwise towards the bed so that the probe fits better between the rib spaces.


Step 2: eFAST Left Upper Quadrant View (LUQ)
eFAST LUQ View: Does my patient have free fluid in the abdomen or left thorax?
LUQ Probe Position and Hand Placement
- Grasp the linear probe between your thumb and first finger, like holding a pencil.
- Orientate the probe indicator towards the patient’s head.
- Anchor your probe in the posterior axillary line around the 8th intercostal space.
- You should have your “Knuckles to the bed” since the spleen is fairly posterior.


LUQ Normal View and Structures
- Using the spleen as an acoustic window, identify the spleen, perisplenic space, diaphragm, and the long-axis view of the left kidney.
- Free fluid in the LUQ is most frequently seen in the perisplenic space (between the spleen and the diaphragm). The reason is that there is a splenorenal ligament limiting the ability of fluid to track in between the spleen and left kidney
- A Mirror Image Artifact is a normal finding, similar to the RUQ, signifying there is an aerated lung above the diaphragm. If you want to dive a little deeper on this, see here.
- You may have to move up or down a rib space to identify the structures.
- POCUS 101 Tip: these structures move as the diaphragm contracts and relaxes during the respiratory cycle. Consider asking your patient to hold their breath to keep the desired organs from moving. Also, consider slightly rotating the probe clockwise towards the bed, so that the probe fits better between the rib spaces.


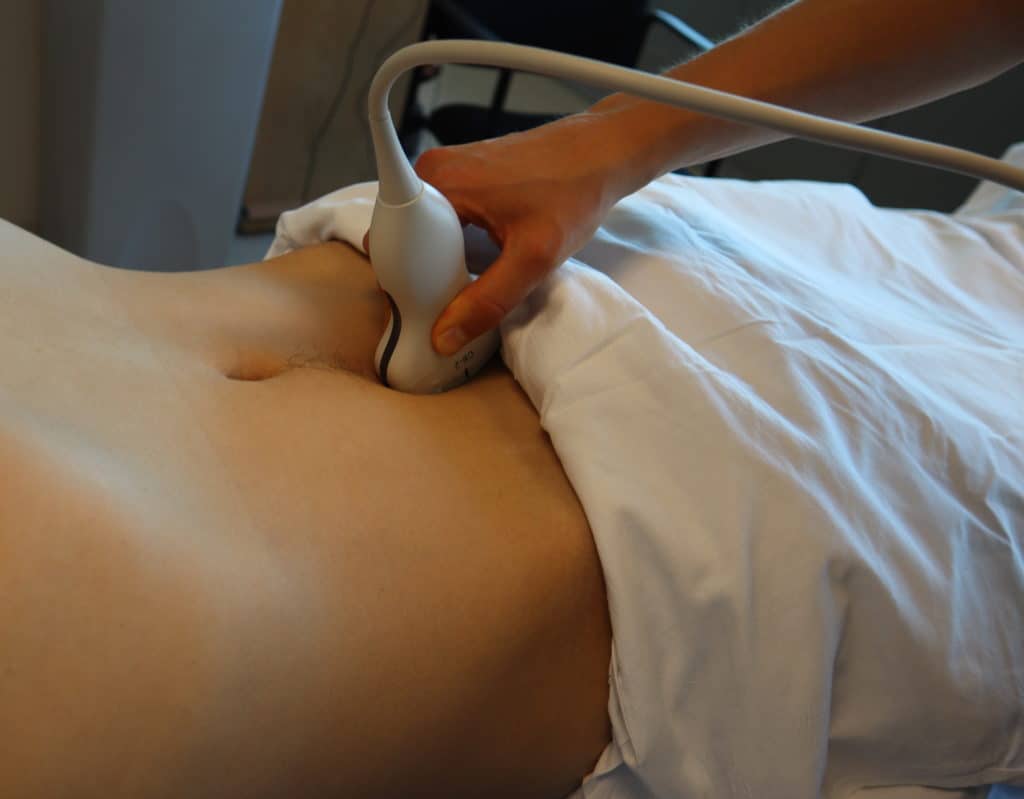
Step 3: eFAST Pelvic View
eFAST Pelvic View: Does my patient have free fluid in the abdomen or pelvis?
When looking for free fluid in the pelvis it’s important to consider the sex of your patient, as free fluid has a tendency to accumulate in different locations depending on the patient’s gender. Additionally, females may have a scant amount of normal physiologic fluid accumulation in the pelvis (pouch of Douglas).
- Ideally, scan your patient with a full bladder (so the bladder can be used as an acoustic window). Therefore, try to initiate the scan prior to foley catheter placement.
- Machine Depth: 10-15 cm
Pelvic Ultrasound – Longitudinal View
- Place the transducer with the indicator pointing towards the patient’s head in the patient’s midline, right above the pubic symphysis.
- Rock the probe so that it points down towards the pelvic cavity.
POCUS 101 Tip: One of the most important things to remember when performing pelvic ultrasound in the eFAST scan is that the bladder is directly posterior to the pubic bone/symphysis. If you are unable to get proper images, most likely your ultrasound probe is placed too superiorly.
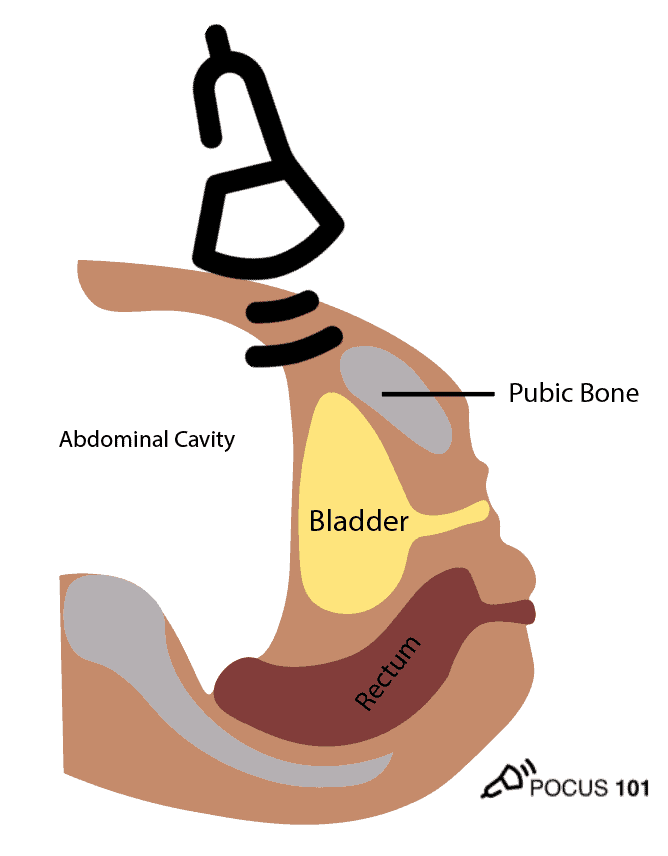
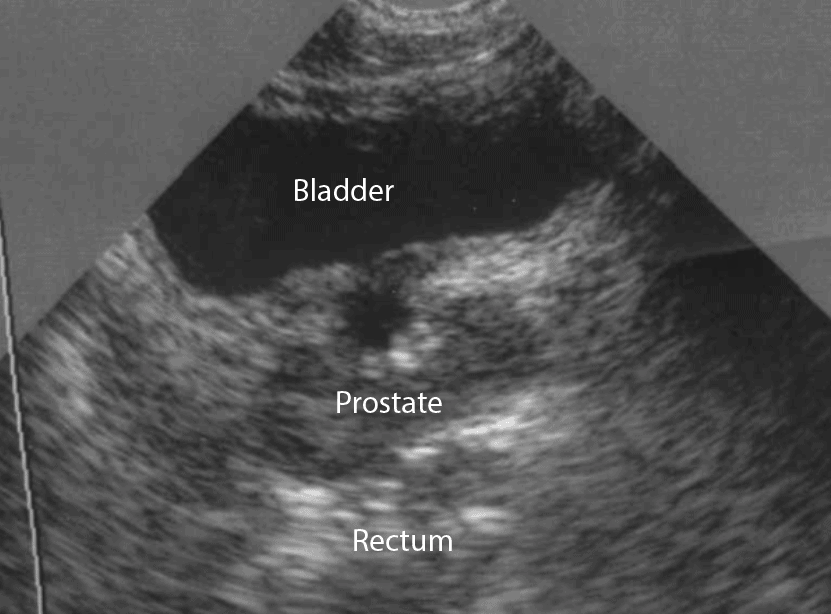
- In males, identify the bladder (immediately posterior to the symphysis), prostate/seminal vesicle, and rectovesical pouch in the longitudinal view.
- The rectovesical pouch is where free fluid will accumulate in the male pelvis.


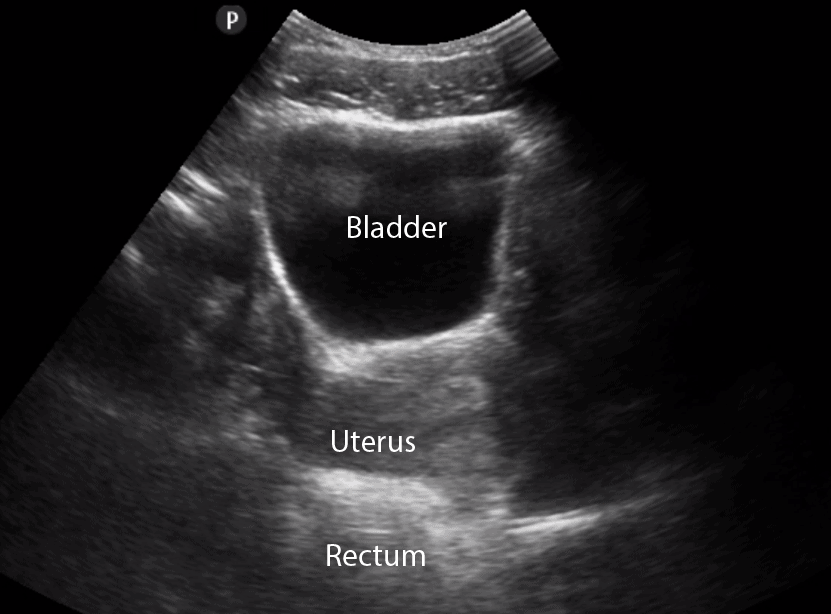
- In Females, identify the bladder, uterus, and Rectouterine Pouch (also called the Pouch of Douglas).
- The Pouch of Douglas is where free fluid will accumulate in the female pelvis.

- In all patients (male or female), observe the lateral borders of the bladder to identify free fluid by tilting/fanning the probe left and right.
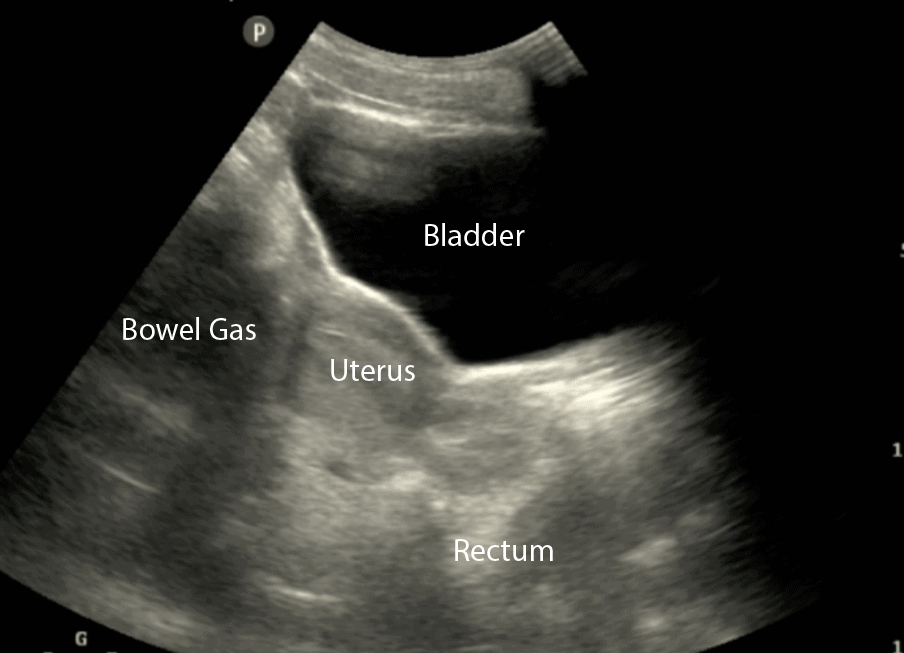
Pelvic Ultrasound – Transverse View
- Next, center the bladder and then rotate the transducer 90 degrees counterclockwise. The indicator should now point to the patient’s Right side.
- Make sure to tilt the ultrasound probe so it scans into the pelvic cavity.
- In the transverse view, identify the Bladder, Uterus (females), Prostate (males), and Rectum.
- Tilt/Fan the probe to examine the entire pelvis from superior to inferior.

Like this Post?
Sign Up For POCUS 101 Updates!

Step 4: eFAST Cardiac View
eFAST Cardiac View: Does my patient have a pericardial effusion with cardiac tamponade?
The subxiphoid view is the preferred scan to evaluate the heart and assess for any pericardial fluid. However, the subxiphoid view can be difficult to obtain in some situations (e.g. patient body habitus or abdominal pain with trauma). If the subxiphoid view cannot be obtained, a parasternal long axis view is recommended.
*Editor’s Note: In this post, we will be pointing the indicator based on the abdominal/eFAST ultrasound preset. When you are in the dedicated cardiac mode preset the indicator will be pointing 180 degrees in the opposite direction.
Cardiac Subxiphoid View
- Hold the probe in the palm of your hand and use an overhand grip.
- Point the probe indicator towards the patient’s right with the ultrasound machine depth set to around 15-20 cm.
- Using the liver as the acoustic window, simultaneously press the probe into the patient’s abdomen while tilting the tail of the probe towards the patient’s feet
- Aim the ultrasound beam towards the patient’s left shoulder.

- Identify the liver, pericardium, right atrium, right ventricle, left atrium and left ventricle


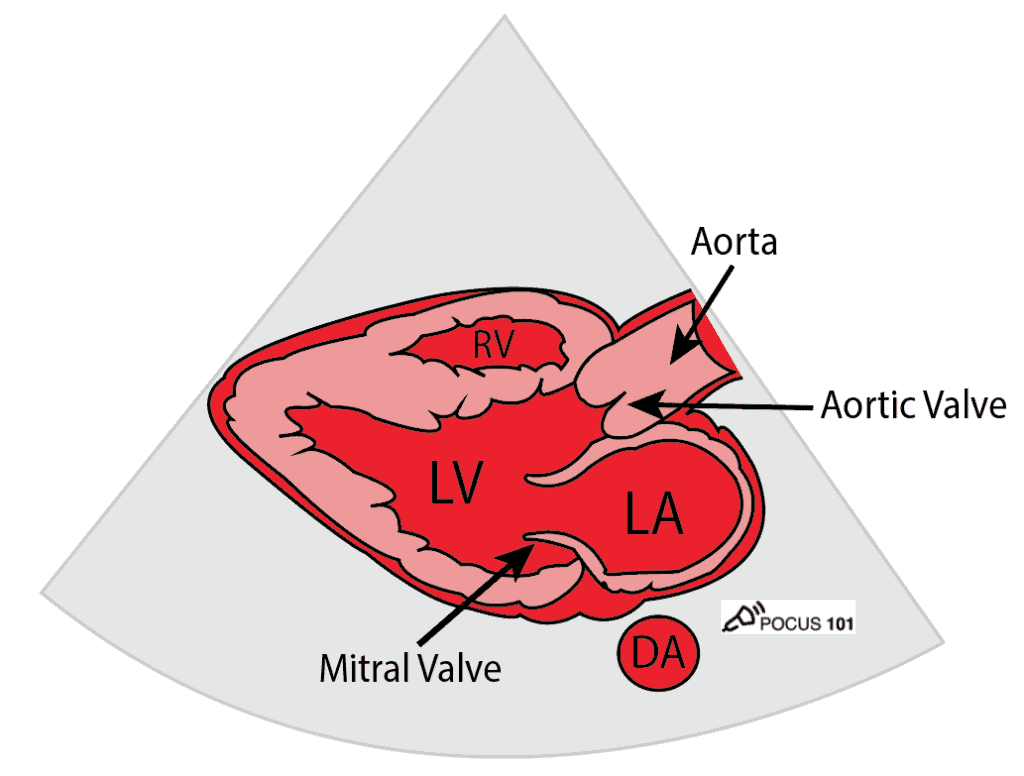
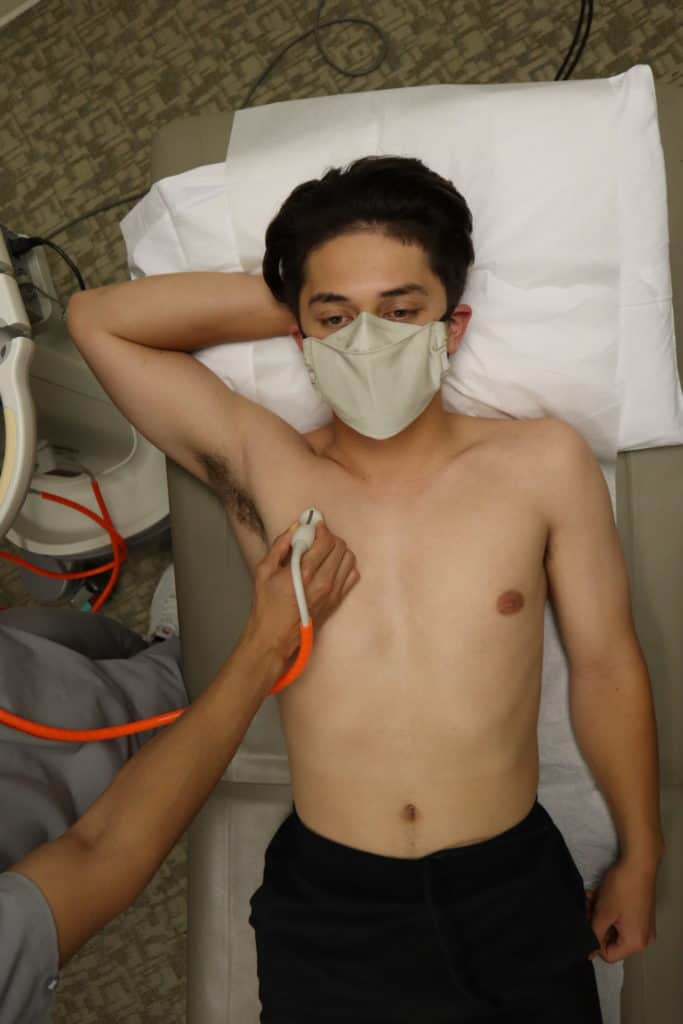
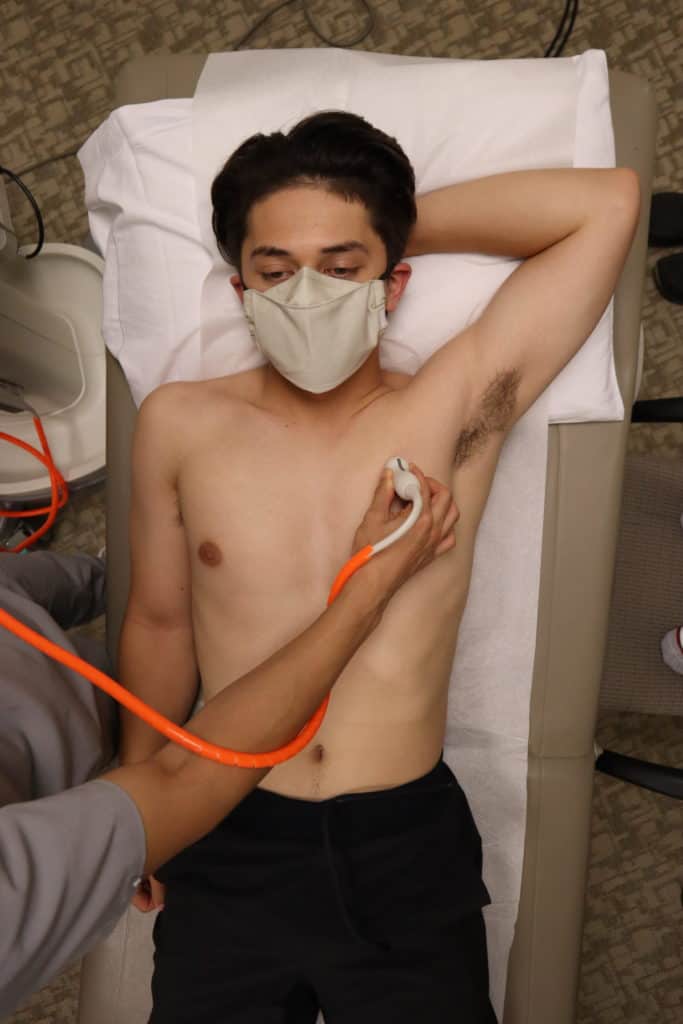
Cardiac Parasternal Long Axis
Consider obtaining the parasternal long-axis view of the heart in a patient when you are unable to obtain the subxiphoid view. Otherwise, proceed to scanning the lungs.
- Grasp the linear probe between your thumb and first finger, like holding a pencil.
- Anchor your third and/or fourth finger(s) in the 2nd or 3rd left intercostal space, just lateral to the sternum.
- Probe indicator towards the patient’s left hip with the machine depth set approximately 10-15 cm

- Identify the pericardium, mitral valve, aortic valve, right ventricle, descending aorta, left atrium, and left ventricle
- You may have to move up or down a rib space to identify the structures

Step 5: eFAST Lung Views
eFAST Lung Views: Does my patient have a pneumothorax?
Recall, the parietal pleura covers the surface of the thorax and the visceral pleura covers the lungs. The presence of these moving against one another produces lung sliding on ultrasound. For a full tutorial on lung ultrasound click HERE.
Lung Probe Position and Hand Placement
- Point your indicator towards the patient’s head.
- Place your probe at the mid-clavicular line at the 2nd intercostal space of the right and left lungs respectively. This point is the most sensitive spot for looking for pneumothorax in the supine patient.
- Anchor your probe in the space between two ribs and set the ultrasound machine depth to 3-5cm.
Identify Two Rib Shadows (Batwing Sign)
- The first lung ultrasound finding to confirm you are in the correct position is to look for the two rib shadows or the “Batwing Sign.” This ensures that your probe is in between two ribs.


Identify Lung Sliding
- The next finding you will want to look for is lung sliding during respiration.
- Lung sliding is a normal finding where the visceral and parietal pleura slide back and forth on one another as the patient breathes. Some say this looks like tiny “ants marching on a line.”
- “Ants Marching” sign is produced from the visceral and parietal pleura moving against one another during respiration.
- This is a simple finding but extremely useful since lung sliding definitely means that the visceral and parietal pleura are next to each other, effectively ruling out a pneumothorax.

Although looking for lung sliding using B-Mode is usually sufficient, you can also consider assessing for a pneumothorax using M-mode.
Identify Lung Sliding using M-Mode (Optional)
- If lung sliding is not readily apparent, it can be further be evaluated using M-Mode. The goal of M-Mode is to see if the patient has a normal seashore sign.
- Place the ultrasound machine in M-Mode (M-Mode for motion)
- Place the ultrasound doppler indicator/cursor over the lung field (NOT over the rib).
- Look for the normal “Seashore Sign“: Sky = Skin/Subcutaneous Tissue, Ocean= Muscle, Beach = Lung sliding motion (sandy appearance). The Seashore Sign is a NORMAL finding.
- Contrast this with the Barcode sign (see in eFAST pathology section below).

Here is a quick video on how to use M-mode for lung ultrasound:
Like this Post?
Sign Up For POCUS 101 Updates!
eFAST Ultrasound Pathology
Recall that fluid will appear black, or anechoic. For the purposes of the eFAST exam we are looking for anechoic (black) areas in the abdomen, chest, and heart that signify bleeding in those potential spaces.
For pneumothorax we will be evaluating the presence or absence of lung sliding.
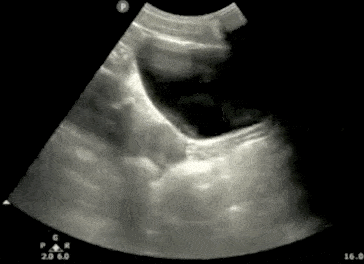
Hemoperitoneum – eFAST
The eFAST is moderately sensitive (approximately 80%) and highly specific (>90%) for detecting free fluid from hemoperitoneum. The general consensus is that there needs to be at least 200-250ml of blood before the eFAST scan will appear positive.
Another important point to remember for the eFAST scan is that observing free fluid on the eFAST scan does not localize the bleeding to a specific organ. For example, if free fluid is noted in the pelvis, it could be originating from anywhere in the abdomen, and does not localize the injury to the bladder. A CT scan is needed to localize the origin of abdominal bleeding in a trauma patient.
Right Upper Quadrant (RUQ) – Hemoperitoneum
The three common locations for free fluid to accumulate in the RUQ of the eFAST scan are the:
- Hepatorenal Space or “Morison’s Pouch”
- Caudal Tip of the Liver
- Suprahepatic Space


Left Upper Quadrant (LUQ) – Hemoperitoneum
We will evaluate the LUQ in the eFAST for free fluid in the following places:
- Perisplenic Space
- Spleen Tip
- Splenorenal Recess
POCUS 101 TIP: It is important to note that in the LUQ the most common area to find fluid is in the perisplenic space, NOT between the spleen and the left kidney. This is because there is a splenorenal ligament that attaches the spleen and the left kidney preventing a significant amount of fluid to accumulate there unless the ligament is ruptured.


Male Pelvis – Hemoperitoneum
In the male pelvis, you can find free fluid in the rectovesical pouch/space.

Female Pelvis – Hemoperitoneum
In the female pelvis, you can find free fluid in the Pouch of Douglas (Rectouterine Pouch).

Hemothorax – eFAST
After evaluating the RUQ or LUQ, move the probe superiorly one or two rib spaces to evaluate the thorax for fluid accumulation.
A normal lung will have a Mirror Image Artifact and you will be unable to see the spine going above the diaphragm since all of the ultrasound waves will be reflected back by the aerated lung.
Visualizing the patient’s spine above the diaphragm implies that there is free fluid (e.g. blood) in the thorax since ultrasound waves can easily pass through the free fluid in the chest cavity, allowing you to see the spine. This is referred to as a Positive Spine Sign (click here for a more in-depth explanation on the spine sign).


Pericardial Effusion and Tamponade – eFAST
- Anechoic free fluid can accumulate in the pericardial sac causing a pericardial effusion.
- Simply seeing a pericardial effusion not mean the patient has cardiac tamponade. Rather, the fluid must be impairing cardiac filling for it to be considered tamponade.
- Consider tamponade when the following is observed:
- Right Atrial Systolic Collapse – the most sensitive (and earliest) echocardiographic finding of tamponade (Perez-Casares, A., et al). Also referred to as the Trampoline Sign.
- Right Ventricle Diastolic Collapse – the most specific echocardiographic finding for tamponade (75-90%) (Armstrong, et al)


Pneumothorax – eFAST
Here are three important steps to evaluating for pneumothorax when performing the eFAST scan:
First, if lung sliding is present, you can rule out pneumothorax with 100% accuracy at that ultrasound point (Husain LF).
You can look for lung sliding with B-mode or M-mode:
Second, if lung sliding is ABSENT, you should not automatically assume pneumothorax.
Recall other causes of reduced/absent lung sliding: severe consolidation, chemical pleurodesis, acute infectious or inflammatory states, fibrotic lung diseases, acute respiratory distress syndrome, or mainstem intubation.


For the purposes of the eFAST scan, it is highly likely that your patient has a pneumothorax if you do not see lung sliding on B-mode or M-mode. If you want to confirm you can proceed to look for the “Lung Point Sign” below.
Third, if a lung point is present, you can rule in pneumothorax with 100% accuracy (Chan S).
To confirm the presence of a pneumothorax, you should look for the “Lung Point Sign.“
The lung point is when you can see the transition between normal lung sliding and the absence of lung sliding. This is the transition point between the collapsed lung and normal lung. If you see this you can definitively rule in a pneumothorax. The Lung point sign also helps you quantify how large a pneumothorax is.
If you think you may have found a lung point but are not sure, use M-Mode and place your cursor at the intersection where you think lung sliding starts and stops. If you see a normal seashore sign that turns into an abnormal barcode sign, then you have located the lung point with M-Mode.


Pneumoperitoneum – eFAST
In the setting of trauma (especially penetrating trauma) you may encounter pneumoperitoneum, or free air within the peritoneal cavity.
On abdominal ultrasound, the most common finding for pneumoperitoneum is the Enhanced Peritoneal Stripe Sign (EPSS). This is when air within the peritoneal space rises and causes an “echoing” of the usually single, hyperechoic peritoneal stripe that separates the abdominal wall from underlying peritoneal fluid and fluid-filled organs (Indiran).
If there is a large amount of pneumoperitoneum, your image of abdominal organs will be obscured by air wherever you place your probe.
POCUS 101 tip: if you can’t get any good abdominal views despite having your probe in the correct position, have a high suspicion for pneumoperitoneum.

eFAST Algorithm and Summary
- Remember that the POCUS eFAST ultrasound exam is most beneficial in hemodynamically unstable patients who are unable to go to the CT scanner. A positive eFAST scan can help the surgeon identify the general region of bleeding (i.e. abdomen vs heart vs lungs) to plan their surgical approach.
- A negative initial eFAST exam in patients with a highly-suspicious mechanism of injury may benefit from a CT scan or serial eFAST exams, especially in the context of a worsening clinical status (e.g. worsening vitals, hemodynamic instability, worsening pain, or worsening abdominal exam) as patients can also have a delayed presentation.
eFAST Exam Algorithm
Here is an algorithm for how to use the eFAST exam in the clinical setting:

Summary Video of eFAST Ultrasound Exam
We made this video to completely summarize how to perform and interpret the eFAST Ultrasound Scan:
References
- Lobo V, Hunter-Behrend M, Cullnan E, et al. Caudal Edge of the Liver in the Right Upper Quadrant (RUQ) View Is the Most Sensitive Area for Free Fluid on the FAST Exam. West J Emerg Med. 2017;18(2):270-280. doi:10.5811/westjem.2016.11.30435
- Little WC, Freeman GL. Pericardial Disease. Circulation 2006;113:1622–32. doi:10.1161/circulationaha.105.561514
- Jung H-O. Pericardial effusion and pericardiocentesis: role of echocardiography. Korean Circ J 2012;42:725–34. doi:10.4070/kcj.2012.42.11.725
- US Probe: When Does an Effusion Become Pericardial Tamponade? http://www.emdocs.net/us-probe-when-does-an-effusion-become-pericardial-tamponade/ Accessed 6/28/2020
- Guntheroth, W.G., Sensitivity and specificity of echocardiographic evidence of tamponade: implications for ventricular interdependence and pulsus paradoxus.Pediatr Cardiol, 2007. 28(5): p. 358-62.
- Himelman, R.B., et al., Inferior vena cava plethora with blunted respiratory response: a sensitive echocardiographic sign of cardiac tamponade.J Am Coll Cardiol, 1988. 12(6): p. 1470-7.
- Settle, H.P., et al., Echocardiographic study of cardiac tamponade.Circulation, 1977. 56(6): p. 951-9
- Perez-Casares, A., et al., Echocardiographic Evaluation of Pericardial Effusion and Cardiac Tamponade.Front Pediatr, 2017. 5: p. 79.
- Armstrong, W.F., et al., Diastolic collapse of the right ventricle with cardiac tamponade: an echocardiographic study.Circulation, 1982. 65(7): p. 1491-6
- Singh, S., et al., Right ventricular and right atrial collapse in patients with cardiac tamponade–a combined echocardiographic and hemodynamic study.Circulation, 1984. 70(6): p. 966-71.
- Engel, P.J., et al., Echocardiographic study of right ventricular wall motion in cardiac tamponade.Am J Cardiol, 1982. 50(5): p. 1018-21.
- Kronzon, I., M.L. Cohen, and H.E. Winer, Diastolic atrial compression: a sensitive echocardiographic sign of cardiac tamponade.J Am Coll Cardiol, 1983. 2(4): p. 770-5.
- Rozycki GS, Shackford SR. Ultrasound, what every trauma surgeon should know. J Trauma. 1996;40(1):1-4. doi:10.1097/00005373-199601000-00001
- Ma OJ, Mateer JR. Trauma ultrasound examination versus chest radiography in the detection of hemothorax. Ann Emerg Med. 1997;29(3):312-316. doi:10.1016/s0196-0644(97)70341-x
- Kimura A, Otsuka T. Emergency center ultrasonography in the evaluation of hemoperitoneum: a prospective study. J Trauma. 1991;31(1):20-23. doi:10.1097/00005373-199101000-00004
- Plummer D, Brunette D, Asinger R, Ruiz E. Emergency department echocardiography improves outcome in penetrating cardiac injury. Ann Emerg Med. 1992;21(6):709-712. doi:10.1016/s0196-0644(05)82784-2
- Lichtenstein DA, Menu Y. A bedside ultrasound sign ruling out pneumothorax in the critically ill. Lung sliding. Chest. 1995;108(5):1345-1348. doi:10.1378/chest.108.5.1345
- Kirkpatrick AW, Sirois M, Laupland KB, et al. Hand-held thoracic sonography for detecting post-traumatic pneumothoraces: the Extended Focused Assessment with Sonography for Trauma (EFAST). J Trauma. 2004;57(2):288-295. doi:10.1097/01.ta.0000133565.88871.e4
- LM, Friedman & Tsung, James. (2013). Extending the eFAST examination in Children.2011.
- Richards, J., McGahan, J. (2017). Focused Assessment with Sonography in Trauma (FAST) in 2017: What Radiologists Can Learn. Radiology 283(1), 30 – 48.


Fantastic post! Using this to prepare for my Surgery US training sesh. Thanks all!
[…] eFAST Exam Tutorial […]
Amazing post! The video is so clear and honestly the best explanation I have come across. Thank you so much!
Thanks Nadiah!! Appreciate the kind words.
[…] these techniques, you’ll be able to diagnose ascites and hemoperitoneum in trauma patients. Keep in mind that blood will look more echogenic as hemoperitoneum progresses and begins to […]
Very informative and up to date information.
I just need to clarify one thing in the pelvic efast. In the text its mentioned RECTO-vesicular pouch but the image is labelled as RETRO-vesicular pouch.
Do they mean the same?
Hi Israr. Nice catch! Yes, it should be labeled Rectovesicular Pouch! Yes, but they are referring to the same area.