

Primary Authors: Satchel Genobaga, Vi Dinh; Co-authors: Jessica Ahn, Jade Deschamps, Annalise Lang, Victor Lee, Reed Krause, Devin Tooma, Seth White. Oversight, Review, and Final Edits by Vi Dinh (POCUS 101 Editor).
Obstetric (OB) Point of Care Ultrasound (POCUS) can be used in all stages of pregnancy for a wide range of applications: from diagnosing the patient presenting with vaginal bleeding, gestational dating, to measuring fetal cardiac activity.
After reading this post, you will learn how to use basic obstetrical ultrasound to do the following:
- Recognize an intrauterine pregnancy and 1st-trimester findings (gestational sac, yolk sac, fetal pole)
- Estimate gestational age
- Measure fetal cardiac activity
- Recognize the ultrasonographic findings of pregnancy pathologies
- Assess fetal lie, viability, biometrics, and placental location in the 2nd & 3rd trimester
Table of Contents
Obstetric (OB) Ultrasound POCKET CARD PDF
Download OB Ultrasound Protocol Card PDF HERE

Like this Post?
Sign Up For POCUS 101 Updates!

Obstetric/OB Ultrasound Indications
- Vaginal bleeding in pregnancy
- Abdominal/Pelvic pain in pregnancy
- Gestational dating
- Positive pregnancy test with increased B-hCG
- Assessing for fetal viability
- Maternal trauma
Pre-Exam Preparation
Determining Estimated Due Date Based on LMP
It is important to estimate the gestational age prior to Obstetric/OB ultrasound assessment to determine if the findings are normal. Naegele’s Rule is a simple way to calculate the due date based on the last menstrual period (LMP) and estimate gestational age prior to the Obstetric/OB ultrasound assessment.
Due Date = Date of first day of last menstrual period (LMP) + 9 Calendar months + 7 days
For example, if the LMP was 7/16/20, add 9 months (4/16/21), then add 7 days = 4/23/21
Gestational age is estimated in weeks from the first day of the LMP. The gestational age as well as the estimated due date can be refined using ultrasound findings which we’ll discuss below.
B-hCG Discriminatory Zone
It is generally accepted that an intrauterine pregnancy should be seen on transvaginal ultrasound with a B-hCG level of 1000-2000 mIU/mL, and on transabdominal ultrasound with a level of 3000-5000 mIU/mL; this is called the discriminatory zone (Bree et al). If an intrauterine pregnancy (IUP) isn’t seen at this time, you should be suspicious of an ectopic pregnancy or non-viable intrauterine pregnancy.
However, there has been some debate on the utility of the discriminatory zone, with evidence showing the chance of a viable IUP developing later on despite no IUP detected below the discriminatory zones (Doubilet et al, Wang 2011).
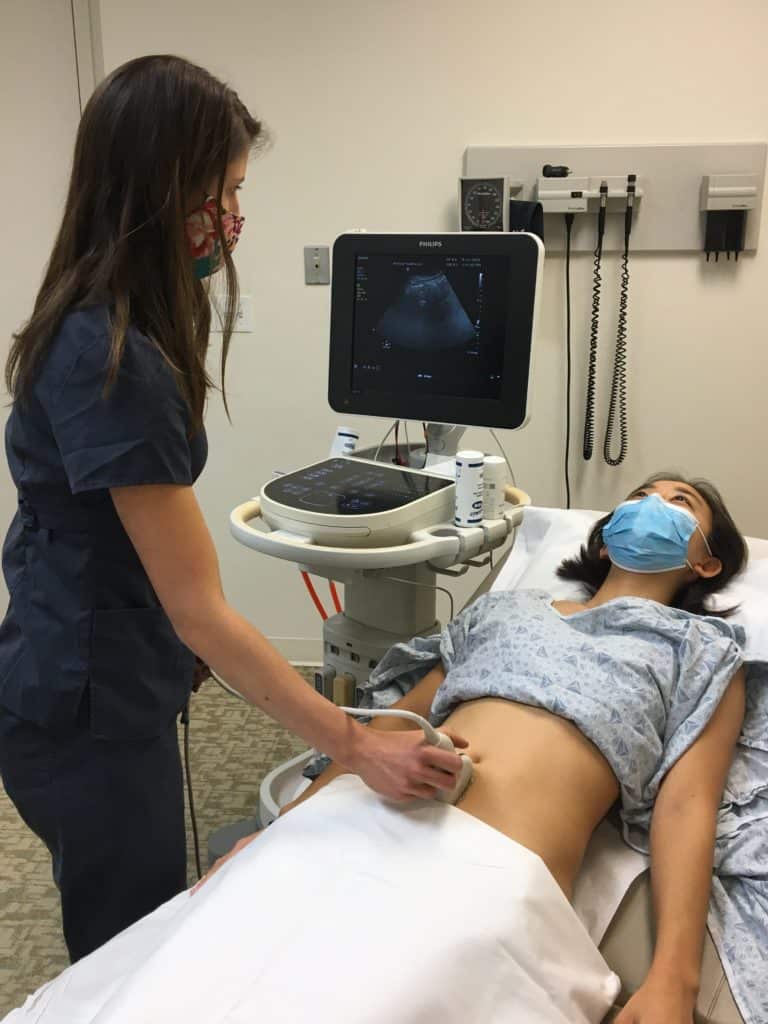
OB Ultrasound Transabdominal Approach
For full details on how to perform transabdominal pelvic ultrasound read our Complete Pelvic Ultrasound Post HERE.
Patient Preparation
- Supine
- Full urinary bladder is preferred if in the 1st-trimester
Ultrasound Machine Preparation
- Transducer: Curvilinear Ultrasound Probe (Ideal Choice) or Phased Array Probe.
- Preset: Pelvic or Abdomen
- Machine Placement: Position the ultrasound machine on the right side of the patient with the screen facing you. With this configuration you can face both the patient and the ultrasound screen, scanning with your right hand and manipulating buttons on the machine with the left hand.
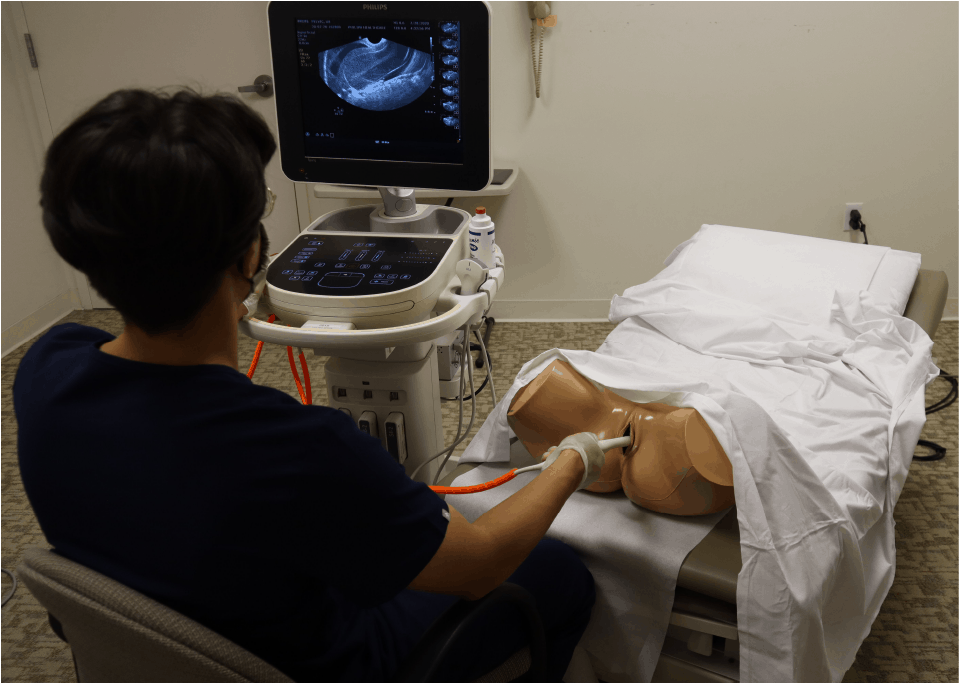
OB Ultrasound Transvaginal Approach
Transvaginal ultrasound is primarily used in the 1st trimester since signs of pregnancy can be seen earlier than transabdominal ultrasound. For complete details on how to perform transvaginal ultrasound read our Complete Pelvic Ultrasound Post HERE.
Patient Preparation
- Dorsal Lithotomy position. Make sure to have a drape/sheet and cover the patient properly. Position them similarly to how you would perform a normal pelvic exam.
- Empty bladder (if possible)
- Have a chaperone present in the room with you.
Ultrasound Machine Preparation
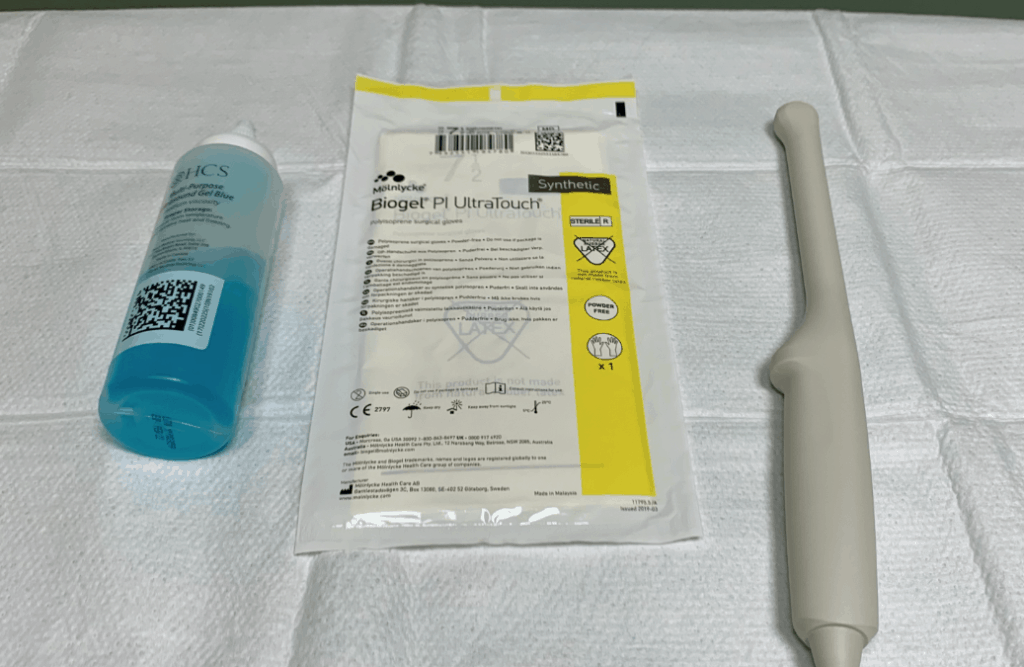
- Transducer: Transvaginal/Endocavitary probe.
- Preset: Gyn/Pelvic
- Will also need a sterile condom (or sterile glove) and sterile gel.
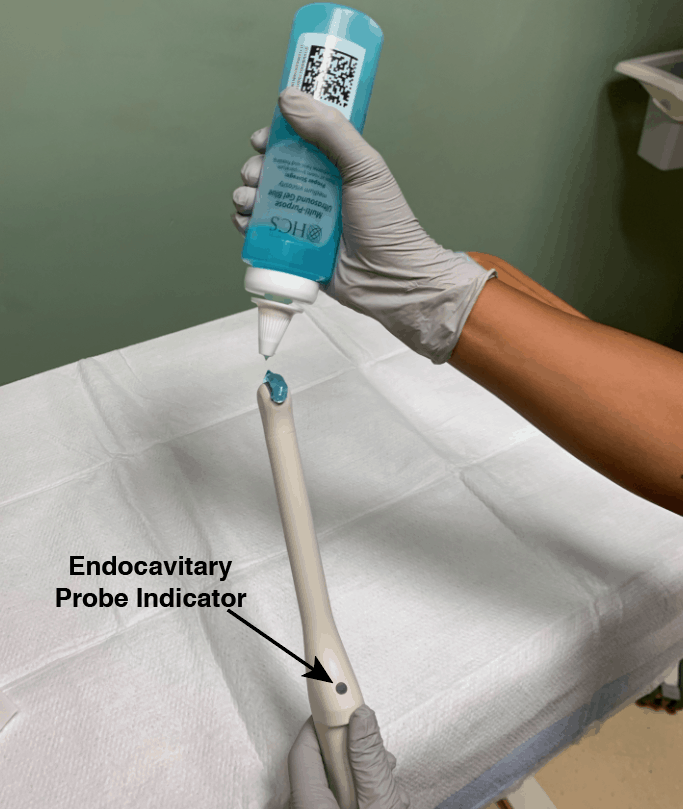
- The indicator is located at the 12 o’clock position of the probe.
- Place gel at the tip of the endocavitary probe.
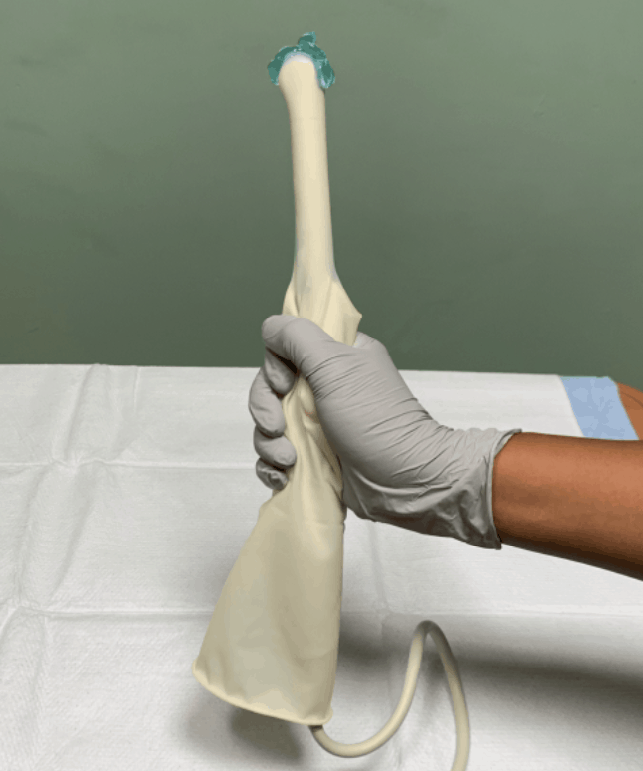
- Apply sterile glove or sterile condom over the endocavitary probe
- Apply sterile gel to the tip of the covered endocavitary probe.
- Machine Positioning: Position the ultrasound machine on the right side of the patient with the screen facing you. With this configuration you can face both the patient and the ultrasound screen, scanning with your right hand and manipulating buttons on the machine with the other hand. Also position a chair at the foot of the bed to sit in while performing the scan.
1st Trimester Obstetric/OB Ultrasound Protocol
Identifying an Intrauterine Pregnancy
To definitively diagnose an intrauterine pregnancy, either a yolk sac or a fetal pole must be seen within a gestational sac inside of the uterus.
| Transvaginal Ultrasound | Transabdominal Ultrasound | |
| Gestational sac | 4-5 weeks | Not reliable for gestational age under 6 weeks |
| Yolk sac | 5 weeks | 6-7 weeks |
| Fetal pole | 5-5.5 weeks | 7 weeks |
Gestational Sac (4-5 weeks)
The gestational sac is a collection of fluid surrounding the embryo and yolk sac. It is the first structure to be seen in the development of an IUP. It will have these features:
- Anechoic (dark), round structure with an echogenic (bright) border.
- Typically, it is in the upper 1/3 of the uterine fundus.
- You should expect to see the gestational sac at 4.5-5 weeks gestational age with transvaginal ultrasound.
- Make sure the sac is actually in the uterus by tracking the vaginal stripe to the uterus.
Shortly after the appearance of the gestational sac, the decidual layers are commonly seen. This is called the Double Decidual Sign. They will appear as 2 echogenic rings surrounding the gestational sac. The outer ring is the decidua parietalis (lining the uterine cavity) and the inner ring the decidua capsularis (lining the gestational sac). The presence of a Double Decidual Sign is highly indicative of an early intrauterine pregnancy. However, a definitive diagnosis of IUP will require the presence of a yolk sac or fetal pole.


POCUS101 Tip: Don’t diagnose a IUP until you see a yolk sac or fetal pole within a uterine gestational sac.
Pseudogestational Sac
A common pitfall is to falsely identify a gestational sac. Small collections of fluid can look very similar to gestational sacs and are appropriately called Pseudogestational sacs. How can we tell them apart? Pseudogestational sacs will usually have one or more of the following characteristics (Benson et al, 2013):
- A pseudogestational sac is more irregularly shaped or pointy-edged than a round gestational sac.
- The border surrounding the sac is not as echogenic as that of a true gestational sac.
- The fluid within a pseudo-gestational sac is not completely anechoic, there are some echoes seen in the fluid.
- The fluid of a pseudo-gestational sac will not be found in the decidua like a true gestational sac, but in the uterine cavity.
- A pseudo-gestational sac will not have the contents of a maturing gestational sac such as the yolk sac and embryo.
Correctly distinguishing between a true and pseudo-gestational sac is important because intrauterine fluid collections reportedly occur in 9-20% of ectopic pregnancies (Benson et al, 2013). Additionally, misdiagnosing a pseudo-gestational sac for an early IUP can lead to improper treatment.
Note the irregular shape, lack of double decidual sign, presence of echoes in the fluid, and lack of embryonic contents in Pseudogestational Sac.


Yolk Sac – (5 weeks)
Typically seen at around 5 weeks gestational age by transvaginal OB ultrasound, the yolk sac is an early source of nutrition for the developing embryo which usually isn’t yet visible. The yolk sac is a circular, echogenic ring with an anechoic center seen eccentrically (not in the center) in the gestational sac.

Fetal Pole – (5.5-6 weeks)
The fetal pole, or developing embryo, should be seen at 5.5-6 weeks gestational age by transvaginal ultrasound. It grows directly adjacent to the yolk sac. With transvaginal ultrasound, the fetal pole should be seen when it is 2-4mm in length.

Pregnancy Dating in the 1st Trimester
Mean Sac Diameter (MSD)
Prior to the appearance of a fetal pole, the mean sac diameter can be used to estimate the gestational age.
- Step 1 – Optimize depth to see gestational sac
- Step 2 – Obtain a sagittal view of the gestational sac
- Step 3 – Measure the height and length of the sac using the mean sac diameter calculation package.
- Step 4 – Rotate the probe 90º to obtain a transverse view of the gestational sac.
- Step 5 – Measure the width of the gestational sac.
Generally, the formula for calculating gestational age from mean sac diameter is:
MSD (in mm) + 30 = Gestational age (in days)
| Structure | For transvaginal ultrasound, the structure should be seen by the time the MSD is: | For transabdominal ultrasound, the structure should be seen by the time the MSD is: |
| Yolk Sac | 8 mm | 20 mm |
| Fetal Pole | 16 mm | 25 mm |

Crown-Rump Length (CRL)
Once a fetal pole is present, the crown-rump length should be used to estimate the gestational age as it is the most accurate method of dating the pregnancy. The crown-rump length is defined as the measurement between the top of the head and the bottom of the torso.
- Step 1 – Optimize depth to clearly see the entire fetal pole or embryo.
- Step 2 – Acquire a proper view of the fetus (Wanyonyi et al, Ioannou et al)
- Step 3 – Measure the crown-rump length using your machine’s calculation package.

If your ultrasound does not have an OB package use this formula: CRL (in mm) + 42 = Gestational age (in days)
POCUS 101 Tip: Make sure that the view of the fetus is in the mid-sagittal plane. Having an oblique section or an off-center longitudinal section of the fetus will lead to underestimation of the crown-rump length.
Cardiac Activity (Fetal Heart Rate Measurement)
Assessing cardiac activity is a crucial task in obstetric ultrasound. Fetal cardiac activity should be seen at a crown rump length (CRL) of 5-7mm.
M-mode is the preferred way to measure fetal cardiac activity over pulsed wave doppler because it subjects the fetus to lower ultrasound energy.
- Step 1 – Locate the fetal heart and optimize the depth
- Step 2 – Properly place the M-Mode cursor over the beating heart and activate M-Mode
- Step 3 – Open the OB calculation package and place the vertical cursors at one heartbeat cycle (some machines measure at 2 heartbeat cycles)
- Step 4– The machine should automatically calculate the fetal heart rate from your measurement.

Normal fetal heart rate ranges:
| 6-7 weeks | 100-120 bpm |
| 8 weeks | 145-170 bpm |
| 9+ weeks | 120-160 bpm |
Here is a quick video summarizing how to measure fetal heart rate using M-Mode:
Ectopic Pregnancies
An ectopic pregnancy refers to any pregnancy occurring outside of the uterus. They pose a substantial risk to the mother and thus must be diagnosed accurately. Ectopic pregnancies cannot be missed.
- These patients commonly present with abdominal pain, pelvic pain, or vaginal bleeding.
- Presentations that increase concern:
- Peritoneal irritation
- Cervical motion tenderness
- Lack of fetal heart tones
- Risk factors:
- Previous tubal surgery
- Prior ectopic pregnancy
The vast majority of ectopic pregnancies are found in the fallopian tubes, particularly in the ampullary region of the tube. They can be seen in many different locations, however. Because there are many places in which an ectopic pregnancy can be, the primary goal of ultrasound should be not to definitively rule in an ectopic pregnancy, but rather to rule in an intrauterine pregnancy; therefore making an ectopic pregnancy highly unlikely.

Follow these steps to look for an ectopic pregnancy:
Step 1 – Scan the uterus for a gestational sac with a yolk sac, fetal pole, or cardiac activity within the uterus. If detected then the patient has IUP and unlikely a concurrent ectopic (unless IVF therapy)
- Step 2 – if no IUP detected then scan adnexa for direct signs of ectopic pregnancy.
- The tubal ring sign (Stein et al) is a common ultrasound finding with an ectopic pregnancy. This is a thick hyperechoic ring around a tubal mass.
- The ring of fire sign (Pellerito et al) can be seen in ectopic pregnancy but can also be seen in corpus luteum cysts. The ring of fire sign describes the high-velocity flow seen on color Doppler imaging due to the high vascularization of the area surrounding the ectopic pregnancy.
- Finding a gestational sac and fetal pole with cardiac activity outside of the uterus is diagnostic of an ectopic pregnancy.


Step 3 – Assess the Pouch of Douglas for free fluid.
Step 4 – Integrate ultrasound findings with B-hCG levels
- Normal IUP
- Fetus visible in the uterus
- B-hCG level of 1000-2000 mIU/mL
- Suspicious for Ectopic
- Ectopic mass
- Fluid in the cul de sac
- Absent IUP
- Abnormal serum B-hCG pattern*
*Normally, B-hCG levels rise at least 50% in a 48 hour period. In ectopic pregnancies, B-hCG levels commonly rise 50% or less in the same timeframe. Additionally, B-hCG levels plateau sooner than IUPs (IUPs usually plateau at around 10-12 weeks) (Lin et al).

Corpus Luteal Cyst
A corpus luteal cyst develops due to the growth, instead of the normal regression, of the corpus luteum. These cysts will appear very similar to a tubal ectopic pregnancy.
How can you tell the difference between the two?
| Tubal Ectopic Pregnancy | Corpus Luteal Cyst |
| May find yolk sac or fetal pole | |
| Will move independent of the ovary in response to transducer manipulation | Will move with the ovary in response to transducer manipulation |
| Tubal ring is more echogenic | Tubal ring is less echogenic |
| Tubal ring is thicker | Tubal ring is thinner |
| Cystic fluid is more likely to be “clumpy” or have some echoes | Cystic fluid is more likely to be clear and anechoic |
| May have ring of fire sign | May have ring of fire sign |

Miscarriage
It is important to use proper terminology when describing miscarriages:
| Clinical Exam | Ultrasound Findings | |
| Threatened Miscarriage | Abnormal vaginal bleeding during a viable pregnancy | Normal IUP |
| Inevitable Miscarriage | Vaginal bleeding with a dilated cervix while still retaining all products of conception | Normal IUP or products of conception near cervix |
| Incomplete Miscarriage | Some products of conception have been retained | Retained products of conception |
| Complete Miscarriage | All products of conception have been expelled and bleeding has stopped | Empty, non-gravid uterus |
| Missed Miscarriage | The fetus is non-viable but no products of conception have been passed | IUP with no cardiac activity or fetal movement |
Molar Pregnancy
A molar pregnancy is a tumor due to the uncontrolled proliferation of trophoblasts, which are cells that surround the blastocyst and later become the placenta. These “moles” are categorized into complete and partial.
| Complete moles | Partial moles |
| No fetal/embryonic tissue | May contain fetal structures, albeit abnormal ones |
| Abnormally elevated B-hCG levels: >100,000 mIU/mL | Normal B-hCG levels |
Presentation:
- Vaginal bleeding
- Exaggerated uterine size for gestational age
- Hyperemesis
- Pregnancy-induced hypertension
A molar pregnancy will appear on ultrasound as a “snowstorm” inside the uterus. The contents of the uterus are complex and heterogeneous and often contain many small cystic structures. In addition, there may be theca-lutein cysts in the ovaries which are thin-walled cystic structures (these are more common in 2nd-trimester complete moles) (Benson et al, 2000).


Like this Post?
Sign Up For POCUS 101 Updates!

2nd-3rd Trimester Obstetric/OB Ultrasound Protocol
Cardiac Activity (Fetal Heart Rate Measurement)
Like in the 1st trimester, identifying fetal cardiac activity is essential to determining the viability of a pregnancy. Now that the fetus has grown to the point where we can identify its anatomy, we can directly visualize the 4 chambers of the heart. We can still use M-mode to measure fetal heart rate. Use the steps described above to calculate the fetal heart rate.
- Acquire a 4-chamber view of the fetal heart. This view can be found by scanning through the fetus in a transverse plane.
- Optimize the magnification and gain so that the fetal heart takes up the majority of the screen.
- The left atrium will be closest to the spine.
- The axis of the heart will be pointing to the left of the fetus.
- Use the calipers to measure the length of 1 (or 2 depending on the machine) cardiac cycle(s). The fetal heart rate should be calculated by the machine.
A refresher on how to use M-mode to measure fetal heart rate:
Fetal Presentation
The presentation of the fetus refers to which part of the fetus is closest to the birth canal.
- Obtain a midline sagittal view of the lower uterus.
- Determine which part of the fetus is closed to the maternal pelvic inlet.
Cephalic Presentation — Head first

Breech Presentation — Buttocks/Feet first

Shoulder Presentation — Shoulder/Arm first
- This presentation will show a transverse (short axis) or oblique cross-section of the fetus in a mid-sagittal view of the uterus.

Fetal Lie
Fetal lie refers to the relative orientation of the fetal and maternal spines and can either be longitudinal, oblique, or transverse.
To determine the fetal lie, acquire a mid-sagittal view of the fetal spine and compare it to the maternal spine.
Longitudinal Lie – The maternal and fetal spines are parallel (can be breech or cephalic presentations)
Oblique Lie – The fetal spine is at an oblique angle to the maternal spine
Transverse Lie – The maternal and fetal spines are perpendicular

Amniotic Fluid Volume (Maximum Vertical Pocket)
Amniotic fluid accompanies the fetus in the amniotic sac. It functions as a cushion for the fetus, helps protect it from infection, and promotes muscle, lung, and digestive system development. Polyhydramnios refers to having too much amniotic fluid while oligohydramnios refers to having too little. Polyhydramnios is associated with fetal malformations, developmental delay, and neurologic disorders (Yefet & Daniel-Spiegel). Oligohydramnios is associated with increased perinatal morbidity and mortality (Casey et al).
Amniotic fluid volume can be assessed with ultrasound by measuring the maximum vertical pocket of amniotic fluid.
- Oligohydramnios: <2 cm
- Normal: 2-8 cm
- Polyhydramnios: >8 cm
Here’s how to measure the maximum vertical pocket:
- Scan the amniotic sac from left to right in a sagittal view.
- Estimate a location that has the deepest vertical pocket and measure it with the calipers.
- The caliper line must be in a vertical orientation.
- The caliper line must be free of any fetal parts or the umbilical cord.

Fetal Biometrics
In the 2nd and 3rd trimester, various measurements of the fetus, known as fetal biometrics, can be used to estimate the weight and gestational age. These aren’t as accurate as the 1st-trimester crown-rump length measurement, but they can be helpful nonetheless.
The ultrasound OB calculation package will automatically calculate the weight and gestational age for you. However, if you don’t have an OB calculation package, a great resource for normal ranges of these measurements by gestational age can be found HERE.
Biparietal Diameter
- Acquire a transverse view of the fetal head and at the level of the thalami, you should see:
- The midline falx
- Thalami
- Septum cavi pellucidi (labelled in the image below)
- You should not see the cerebral hemispheres.
- The structures on each side of the midline falx should be symmetrical.
- Activate the BPD measurement package on the OB/GYN preset.
- The caliper line should be perpendicular to the midline falx.
- Place the near caliper (top of the screen) on the outside of the parietal bone wall.
- Place the far caliper (bottom of the screen) on the inside of the parietal bone wall.

Head Circumference
- Use the same view that you acquired for the biparietal diameter measurement.
- Activate the head circumference (HC) measurement package on the OB/GYN preset.
- Trace the head circumference.
- If an ellipse tool is not available on your machine, measure the long axis diameter (OFD) of the head. The machine should calculate the head circumference from the BPD and OFD.
Abdominal Circumference
- Along the same transverse plane, scan down towards the fetus’ upper abdomen.
- You should see the following structures in your view:
- Portal sinus
- Umbilical vein
- Stomach
- You should not see the kidneys.
- Activate the abdominal circumference (AC) measurement package on the OB/GYN preset.
- Trace the abdominal circumference.

Femur Length
- Acquire a long axis view of one of the femurs.
- Activate the femur length (FL) measurement package on the OB/GYN preset.
- Place the calipers on each end of the bone.

Placental Evaluation
Normal Placenta
The placenta should be clearly visible by the beginning of 2nd trimester. Here are the characteristics of a normal placenta:
- Uniform echogenicity (shade of gray) and rounded margins
- Slight hypoechoic area behind the placenta
- Usually, the cord will be centrally inserted
- Average thickness of 2-4 cm (Fadl et al)

To locate the placenta follow these steps:
- Starting at the superior end of the uterus, sweep from left to right in a sagittal plane.
- Follow the same pattern for more inferior sections of the uterus
- Identify the margins of the placenta.
- If the fetus is creating artifact and obscuring a posterior placenta, scan laterally.
Placenta Previa
Placenta previa refers to when the placenta is covering the internal os. This will commonly present as painless vaginal bleeding.
The earlier that placenta previa is detected, the less likely it is to be present at delivery since the placenta appears to migrate during pregnancy. However, if the placenta is covering the internal os at the onset of labor, a C-section is indicated.
Transvaginal ultrasound is preferred over transabdominal ultrasound for detecting low lying placenta and placenta previa.
Marginal placenta previa is when the placenta is extending to the edge of the internal os.
A low lying placenta is when the placenta is within 2 cm of the internal os.

Placenta Accreta Spectrum
Placenta accreta spectrum, also known as morbidly adherent placenta or just placenta accreta, is the excessive proliferation of the placenta into the myometrium. It is defined along a spectrum based on how deep into the myometrium the placenta invades (see figure below).
- Risk factors: Prior uterine surgery, placenta previa, assisted reproduction
- Placenta Accreta: Placenta is in contact with the myometrium
- Placenta Increta: Placenta invades the myometrium
- Placenta Percreta: Placenta invades past the myometrium into adjacent structures

Placenta accreta spectrum has these features on ultrasound:
- Discontinuous myometrium or thin (<1 mm) myometrium
- Absent retroplacental hypoechoic space that is seen in a normal placenta
- Increased retroplacental vascularity
- Placental lacunae – hypoechoic areas within the placenta
- This is said to look like Swiss cheese
- These will have turbulent blood flow on color doppler
- In placenta percreta: Abnormal or loss of interface between uterus and adjacent structures (e.g. bladder) with chaotic vascularity


Placental Abruption
Placental abruption occurs when the placenta prematurely separates from the uterine wall. For the fetus, this can lead to preterm birth or stillbirth. For the mother, abruption can lead to large blood loss, DIC, or even death.
Diagnosing placental abruption with ultrasound can be difficult due to the varying presentation and severity. The clinical and ultrasound appearance of abruption depends on several factors:
- The location of the placenta
- The location of the separation and bleeding (pre-placental, retroplacental, placental margin)
- How old the bleeding is

How do these factors influence ultrasound findings? Acute bleeding will appear as hypoechoic or isoechoic to the placenta. The blood will appear hyperechoic after 1-2 weeks. Therefore, a blood clot over the internal os can look similar to a placenta previa. Additionally, a retroplacental abruption can mimic the appearance of the hypoechoic space behind a normal placenta (Oyelese & Anath).
With those factors in mind, here are some ultrasound findings that may suggest the presence of an abruption (Fadl et al):
- The placenta “jiggles” with quick transducer pressure. This is known as the jello sign.
- Retroplacental, preplacental, or placental margin collection of fluid — will have a lack of flow.
- Placental heterogeneity
- Varying placental thickness


References
- Bree, R., Edwards, M., Bohm-Velez, M., Beyler, S., Roberts, J., Mendelson, E. (1989). Transvaginal sonography in the evaluation of normal early pregnancy: correlation with HCG level American Journal of Roentgenology 153(1), 75-79. https://dx.doi.org/10.2214/ajr.153.1.75
- Doubilet, P., Benson, C., Bourne, T., Blaivas, M., Pregnancy, S., Barnhart, K., Benacerraf, B., Brown, D., Filly, R., Fox, J., Goldstein, S., Kendall, J., Lyons, E., Porter, M., Pretorius, D., Timor-Tritsch, I. (2013). Diagnostic Criteria for Nonviable Pregnancy Early in the First Trimester New England Journal of Medicine 369(15), 1443-1451.
- Chiang, G., Levine, D., Swire, M., McNamara, A., Mehta, T. (2004). The Intradecidual Sign: Is It Reliable for Diagnosis of Early Intrauterine Pregnancy? American Journal of Roentgenology 183(3), 725-731.
- Benson, C., Doubilet, P., Peters, H., Frates, M. (2013). Intrauterine Fluid With Ectopic Pregnancy Journal of Ultrasound in Medicine 32(3), 389-393.
- Wanyonyi, S., Napolitano, R., Ohuma, E., Salomon, L., Papageorghiou, A. (2014). Image-scoring system for crown-rump length measurement Ultrasound in Obstetrics & Gynecology 44(6), 649-654. https://dx.doi.org/10.1002/uog.13376
- Ioannou, C., Sarris, I., Hoch, L., Salomon, L., Papageorghiou, A., Century, I. (2013). Standardisation of crown-rump length measurement BJOG: An International Journal of Obstetrics & Gynaecology 120(s2), 38-41. https://dx.doi.org/10.1111/1471-0528.12056
- Stein, M., Ricci, Z., Novak, L., Roberts, J., Koenigsberg, M. (2004). Sonographic Comparison of the Tubal Ring of Ectopic Pregnancy With the Corpus Luteum Journal of Ultrasound in Medicine 23(1), 57-62.
- Pellerito, J., Taylor, K., Quedens-Case, C., Hammers, L., Scoutt, L., Ramos, I., Meyer, W. (1992). Ectopic pregnancy: evaluation with endovaginal color flow imaging. Radiology 183(2), 407-411.
- Lin, E., Bhatt, S., Dogra, V. (2008). Diagnostic Clues to Ectopic Pregnancy RadioGraphics 28(6), 1661-1671. https://dx.doi.org/10.1148/rg.286085506
- Lozeau, A., Potter, B. (2005). Diagnosis and management of ectopic pregnancy. American family physician 72(9), 1707-14.
- Benson, C., Genest, D., Bernstein, M., Soto-Wright, V., Goldstein, D., Berkowitz, R. (2000). Sonographic appearance of first trimester complete hydatidiform moles: First trimester moles Ultrasound in Obstetrics and Gynecology 16(2), 188-191. https://dx.doi.org/10.1046/j.1469-0705.2000.00201.x
- Yefet, E., Daniel-Spiegel, E. (2016). Outcomes From Polyhydramnios With Normal Ultrasound PEDIATRICS 137(2), e20151948-e20151948. https://dx.doi.org/10.1542/peds.2015-1948
- Casey, B., McIntire, D., Bloom, S., Lucas, M., Santos, R., Twickler, D., Ramus, R., Leveno, K. (2000). Pregnancy outcomes after antepartum diagnosis of oligohydramnios at or beyond 34 weeks’ gestation American Journal of Obstetrics and Gynecology 182(4), 909-912. https://dx.doi.org/10.1016/s0002-9378(00)70345-0
- Fadl, S., Moshiri, M., Fligner, C., Katz, D., Dighe, M. (2017). Placental Imaging: Normal Appearance with Review of Pathologic Findings RadioGraphics 37(3), 979-998.
- Oyelese, Y., Ananth, C. (2006). Placental Abruption Obstetrics & Gynecology 108(4), 1005-1016.
- Abuhamad, A., Chaoui, R., Jeanty, P., Paladini, D.Ultrasound in Obstetrics & Gynecology: A Practical Approach
- Jones, R., Goldstein, J., Boulger, C., Dschaak, T., Gibson, K., Gramer, D., Kehrl, T., Kennedy, M., Lappen, J., Minardi, J., Smalley, C., Tabbut, M. (2016). Point-of-Care OB Ultrasound


[…] Obstetric/OB Ultrasound Tutorial […]
The earlier that placenta previa is detected, the less likely it is to be present at delivery since the placenta appears to migrate during pregnancy. However, if the placenta is covering the internal os at the onset of labor, a C-section is indicated.Santhathi is one of the best ivf center and gives a good treatment on fertility
It appears that you have mislabeled your BPD fetal head image. The Cavum Septum Pellucidum is in the anterior brain, and you placed it in the posterior brain. I do see it in the image you used. FYI!