Primary Authors: Victor Lee, Vi Dinh; Co-authors: Jessica Ahn, Jade Deschamps, Satchel Genobaga, Annalise Lang, Devin Tooma, Seth White, Reed Krause. Oversight, Review, and Final Edits by Vi Dinh (POCUS 101 Editor).
A bedside Cardiac Ultrasound or Echocardiogram is a quick Point of Care Ultrasound (POCUS) that allows you to visualize and evaluate how the heart is functioning. In addition, bedside echocardiography also allows you to evaluate hemodynamic changes and pathological heart diseases.
The Cardiac Ultrasound Procedure is also known as: Echocardiography, Echocardiogram, or even just “Echo.” They all refer to the same thing.
In addition, you may see cardiac ultrasound referred to as “Transthoracic” or Transesophageal” echocardiography. Transthoracic Echocardiography (TTE) is when a cardiac ultrasound is performed on the patient’s chest. TTE is the most common cardiac ultrasound application and is non-invasive. TTE is what we will be covering in this post. Transesophageal Echocardiography (TEE) is a more specialized cardiac ultrasound with a special probe that is inserted into the patient’s esophagus. TEE requires sedation and is considered more invasive than TTE.
In this Cardiac Ultrasound (Echocardiography) for Beginners Guide, we will be showing you how you can get started on using basic Transthoracic Echocardiography (TTE) right away!
After reading this Echo Tutorial, you will be able to use bedside Cardiac Ultrasound (Echocardiography) to:
- Obtain the 5 Major Cardiac Windows and Views of the Heart (including the Inferior Vena Cava(IVC) View)
- Perform Proper Cardiac Ultrasound (Echocardiography) Technique
- Evaluate for Major Cardiac Ultrasound Pathology:
- Evaluate Left Ventricular Ejection Fraction
- Estimate Central Venous Pressure (CVP) for fluid status/ fluid tolerance using the IVC
- Evaluate for Pericardial Effusion/Tamponade
- Evaluate for Pulmonary Embolism
Table of Contents
Cardiac Ultrasound Indications
Point of Care Bedside Cardiac Ultrasound can used in the following indications:
- Significant EKG changes
- Assessing Left ventricular Function
- Chest Pain/Palpitations
- Dizziness
- Shortness of Breath
- Hypotension
- New Heart Murmurs
- Cardiac Arrest (assess for cardiac standstill)
Cardiac Ultrasound Preparation
Patient Preparation
- The patient should be supine with the head of the bed flat.
- If you are unable to visualize the heart in the supine position, consider repositioning the patient into the Left lateral decubitus. This will bring the heart away from the sternum and give you better sonographic access.


Cardiac Ultrasound Machine Preparation
- Transducer: Phased Array (AKA “cardiac probe”)
- Preset: Cardiac
One of the most confusing parts of performing cardiac ultrasound (echocardiography) is understanding where the indicator goes on the ultrasound screen and probe orientation.
With the Cardiac Preset:
- Make sure the Ultrasound Image Indicator Marker is on the RIGHT side of the ultrasound screen.
- This is different from almost all other standard applications where the Ultrasound Image Indicator Marker is on the LEFT side of the screen.
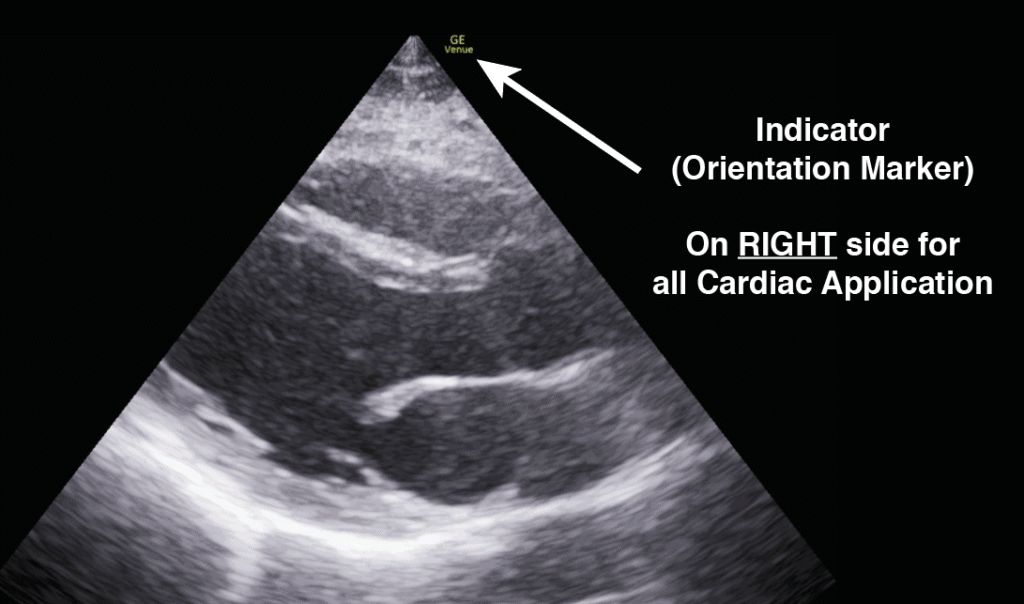
Cardiac Ultrasound Machine Placement:
- Place the ultrasound machine on the patient’s right side, so you can scan with your right hand and manipulate ultrasound buttons with your left hand.

Cardiac Ultrasound Anatomy
Understanding the general anatomy of the heart is important in helping you to visualize the different ultrasound views we will be performing. In addition, it will help keep you organized throughout the cardiac ultrasound exam.
There are a total of 4 chambers in the heart: Right Atrium, Right Ventricle, Left Atrium, and Left Ventricle. These are separated by their respective valves: Tricuspid Valve, Pulmonic Valve, Mitral Valve, and Aortic Valve.
With transthoracic echocardiography (TTE) you are able to visualize all of these structures but you will need to keep in mind that the heart is located much more medially (toward the sternum) than you may think.


Cardiac Ultrasound Views/Echocardiography Protocol
The 5 main/basic cardiac ultrasound views (Cardiac Windows) of the heart are the Parasternal Long Axis, Parasternal Short Axis, Apical 4 Chamber, Subxiphoid (Subcostal), and IVC Views.
Step 1: Parasternal Long Axis (PSLA) View
The Parasternal Long Axis View is often abbreviated as PSLA or PLAX.
It is usually the first cardiac ultrasound view obtained and will give you an immediate assessment of the general condition of the heart including ejection fraction and overall left and right ventricular sizes.
- Point the probe indicator toward the patient’s right shoulder
- Place the probe at the 4th intercostal space which is approximately the nipple line for males or the inframammary fold to the sternum (females).

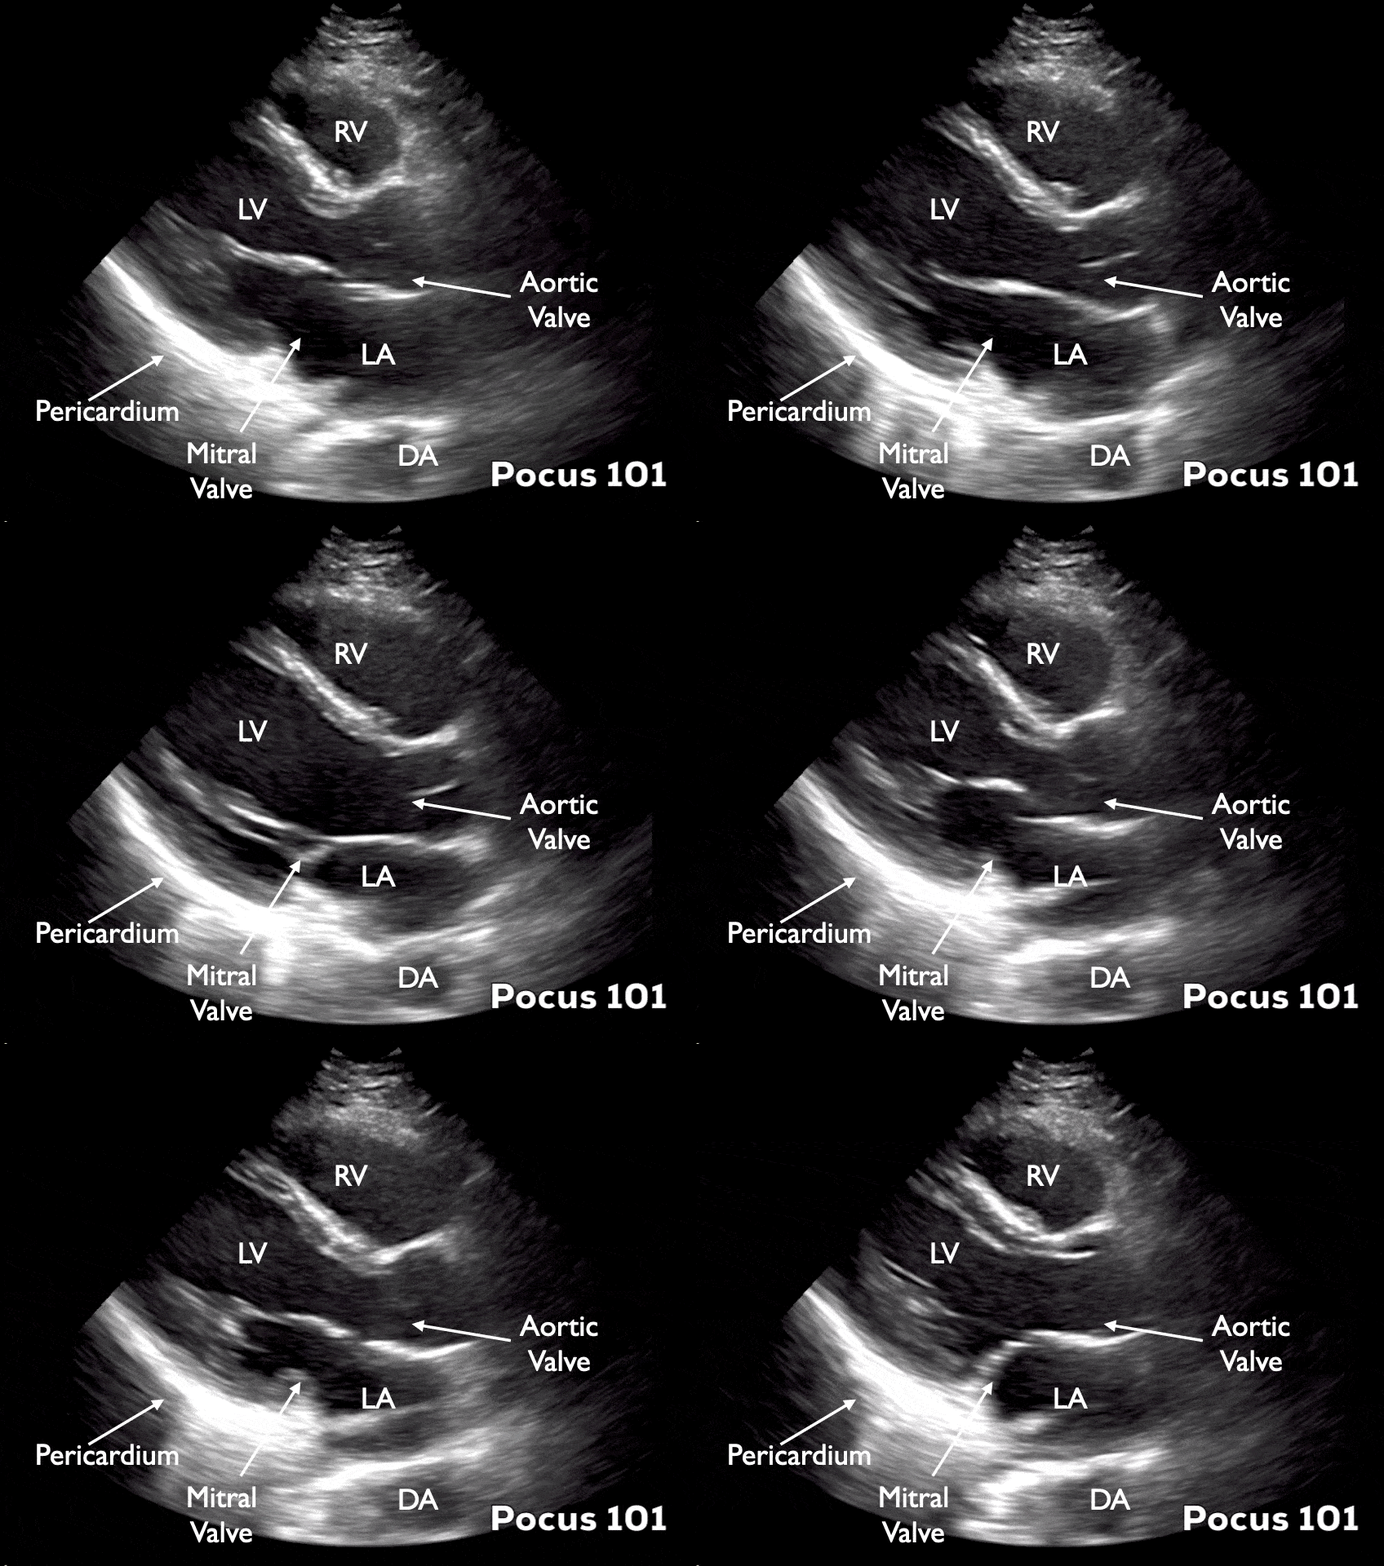
Structures to identify in the Parasternal Long Axis (PSLA) View:
- RV: Right Ventricle
- LV: Left Ventricle
- LA: Left Atrium
- AV: Aortic Valve
- MV: Mitral Valve
- AO: Aorta
- DA: Descending Aorta
- Pericardium

- Optimize the gain to visualize the different chambers of the heart in view
- Optimize the depth to makes sure you can see the Descending Aorta.
- POCUS 101 TIP: If you are having trouble orienting yourself, just remember “the 3 L‘s“: For the Parasternal Long Axis view, the Left Ventricle is on the Left side of the screen.
Video Summary of the Parasternal Long Axis (PSLA) View
Here is a video we made summarizing exactly how to get the Parasternal Long Axis view on transthoracic echocardiogram (TTE):
Step 2: Parasternal Short Axis (PSSA) View
The Parasternal Short Axis view is often abbreviated as PSSA or PSAX.
- From the Parasternal Long Axis view, rotate your probe 90 degrees clockwise so that the indicator is now pointing towards the patient’s left shoulder.

We will go over the three main levels of the Parasternal Short Axis (PSSA) view you can see:
- Mid-Papillary Level
- Mitral Valve Level (Fish mouth view)
- Aortic Valve Level (Mercedes Benz view)
Here is a quick overview of the Parasternal Short Axis levels we will be covering:

Parasternal Short Axis – Mid-Papillary Level
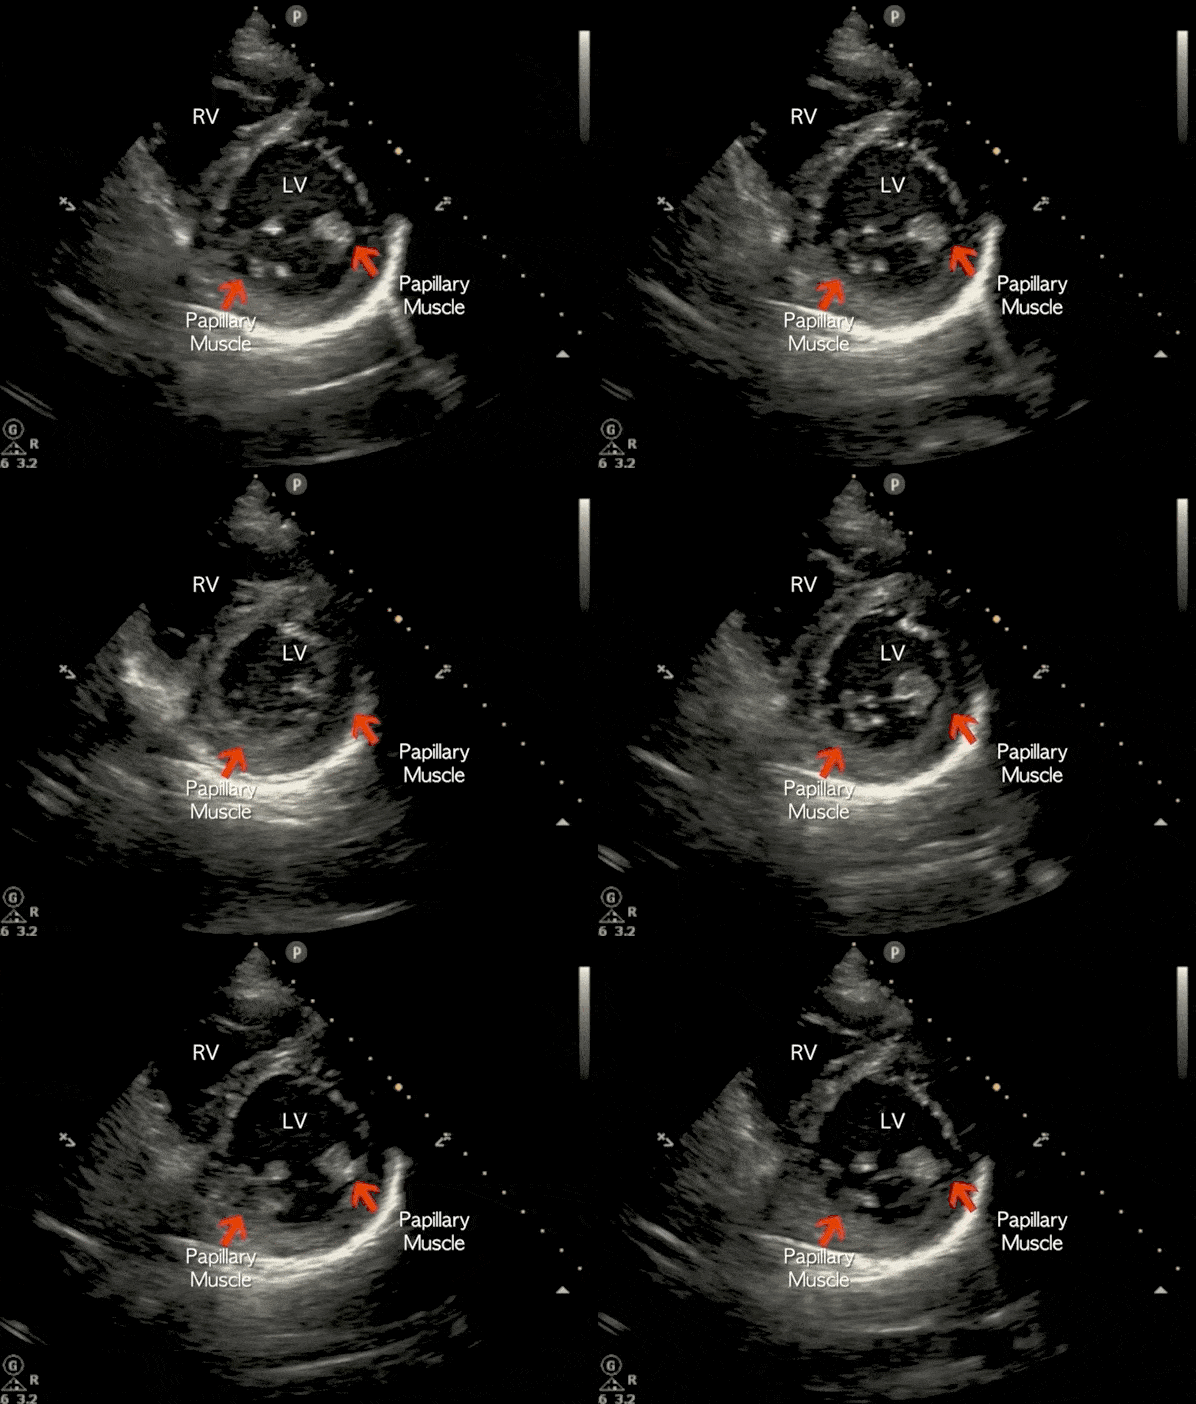
The first Parasternal Short Axis view on echocardiography you should focus on is the Mid-Papillary level. The Mid-Papillary level gives you information regarding overall ejection fraction, right ventricular dysfunction, and left ventricular regional wall motion abnormalities.

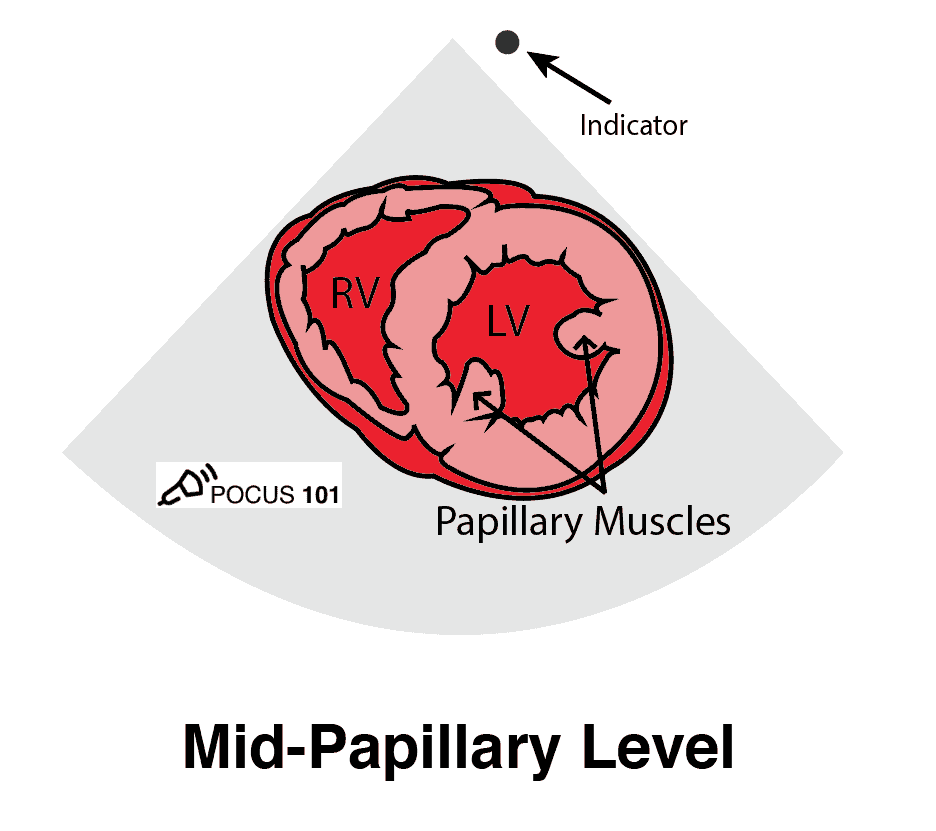
Structures to identify in the Parasternal Short Axis (PSSA) Mid-Papillary Level:
- RV: Right Ventricle
- LV: Left Ventricle
- Papillary Muscles
Parasternal Short Axis – Mitral Valve Level (Fish Mouth View)
The Mitral Valve level is common view seen and allows you to view the anterior and posterior valves of the mitral valve.
- To get the Mitral Valve level from the Mid-Papillary level, slide the Transducer towards the sternum towards the mitral valve (base of the heart).
- The Anterior and Posterior leaflets of the Mitral Valve should come into view.


Structures to identify in the Parasternal Short Axis (PSSA) Mitral Valve Level:
- RV: Right Ventricle
- LV: Left Ventricle
- MV: Mitral Valve (Anterior and Posterior leaflets)

Parasternal Short Axis – Aortic Valve Level (Mercedes Benz View)
The aortic valve level of the parasternal short axis view allows you to visualize the right ventricle, right atrium, left atrium, aortic valve, tricuspid valve, and pulmonic valve. You can use this view to perform some advanced Point of Care Ultrasound (POCUS) applications such as evaluation of a bicuspid aortic valve, the severity of aortic stenosis, tricuspid regurgitation, and measuring of pulmonary pressures.
- To get the Aortic Valve level from the Mitral Valve level, tilt the tail of the probe inferiorly and point it towards the Aortic Valve.
- As you do so the Aortic Valve should come into view with its leaflets representing the “Mercedes Benz Sign.”


Structures to identify in the Parasternal Short Axis (PSSA) Aortic Valve Level:
- RV: Right Ventricle
- TV: Tricuspid Valve
- AV: Aortic Valve
- PV: Pulmonic Valve
- RVOT: Right Ventricular Outflow Tract
- RA: Right Atrium
- LA: Left Atrium

Video Summary of the Parasternal Short Axis Views
Step 3: Apical Views
The Apical Views are some of the most important views to be able to obtain when doing hemodynamic assessment of the heart. This includes looking at diastolic dysfunction, valvular regurgitation, cardiac output, etc.
Unfortunately, it can be one of the most challenging views to obtain when first starting out. In this section, we will show you exactly how to get the mail apical views including the apical 4 chamber view, 5 chamber view, and the coronary sinus view.
Apical 4 Chamber (A4C) View
- From the Parasternal Short Axis View, slide the Transducer towards the apex of the heart keeping the indicator pointed towards the patient’s left side.
- Once you reach the apex of the heart, as indicated by the left ventricle decreasing in size, tilt the tail of the probe down towards the patient’s foot.
- For females, the Point of Maximal Impulse (PMI) is usually just under their left breast.
- As you do this the Apical Four Chamber view should appear.

Structures to identify in the Apical 4 Chamber (A4C) View:
- LV: Left Ventricle
- RV: Right Ventricle
- LA: Left Atrium
- RA: Right Atrium
- TV: Tricuspid Valve
- MV: Mitral Valve
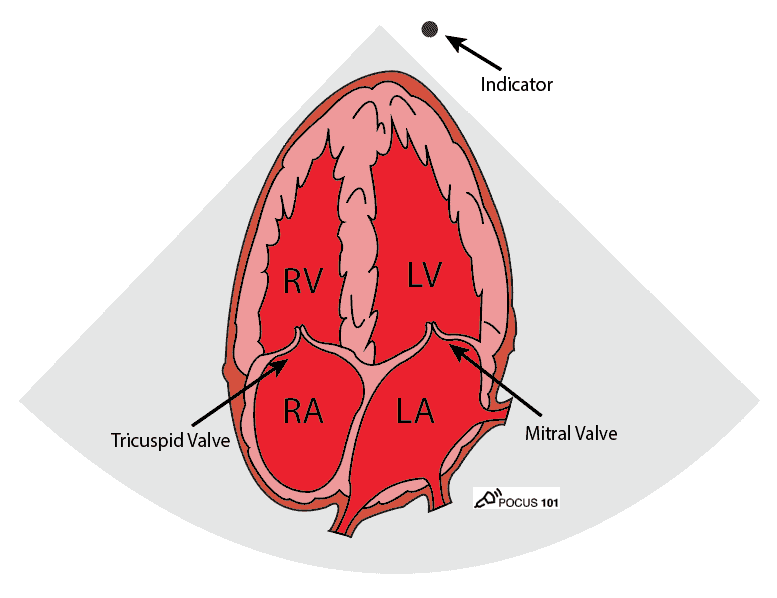
- Optimize the gain and depth to visualize the 4 chambers of the heart.
- POCUS 101 TIP: If you are having trouble getting the Apical 4 Chamber view, try placing the patient in the left lateral decubitus position. It will reduce lung artifact and bring the heart more proximal to your ultrasound probe, usually giving you an optimal view.
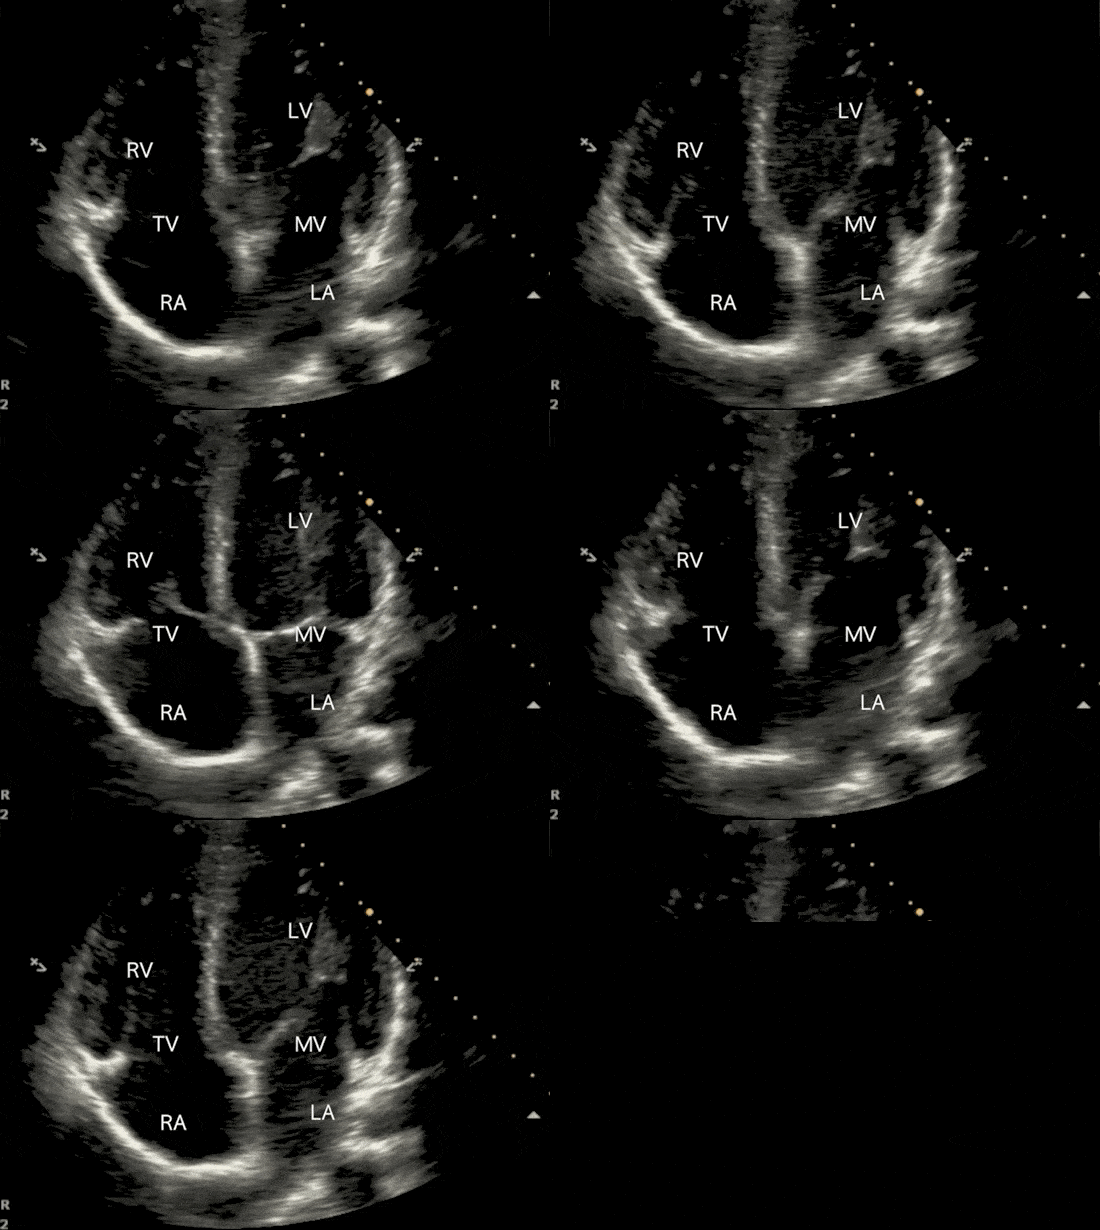
Since the Apical 4 Chamber view can be a challenging view to obtain, you will most likely encounter variants of the apical view including the Apical 5 chamber view and the coronary sinus view. We will go over these views below.
Apical 5 Chamber (A5C) View
- A common view produced when attempting to do the apical 4 chamber view is the “Apical 5 Chamber View.”
- Of course, there are not really 5 chambers in the heart but in echocardiography, the “5th chamber” is when you can see the appearance of the aortic valve and the left ventricular outflow tract.
- Sometimes you will want to intentionally obtain this view in order to calculate the cardiac output of the left heart.
- From the Apical 4 Chamber view, slightly tilt the tail of your probe towards the patient’s feet to get the Apical 5 chamber view. If you want to go back to the Apical 4 chamber view just tilt the probe tail back towards the patient’s head. Often the difference between the two views is just a 5-10 degree tilt!


Coronary Sinus View
- Another common view produced by novice sonographers when attempting to do the apical 4 chamber view is the Coronary Sinus View. You will rarely intentionally need to get this view and it is important to know what to do if you see this view.
- The coronary sinus view will give the appearance of an atrial septal defect between the right and left atrium. Don’t be fooled by this.
- The reason the Coronary Sinus view is coming into view and not the Apical 4 chamber is because the tail of your transducer is tilted too much towards the patient’s head. Tilt your probe tail slightly towards the patient’s feet and it should give you the apical 4 chamber view.

Video Summary of Apical Views
To put everything together, we made this video summarizing how to get the Apical 4 Chamber view as well as the Apical 5 Chamber and coronary sinus views.
Step 4: Subxiphoid (Subcostal) View
The Subxiphoid or “Subcostal” view allows you to see similar structures as the Apical 4 Chamber view but just approached from a different angle. This Subxiphoid view is useful when you are having difficulty getting adequate parasternal views (i.e. COPD patients) or when you are evaluating a trauma patient when doing the eFAST scan.
- With the patient’s knees bent, position the probe under the costal arch (beneath the xiphoid process) with the indicator pointing towards the patient’s left.
- Since the plane of the heart is superficial, you need to use an overhand grip on the probe in order to be parallel with the skin

Structures to identify in the Subxiphoid (Subcostal) View:
- RV: Right Ventricle
- LV: Left Ventricle
- TV: Tricuspid Valve
- MV: Mitral Valve
- LA: Left Atrium
- RA: Right Atrium
- Pericardium

- Make sure to use the Liver as an acoustic window!
- If you approach from the left side your view will be obstructed by the stomach or bowel gas.
- If you are still having trouble getting a clear image, try applying gentle downward pressure on the probe.

Video Summary of Subxiphoid (Subcostal) View
Step 5: Inferior Vena Cava (IVC) View
Evaluating the Inferior Vena Cava (IVC) with ultrasound is one of the most commonly used Point of Care Ultrasound (POCUS) applications. It is a great way to estimate central venous pressure (CVP) and fluid tolerance.
- From the Subxiphoid view with the patient still in the supinated position with knees bent, keep the right atrium in view.
- Locate the Inferior Vena Cava within the Liver and center it on the ultrasound screen.
- Once the IVC is centered on the screen, rotate the transducer clockwise (to your right) to bring the indicator down toward the feet (play the instructional video).
- This will give a longitudinal view of the Inferior Vena Cava entering the Right Atrium.


Structures to identify in the Inferior Vena Cava (IVC) View:
- IVC: Inferior Vena Cava
- RA: Right atrium
- HV: Hepatic Vein (sometimes seen)

Assessing for IVC Collapsibility:
- After you obtain the IVC view you will need to assess for IVC collapsibility in either your spontaneously breathing or ventilated patients.
- For Spontaneously Breathing Patients: have them take a deep breath or have them sniff in. The maximum IVC diameter will be seen during expiration and the minimum IVC diameter will be seen during inspiration for these patients.
- For Ventilated Patients: The positive pressure from the ventilator will have the opposite effect on the IVC compared to spontaneously breathing patients. The maximum IVC diameter will be seen during inspiration and the minimum IVC diameter will be seen during expiration for these patients.

Video Summary of IVC View:
This video summarizes how to obtain the IVC view. Of note, the orientation used in the video below is the standard orientation (orientation marker towards the left of the screen). If you are using the cardiac orientation then your indicator will just need to be rotated 180 degrees.
Cardiac Ultrasound (Echo) Pathology
Using bedside echocardiography (echo) is one of the most useful Point of Care Ultrasound (POCUS) applications. It can help you assess the hemodynamic status of your patients, estimate fluid status, and look for life-threatening causes of shock such as tamponade or pulmonary embolism. In this section, we will show you how to use cardiac ultrasound to help you in your daily practice.
Central Venous Pressure (CVP) Estimation
Ultrasound of the Inferior Vena Cava (IVC) can be used to estimate the central venous pressure (CVP) of a patient by looking at the size (diameter) and collapsibility of the IVC. This is especially useful when you are trying to evaluate fluid tolerance or the presence of venous congestion in your patients.
Here is a simplified and practical table you can use to interpret your IVC findings.
| IVC Size | IVC Collapsibility | Interpretation (CVP) |
| < 1.5cm | >50% collapsibility | 0-5 mm Hg (Low CVP) |
| < 1.5-2.5cm | >50% collapsibility | 6-10 mm Hg |
| 1.5-2.5cm | <50% collapsibility | 11-15 mm Hg |
| >2.5cm | <50% collapsibility | 16-20 mm Hg (High CVP) |
The caveat about IVC measurements is that it just gives you a static measurement to estimate the central venous pressure. So all of the limitations of using CVP will also pertain to IVC measurements.
We find it most useful when the IVC either estimates a low CVP or high CVP. The measurements in between can be considered indeterminate and more advanced hemodynamics measurements should be obtained to assess for venous congestion and fluid responsiveness (change in cardiac output)


Left Ventricular Function/ Ejection Fraction
Patients with Systolic Heart Failure also known as “Heart Failure with Reduced Heart Function (HFrHF)” will commonly present with shortness of breath, orthopnea, paroxysmal nocturnal dyspnea (PND), exercise intolerance, irregular heartbeats, and edema in the bilateral upper and lower extremities. This is usually accompanied by cardiogenic pulmonary edema and B-lines on ultrasound.
One of the most commonly used surrogates in assessing systolic function in these patients is done by measuring the Left Ventricular Ejection Fraction. For a more COMPLETE tutorial on qualitative and quantitative evaluation of Ejection Fraction Click HERE.
Ejection fraction (EF) in percentage is defined as: EF(%) = SV/EDV x 100
Where SV: Stroke Volume and EDV: End Diastolic Volume
Ejection fraction (EF) is basically a percentage, of how much blood the left ventricle pumps out with each contraction. For example, an ejection fraction of 60 percent means that 60 percent of the total amount of blood in the left ventricle is pushed out during each systolic contraction
| Hyperdynamic | Normal | Mildly Reduced | Moderately Reduced | Severely Reduced | |
| Ejection Fraction | >70% | 55-69% | 45-54% | 30-44% | <30% |
Measuring Ejection Fraction on ultrasound can be approached either qualitatively or quantitatively. In this post, we will go over the qualitative technique to assess ejection fraction.
Qualitative Approach to Assessing Ejection Fraction:
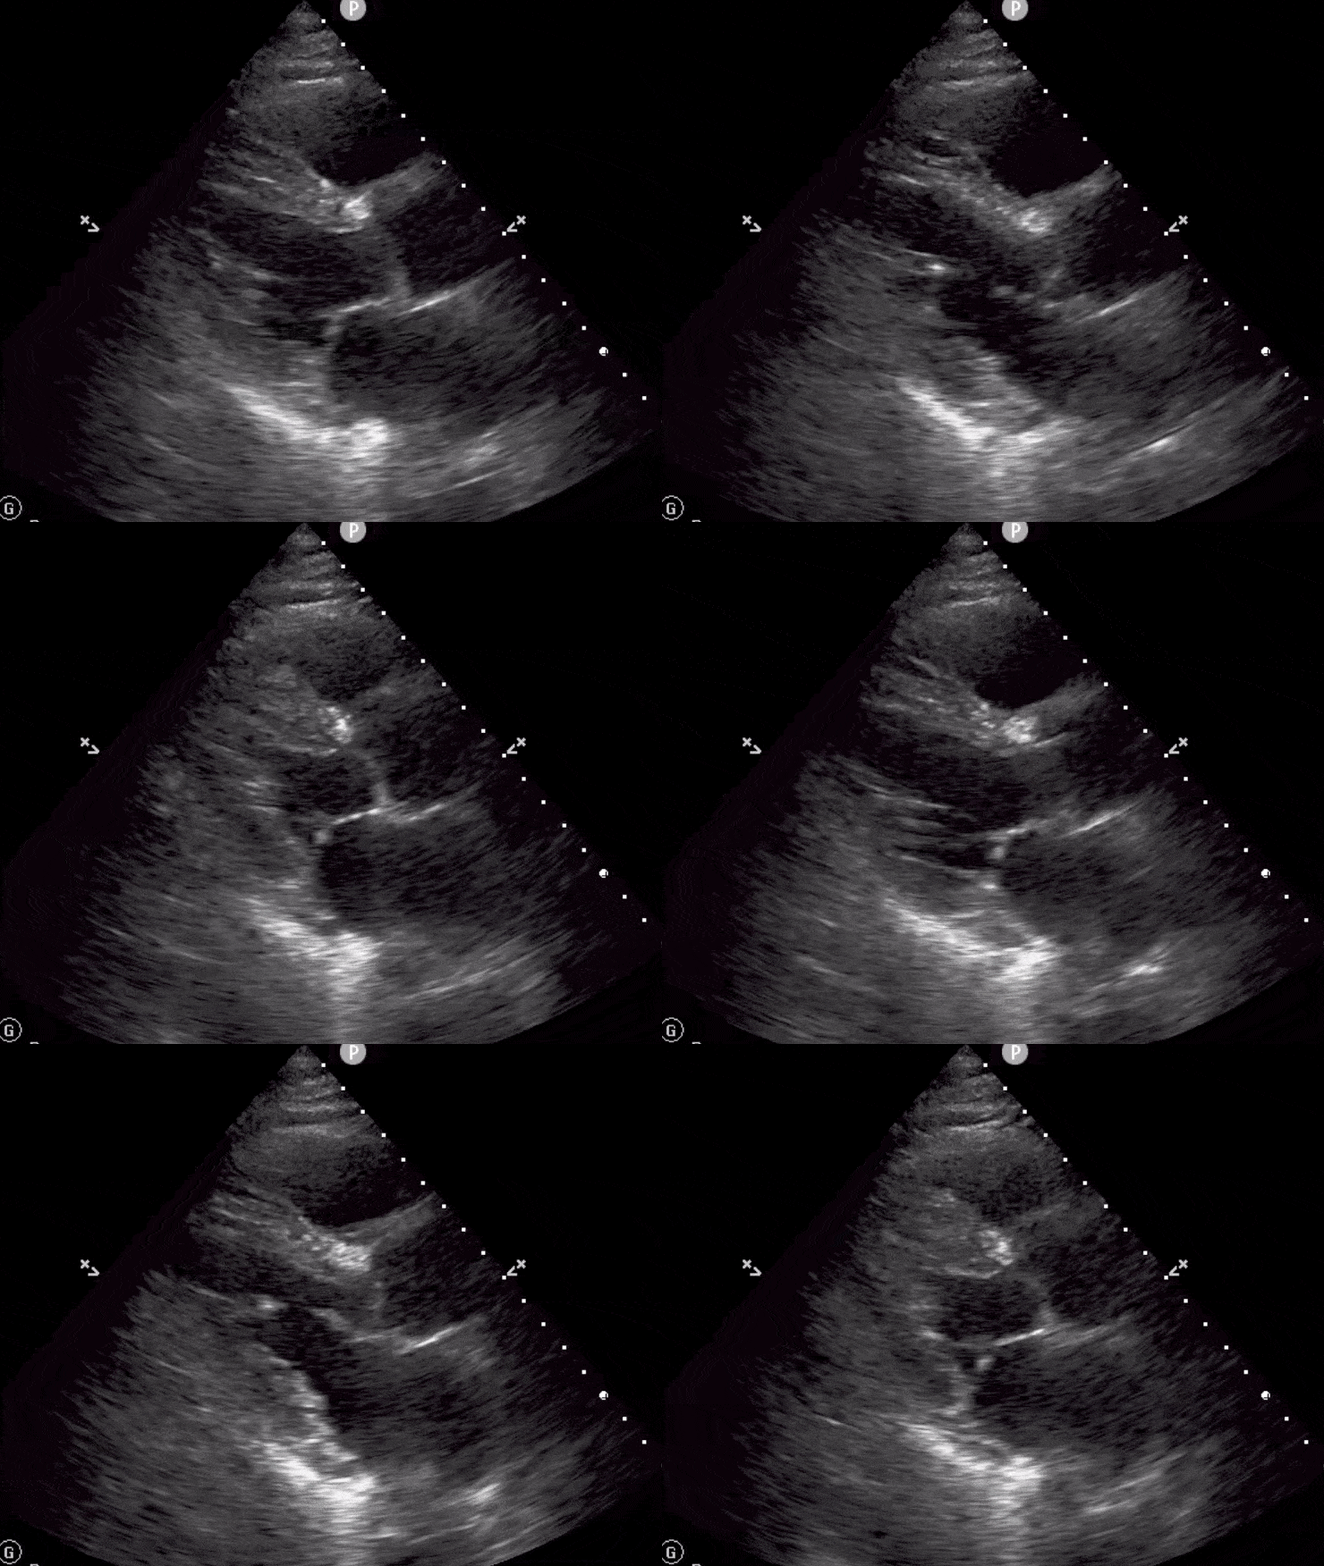
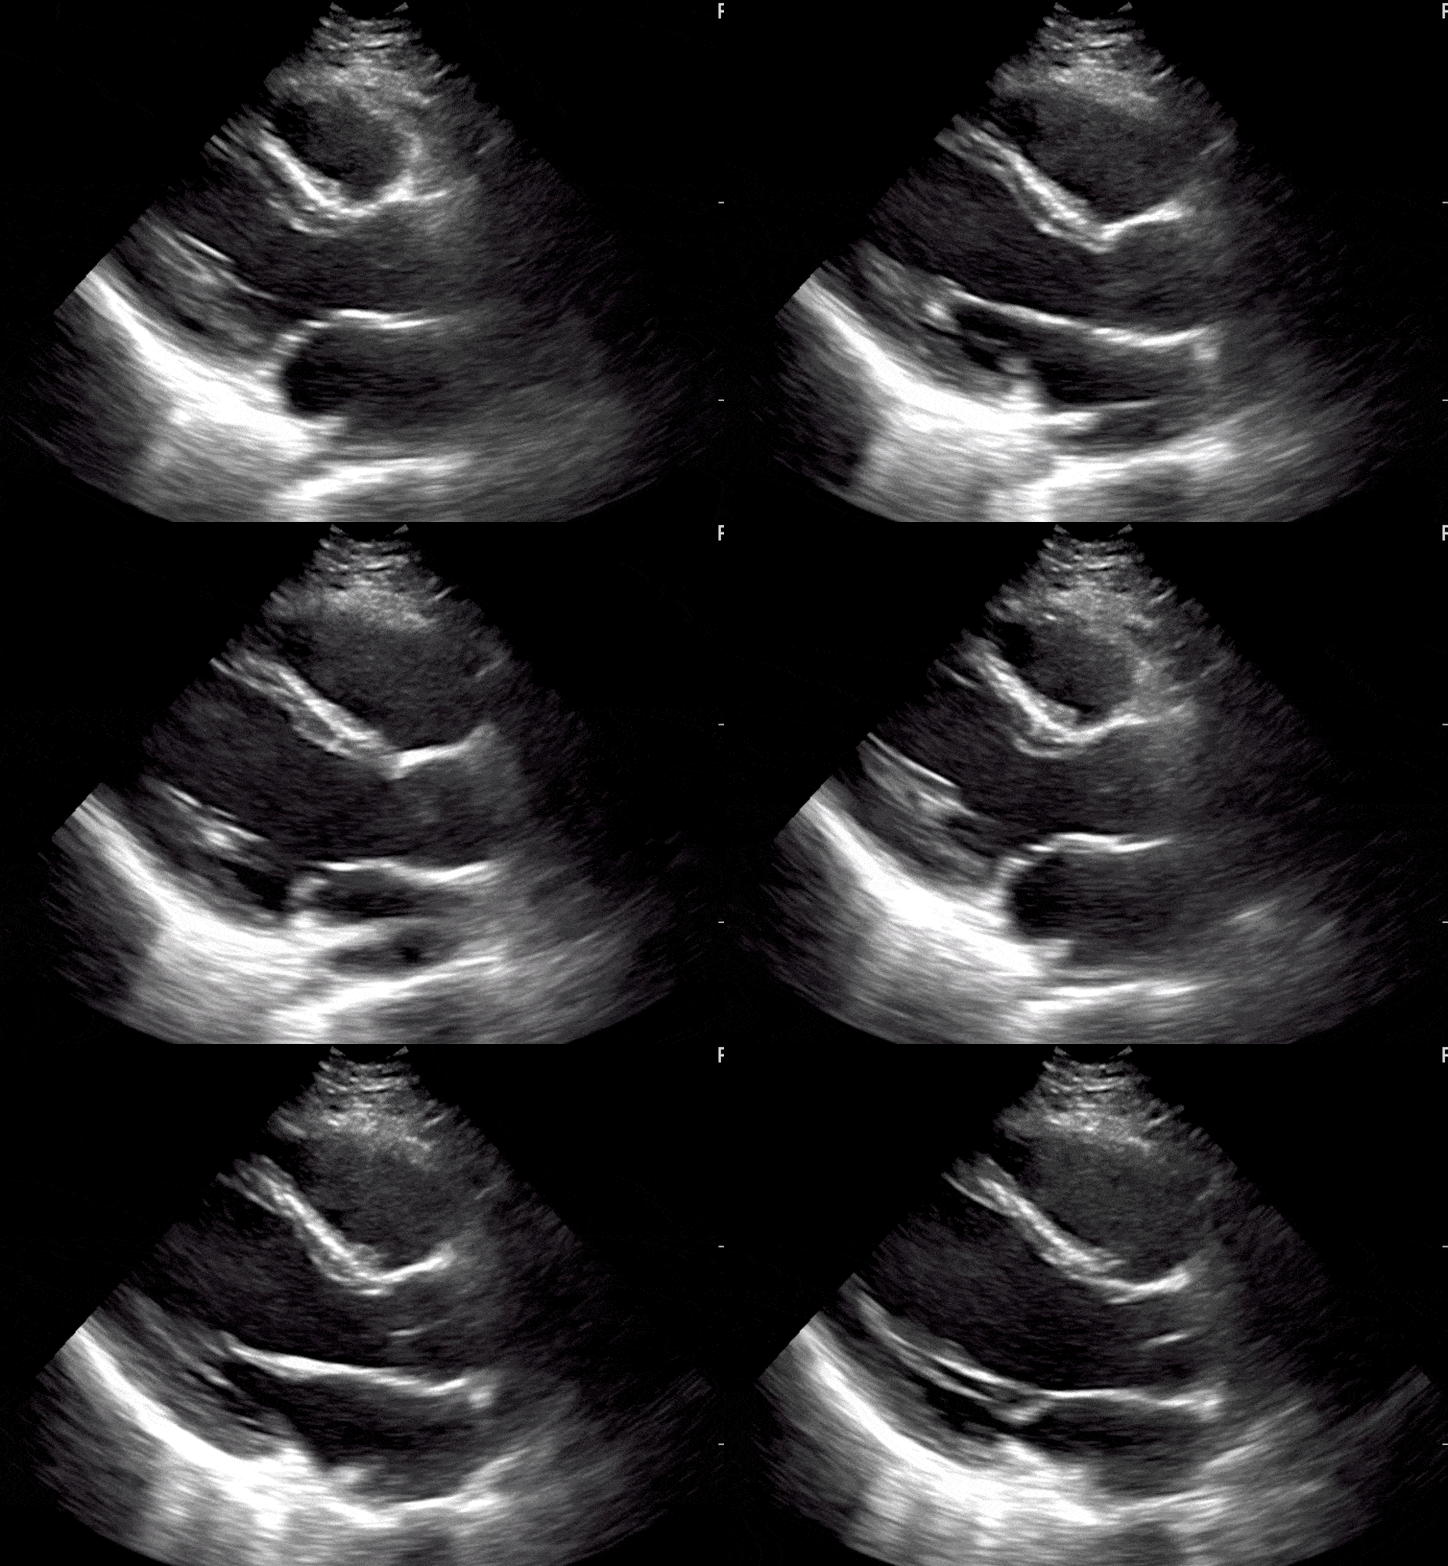
- Look at how well the left ventricle walls are moving. Are they coming close to each other during systole?
- Look at how well the anterior mitral valve leaflet is moving. Is it coming close to the ventricular septum during diastole?
If the left ventricular walls are moving well and coming close together during systole and the anterior mitral valve leaflet is almost touching the septum during diastole then the patient likely has a normal ejection fraction.
Conversely if the left ventricular walls are barely moving during systole and the anterior mitral valve leaflet is barely moving during diastole the patient likely has a low ejection fraction.
Here are cardiac ultrasound (echo) images of patients with different degrees of ejection fraction from hyperdynamic to severely reduced:
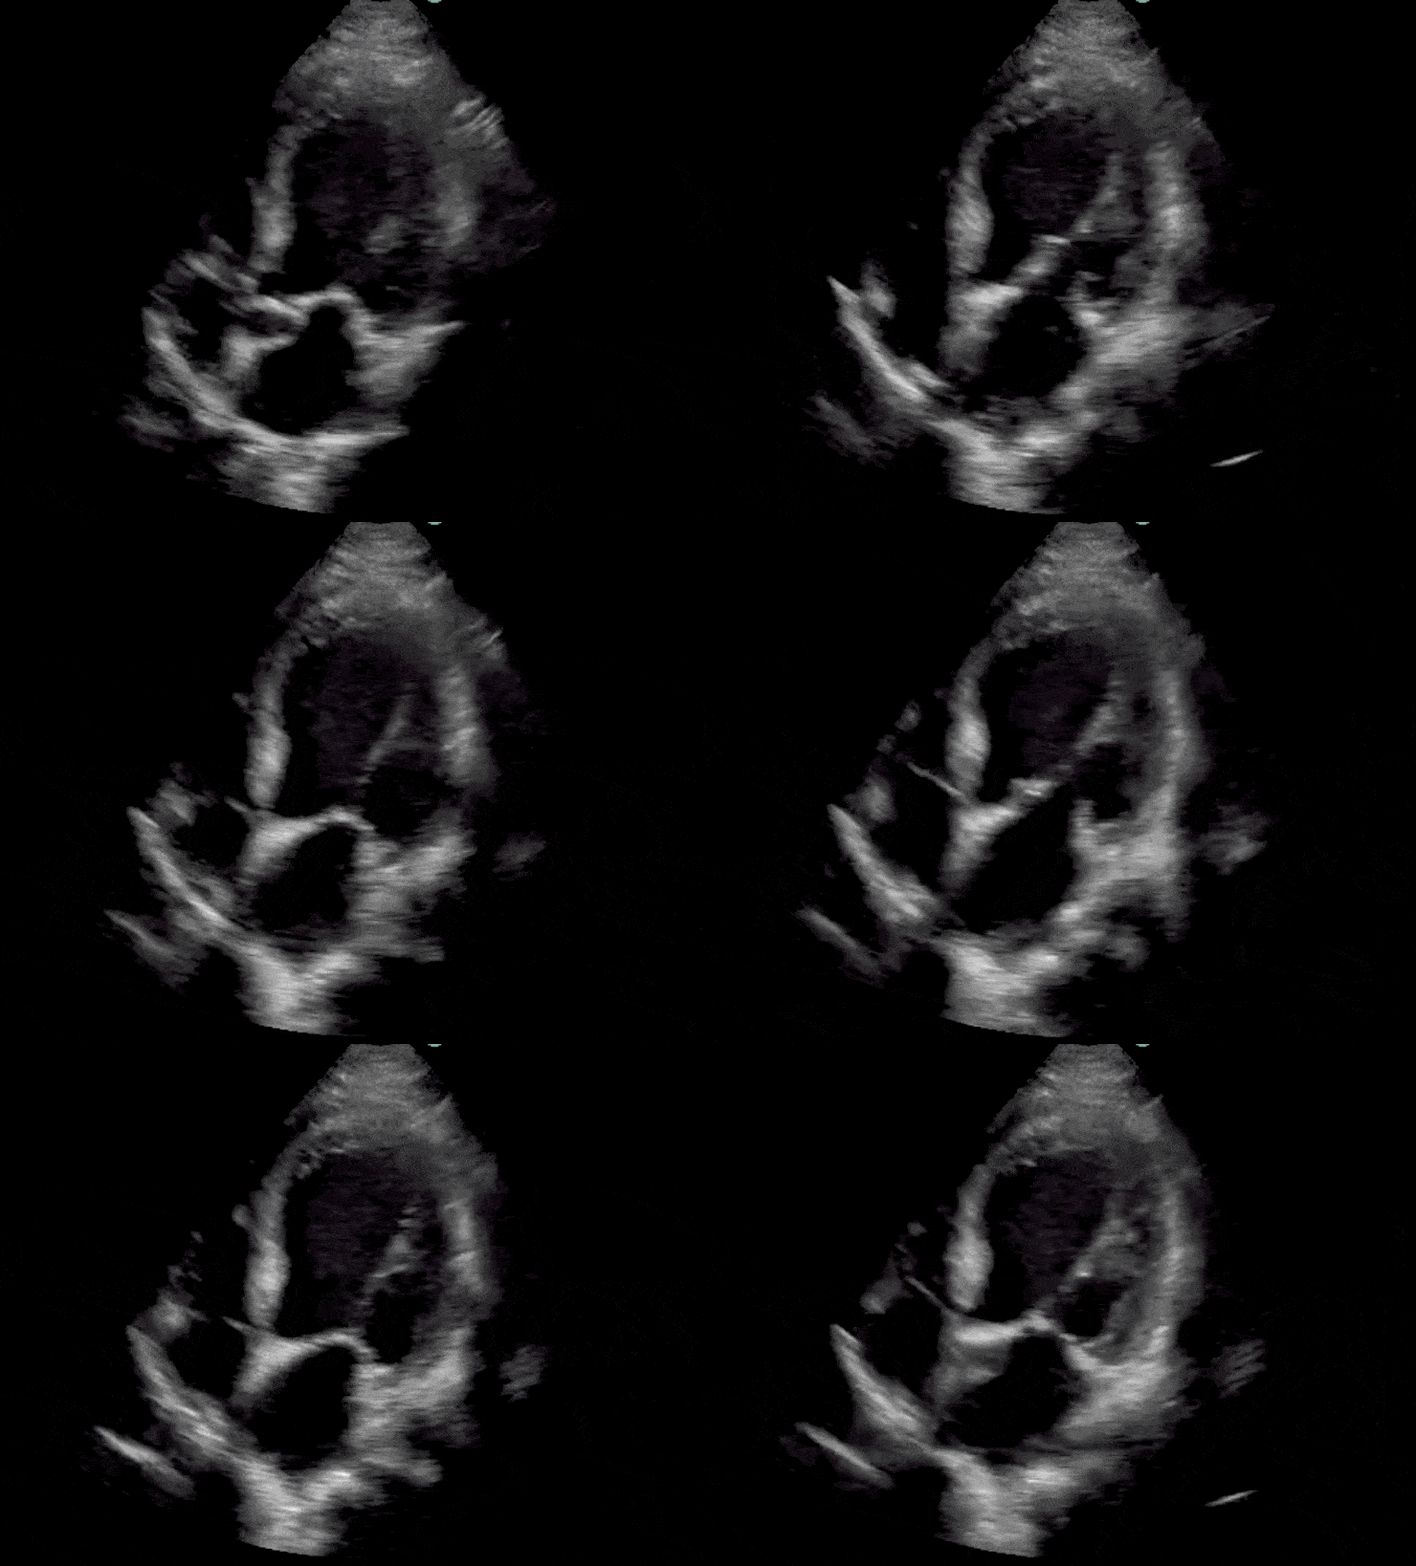
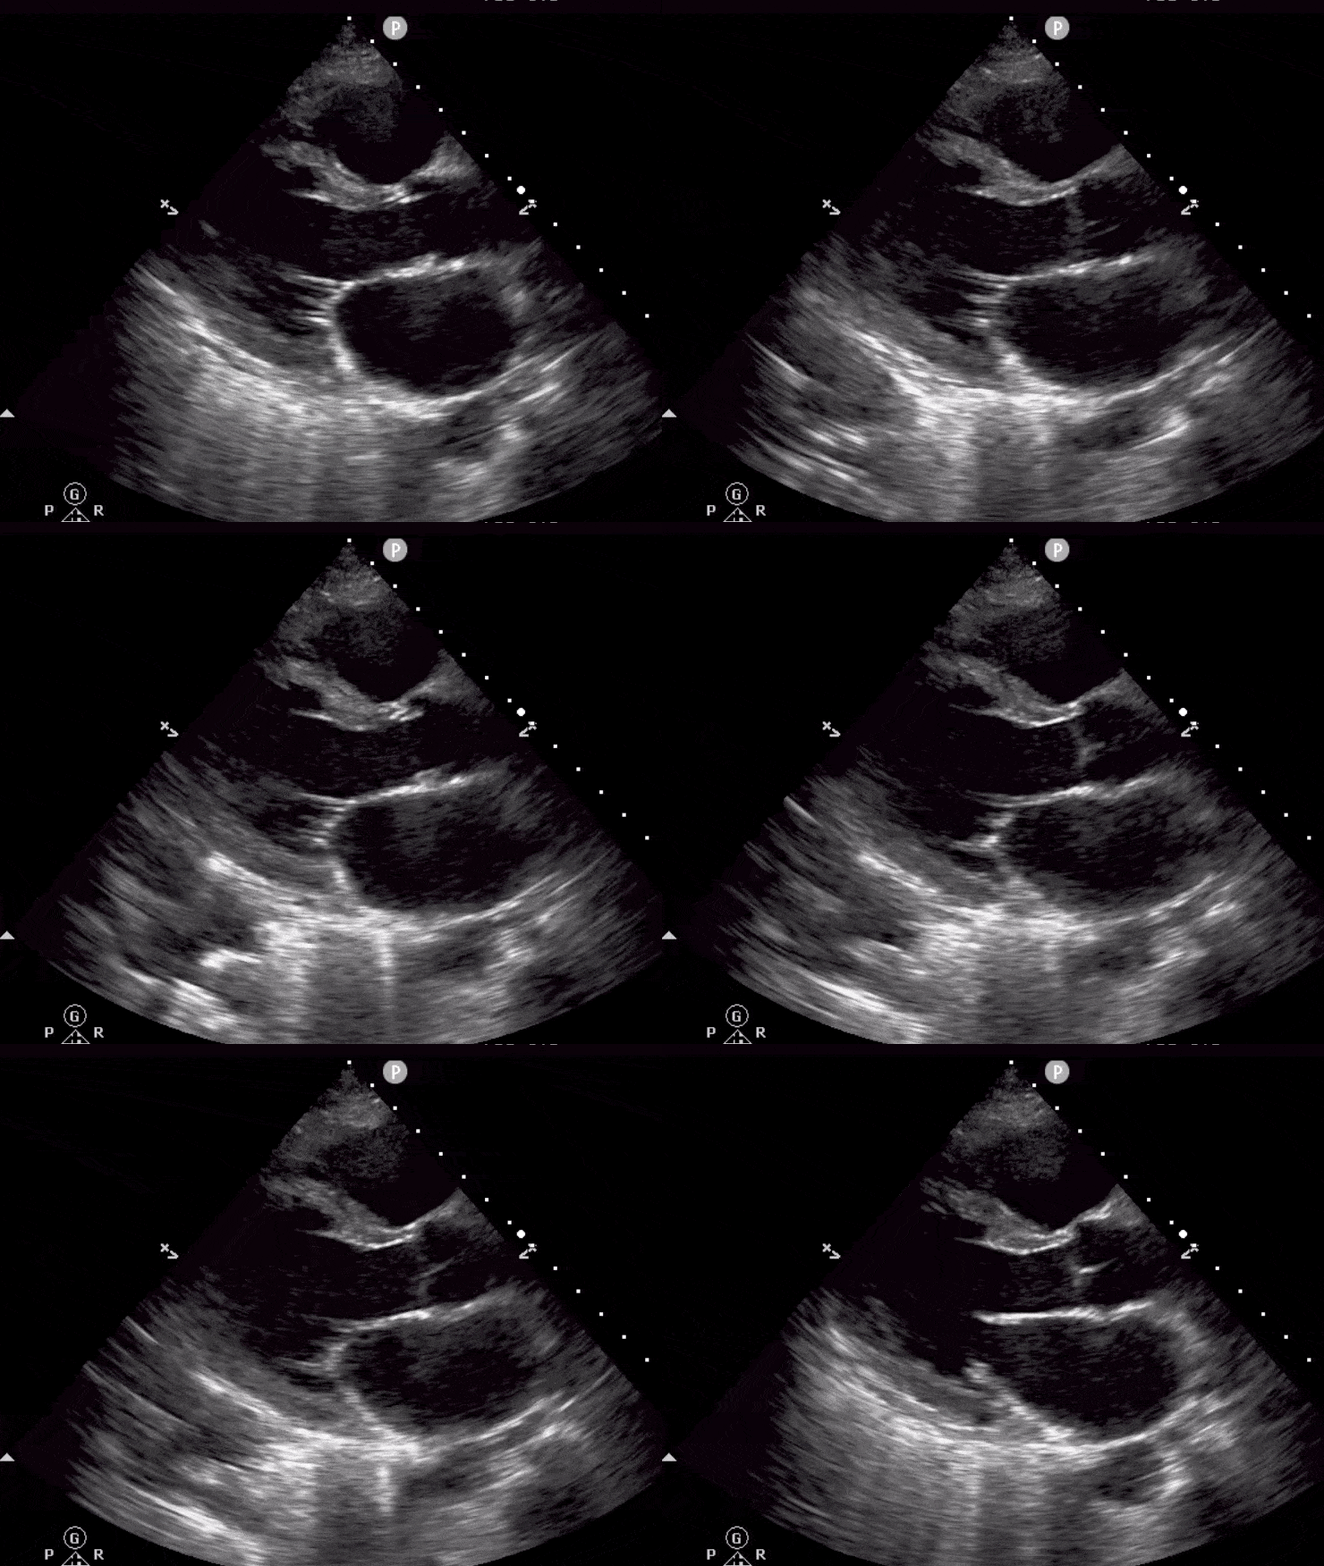
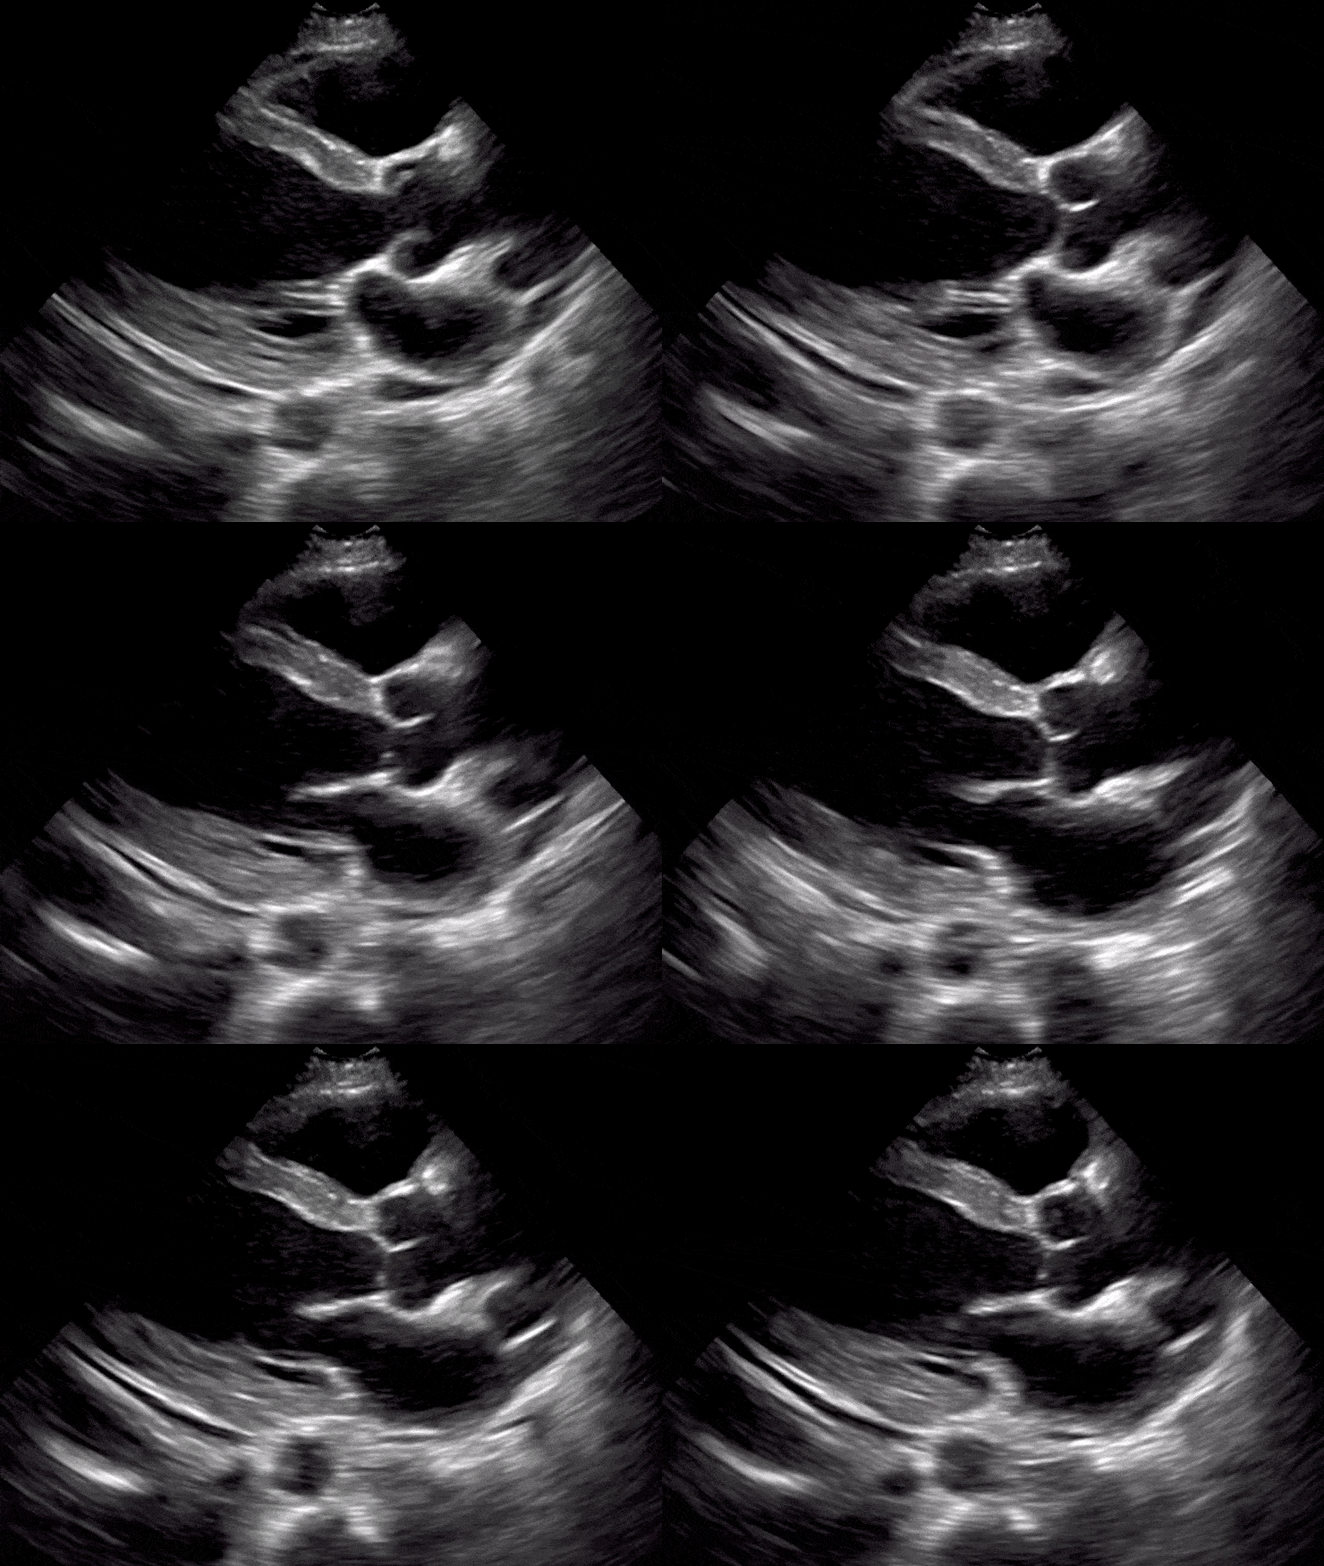
Pulmonary Embolism (PE)
A Pulmonary Embolism is a blood clot that has dislodged from a distal site which has lodged into one of the pulmonary arteries. Predominantly the clot originates from a deep vein thrombosis (DVT) in the lower extremities where it will travel in the venous circulation, enters the right side of the heart, and eventually into the pulmonary arteries. Learn how to perform DVT Ultrasound here.
Considering the rapid onset/timing of a Pulmonary embolism, patients typically show symptoms or complain of chest pain, shortness of breath, cough, hemoptysis, or even syncope. Risk factors include cancer, oral contraceptive (OCP) or hormone replacement therapy (HRT), immobility, and recent travel.
Here are the different types of pulmonary embolism you may encounter:
- Submassive Embolism– Submassive (or intermediate-risk) PE refers to those patients with acute PE without systemic hypotension but with evidence of either right ventricle (RV) dysfunction or myocardial necrosis. RV dysfunction is characterized by RV dilation, hypokinesis, or elevation of brain natriuretic peptide (BNP); myocardial necrosis is suggested by elevated troponin. There is evidence that these patients may possibly benefit from “half dose” thrombolytic therapy.
- Massive Pulmonary Embolism-Massive (or high-risk) PE is a term used to designate patients with right ventricular dysfunction and sustained hypotension (systolic blood pressure <90 mmHg for at least 15 minutes or requiring inotropic support, not due to a cause other than PE). These patients may benefit from thrombolytic therapy.
- Saddle Embolism-A Saddle is a large pulmonary embolism that straddles the bifurcation of the pulmonary trunk, extending into both the left and right pulmonary arteries. Although it only occurs in about 2-5% of all pulmonary embolism, Saddle Embolisms can completely obstruct both left and right pulmonary arteries resulting in right heart failure and, unless treatment is prompt, death.
Bedside echo is extremely valuable in risk stratifying patients with pulmonary embolism to see if they may benefit from anticoagulation or thrombolytic therapy.
Ultrasound findings of Pulmonary Embolism:
The most definitive way to diagnose a pulmonary embolism is to directly visualize the clot either in the pulmonary artery itself or as a clot in transit.

Unfortunately directly visualizing a clot in the heart or pulmonary artery is a rare finding. Most of the echocardiography findings for pulmonary embolism are “indirect signs” that evaluate for the dysfunction of the right ventricle from a significant clot burden. Usually, this is seen as an enlarged right ventricle.
The two most common and easy to recognize signs to look for right ventricular dysfunction on echo are the “D Sign” and McConnell’s sign.
The “D Sign” on Echocardiography
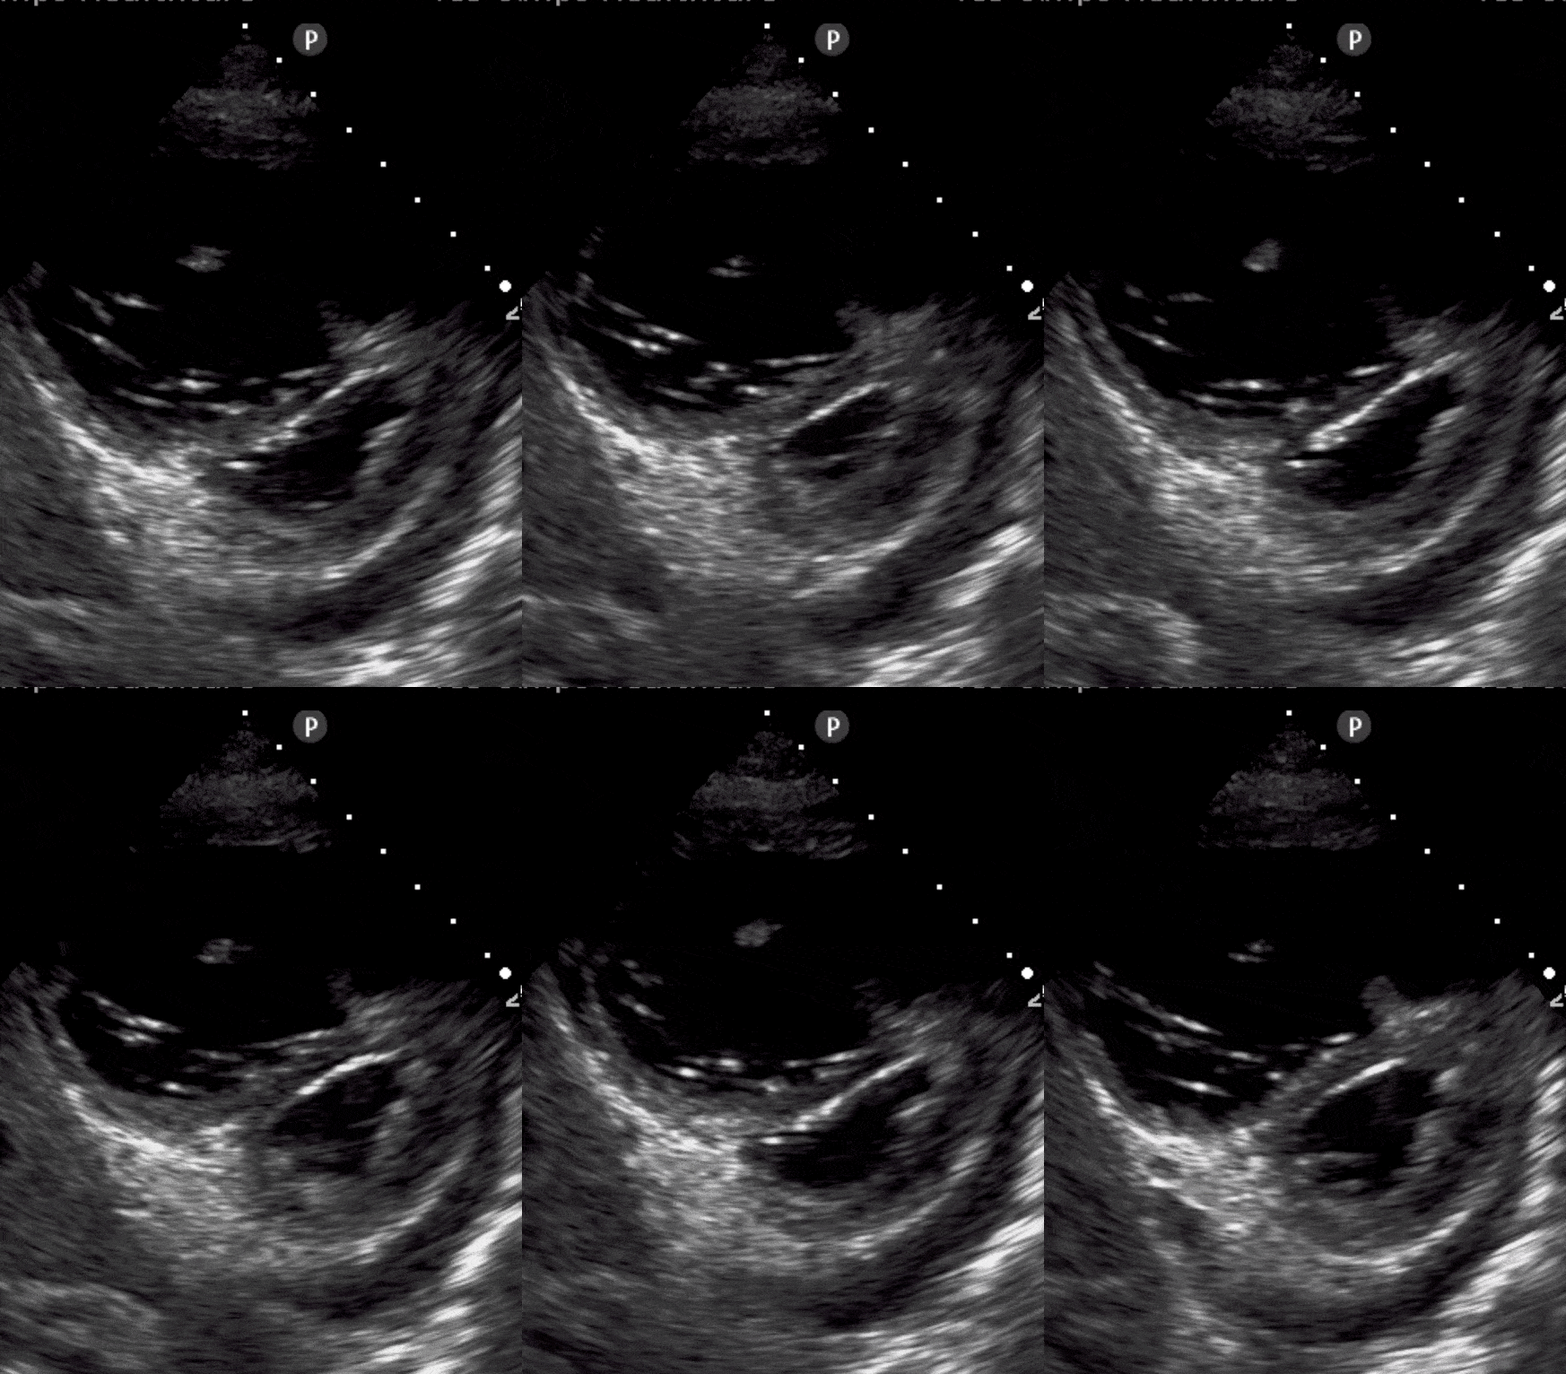
- The “D Sign” is an ultrasound/echo finding that shows the left ventricle as a D-shaped structure. It is a result of right ventricular strain causing a shift of the septum towards the left side of the heart.
- For a complete guide on evaluating the “D Sign” on echocardiography click here.
“McConnell’s Sign” on Echocardiography
- McConnell’s sign is where there is akinesia of the right ventricular lateral wall with hyperdynamic appearance of the right ventricular apical wall.

Pericardial Effusion
A Pericardial Effusion is when there is a collection of excess fluid within the pericardial cavity. When enough pressure builds up from a pericardial effusion, it can turn into Cardiac Tamponade.
Patients with Pericardial effusion will typically present with exercise intolerance, tachycardia, pleural friction rub, tachypnea, shortness of breath, and chest pain. The causes of a pericardial effusion can be from various causes including pericarditis, myopericarditis, uremia, malignancy, infections, rheumatologic, etc.
An important point you must remember about Pericardial effusions is that is it not just based on size, the deleterious effects of pericardial effusions are actually more dependent on how quickly a pericardial effusion accumulates rather than it’s size.
In the figure below, a rapidly accumulating pericardial effusion can increase the pericardial pressures significantly and lead to cardiac tamponade despite a relatively small size. Conversely, an end-stage renal disease patient can have a chronic pericardial effusion that slowly accumulates with over 200-400 ml with no hemodynamic consequences.

Ultrasound Findings of Pericardial Effusion:
- The parasternal long-axis and subcostal four-chamber views are typically favored for inspection of pericardial effusions
- The Descending aorta is a distinguishing landmark used to distinguish between a Pericardial Effusion and a pleural effusion
- A pericardial effusion will appear anterior to the descending aorta whereas a pleural effusion will appear posterior to the descending aorta.


The cardiac ultrasound image below shows both a pericardial effusion (anterior to the descending aorta) and a pleural effusion (posterior to the descending aorta).

Pericardial effusion vs Pericardial Fat Pad
Being able to determine the difference between a Pericardial Effusion and a Pericardial Fat Pad is important as they may have similar sonographic appearances.
- Pericardial fat pads are usually located anteriorly and can usually be seen on the Parasternal Long Axis view.
- Pericardial fat pads are usually not completely anechoic and can appear to have striations.
- Lastly, pericardial fat pads can usually be seen to move with the motion of the heart.
- If you are in doubt, ask another more experienced POCUS user to look at it or order a formal echo to clarify if needed.

Cardiac Tamponade
Cardiac Tamponade occurs when the pericardial pressure exceeds the pressure of the right atrium or right ventricle leading to decreased preload of the left ventricle and eventually a drop in cardiac output/blood pressure. It is considered an obstructive type of shock.
Recall that cardiac tamponade is more dependent on the rate of pericardial fluid accumulation versus the actual size.
On physical exam you may see Beck’s Triad defined as hypotension, jugular venous distension, and muffled heart sounds. You can also detect pulsus paradoxus as well. However, other diagnoses can cause false positives for these findings including severe COPD, tension pneumothorax, or other causes of obstructive shock.
Point of Care Ultrasound can offer a more definitive diagnoses of pericardial effusion and cardiac tamponade.
Ultrasound Findings of Cardiac Tamponade:
Using transthoracic echocardiography (TTE) you can see if the pericardial pressure exceed the right atrial or right ventricular pressures.
Since the lowest pressures in the heart is the right atrium, the first echo sign you will see of cardiac tamponade is right atrial systolic collapse.
The second echo sign you will see in cardiac tamponade is right ventricular diastolic collapse.
Either of these signs are considered positive echocardiographic signs of cardiac tamponade.


Editor’s note: Keep in mind that there is a difference between echocardiographic and clinical cardiac tamponade. Echocardiographic cardiac tamponade just exams to see if the right heart (RA or RV) are affected, the echo can’t tell if your patient is actually hypotensive. Clinical cardiac tamponade requires the patient to be hypotensive and in shock. Even though the echocardiographic signs of cardiac tamponade will usually correlate clinically with a hypotensive patient, it is not always the case.
Video Summary of Cardiac Ultrasound (Echocardiography)
Here is a video we made that summarizes the cardiac ultrasound views and pathology:
References
- Hendrickson RG, Dean AJ, Costantino TG. A Novel use of ultrasound in pulseless electrical activity: The diagnosis of an acute abdominal aortic aneurysm rupture. J Emerg Med.2001;21:141-144.
- Willner, Daniel A. “Pericardial Effusion.” StatPearls [Internet]., U.S. National Library of Medicine, 27 Apr. 2020.
- McConnell MV;Solomon SD;Rayan ME;Come PC;Goldhaber SZ;Lee RT; “Regional Right Ventricular Dysfunction Detected by Echocardiography in Acute Pulmonary Embolism.” The American Journal of Cardiology, U.S. National Library of Medicine, 1996, pubmed.ncbi.nlm.nih.gov/8752195/.
- Kircher BJ, Himelman RB, Schiller NB.
Noninvasive estimation of right atrial pressures from the inspiratory collapse of the inferior vena cava. Am J Cardiol.1990;66:493-496. - Bahner DP.
Trinity, A hypotensive ultrasound protocol. JDMS.2002;18:193-198. - Otto CM.
Textbook of Clinical Echocardiography.W.B. Saunders: Philadelphia,3rd ed. 2004. - Moore CL, Rose GA, Tayal VS, Sullivan DM, Arrowood JA, Kline JA.
Determination of left ventricular function by emergency physician echocardiography of hypotensive patients. Acad Emerg Med.2002;9:186-193. - Blaivas M, Fox JC.
Outcome in cardiac arrest patients found to have cardiac standstill on the bedside emergency department echocardiogram. Acad Emerg Med.2001;8:616-621. - Salen P, O’Connor R, Sierzenski P, Passarello B, Pancu D, Melanson S, Arcona S, Reed J, Heller M.
Can cardiac sonography and capnography be used independently and in combination to predict resuscitation outcomes. Acad Emerg Med.2001;8:610-615. - Varriale P, Maldonado JM.
Echocardiographic observations during in-hospital cardiopulmonary resuscitation. Crit Care Med.1997;25:1717-20. - McKaigney CJ, Krantz MJ, La Rocque CL, et al. E-point septal separation: a bedside tool for emergency physician assessment of left ventricular ejection fraction. Am J Emerg Med. 2014; 32(6):493-497.
- “Ejection Fraction Heart Failure Measurement.” Www.heart.org, 2017, www.heart.org/en/health-topics/heart-failure/diagnosing-heart-failure/ejection-fraction-heart-failure-measurement.
- Ekman, Inger, et al. “Self-Assessed Symptoms in Chronic Heart Failure–Important Information for Clinical Management.” European Journal of Heart Failure, U.S. National Library of Medicine, Apr. 2007.
- Perrier, Arnaud, et al. “Diagnosing Pulmonary Embolism in Outpatients with Clinical Assessment, D-Dimer Measurement, Venous Ultrasound, and Helical Computed Tomography: a Multicenter Management Study.” The American Journal of Medicine, U.S. National Library of Medicine, 1 Mar. 2004.
- Jones, Jeremy. “Saddle Pulmonary Embolism: Radiology Reference Article.” Radiopaedia Blog RSS, radiopaedia.org/articles/saddle-pulmonary-embolism?lang=us.
- Zamorano JL, Bax JJ, Rademakers FE. The ESC Textbook of Cardiovascular Imaging. Springer Verlag. (2010) ISBN:1848824203
- Imazio M, Adler Y. Management of pericardial effusion. (2013) European heart journal. 34 (16): 1186-97. doi:10.1093/eurheartj/ehs372
- Goodman, Adam, et al. “The Role of Bedside Ultrasound in the Diagnosis of Pericardial Effusion and Cardiac Tamponade.” Journal of Emergencies, Trauma, and Shock, Medknow Publications & Media Pvt Ltd, Jan. 2012.
- Kircher, B., Himelman, R., Schiller, N. (1990). Noninvasive estimation of right atrial pressure from the inspiratory collapse of the inferior vena cava The American Journal of Cardiology 66(4), 493-496. https://dx.doi.org/10.1016/0002-9149(90)90711-9




This is so so helpful!
Thanks, Delcy!! Super glad you found it helpful!
I only searched for 1 echo related topic and this have given me so many more!!’ Thanks… this is so helpful and definitely a refresher!!!
Thanks so much for the comment Nikita!! So glad you found it helpful. Just trying our best to make user-friendly POCUS content 🙂 – Vi
its great ! thanks so much.
Thanks Turki! Glad you found it helpful!
Thank you!! It’s so nicely done! It helped me a lot! Great job !! Thank you very much!!🤓🤓
Absolutely. Thanks so much Anca!!
Thank you so much
Great work
Can I get a PDF of this , so I can print
Yes! Just click on the little printer icon that says “Print Ready” at the bottom of the post and it will convert to a PDF for you! Let me know if you have any issues. And thanks for the kind words! – Vi Dinh
[…] Cardiac Ultrasound (Echo) Tutorial […]
Thank you very much for the teaching, so direct, so easy to apply! Insightful-:)
Thanks so much for the kind word!!
[…] Cardiac Ultrasound (Echocardiography) Made Easy: Step-By-Step Guide […]
so helpful where do I get examinable questions to test my self
Hi! You can check out our book here: https://www.pocus101.com/the-ultrasound-board-review-book-is-out-exclusive-pocus-101-discount/
Extremely helpful , Thank You.
Thanks for the kind words!
Just what I needed! Very helpful 😊
Awesome. Glad it was helpful Karl!
Hi ! this was by far the most helpful source of eccocardiography i have seen. Well done. I want teach it to my students. Can you send me the ecco. videos slides in to my email please.
mahadwarsame@hotmail.com
We don’t have video slides, unfortunately. But your students can easily go to the blog to see the videos!
[…] https://www.pocus101.com/cardiac-ultrasound-echocardiography-made-easy-step-by-step-guide/?fbclid=Iw… […]
[…] What stood out for me most would be the “Mercedes” sign/landmark identifying the aortic valve. People with congenital bicuspid aortic valve would lack this landmark. Apparently, this condition is quite common in the Singapore population. I also found a useful educational website which offers identification on the different structures seen on echo images (https://www.pocus101.com/cardiac-ultrasound-echocardiography-made-easy-step-by-step-guide/). […]
i love this.
Thanks Gina!!
Very nice, i learned alotts about Echocardiography. Thanks allots.
Thanks for the kind words!
Great piece of writing , very concise and useful.
Thanks so much Kundan for the kind words.
This is really good! great summary of basic echo – I will be directing my trainees to this site
Thanks so much Steve. Appreciate using this for your trainees!